Dev Life
Building transactional email workflows for abandoned cart notifications with Mailgun’s API
In modern ecommerce applications, transactional emails go beyond order confirmations and shipping updates. They also respond to user behavior; for example, if a user adds items to their cart but doesn’t complete the purchase, you can send a reminder, commonly known as an “abandoned cart” notification. This not only encourages completion but also provides a helpful touchpoint in case the user encounters any issues during checkout.
In this tutorial, you’ll learn how to send an abandoned cart email to users using Mailgun APIs.
Implementing transactional email workflows for abandoned cart notifications
To implement transactional email workflows for abandoned cart notifications, you’ll build a simple UI to simulate a shopping cart and a Flask backend to track abandoned carts and trigger transactional emails.
Before you begin, make sure you have the following:
- A Mailgun account to send emails via Mailgun’s API; if you don’t have an account, follow the quick start guide to set one up for free
- Python 3.8 or higher installed on your machine
- Some familiarity with HTML and JavaScript to understand the UI code
Setting up a Mailgun account
First, sign in to your Mailgun account and note your sending domain in the Mailgun dashboard. If you’re on a free plan, you’ll see a sandbox domain, which will be used in both the API endpoint and th"from" email address when sending emails. The sandbox domain follows this format: sandbox<alphanumeric-id>.mailgun.org:
Note: If you want to send emails from your own custom domain, you’ll need a paid Mailgun plan. The free plan only supports the sandbox domain and limits sending to five authorized recipients.
If you want to send emails from your own custom domain, you’ll need a paid Mailgun plan. The free plan only supports the sandbox domain and limits sending to five authorized recipients.
Next, you need to generate an API key from the API Security page. You can find this option in the drop-down menu under your name in the top-right corner of the Mailgun dashboard:
You’ll use this API key in your Flask application to send abandoned cart notifications via the Mailgun API.
Setting up a new Python project
To set up a new project, open a terminal inside your preferred project directory and run the following commands to fetch the required code – both the UI and backend – onto your machine:
git clone https://github.com/manishh/gifts-giveaways.git cd gifts-giveaways/python/mailgun-abandoned-cart-notifications
Next, inside the mailgun-abandoned-cart-notifications directory, rename .env.example to .env, and update it with your Mailgun API credentials:# Replace with your actual Mailgun API key and domain MAILGUN_API_KEY="YOUR-API-KEY" MAILGUN_DOMAIN="YOUR-MAILGUN-DOMAIN"
Before you proceed, it’s recommended that you create and activate a new virtual environment to isolate your project and avoid dependency conflicts.
Once your virtual environment is active, install the required dependencies:pip install -r requirements.txt
This installs all necessary packages, including Flask, the lightweight web framework that runs the backend.
After installation is complete, launch the Flask application with this command:python app.py
The application UI will then be available at http://localhost:5000/.
Building the abandoned cart interface
The screenshot below shows a simple ecommerce UI for simulating abandoned cart scenarios. At the top, the header displays the title, along with a user profile (showing the name and email) and a shopping cart icon indicating the number of items in the cart. There are four product cards showcasing images, names, prices, and descriptions, and users can select quantities before adding items with the Add to Cart button. At the bottom left, a settings panel lets you configure the abandoned cart timeout (in seconds) and reset the cart if needed. In real life, timeout would be in hours, and it should be tracked by the backend.
You can use this interface to trigger an event when a user leaves items in their cart without completing the purchase:
You can find the code for this shopping cart interface in templates/shopping_cart.html. This file has two important sections: the UI configuration and a function to send abandoned cart data to the backend.
For the UI configuration, locate and edit USER_NAME and USER_EMAIL within the <script> tag to send the correct data to your backend. These two parameters represent the logged-in user in your ecommerce application:
// Configuration: Replace these with your own values const USER_NAME = "John Smith"; const USER_EMAIL = "john.smith@example.com"; // Verified email for Mailgun sandbox account const BACKEND_URL = 'http://localhost:5000/abandoned-cart'; // Update to your Flask API endpoint, if needed let ABANDONED_CART_TIMEOUT = 60; // Default timeout in seconds
Note: If you’re using Mailgun’s free plan, make sure that USER_EMAIL is one of the verified addresses in your Mailgun account. You can leave the remaining two parameters unchanged.
The following JavaScript function, sendToBackend(data), handles the process of sending abandoned cart details – such as user information, items in the cart, and the total value – to the backend for triggering a notification:
// Send data to backend function sendToBackend(data) { console.log('Sending abandoned cart data to backend...'); fetch(BACKEND_URL, { method: 'POST', headers: { 'Content-Type': 'application/json', }, body: JSON.stringify(data) }) .then(response => { // Check if the response status is 200 (OK) if (response.status === 200) { return response.json(); } else { // Throw an error if the status is not 200 throw new Error(`HTTP error! Status: ${response.status}`); } }) .then(result => { console.log('Backend response:', result); alert('Abandoned cart notification sent successfully!'); resetCart(); }) .catch(error => { console.error('Error sending abandoned cart notification:', error); alert('Error sending abandoned cart notification. Check console for details.'); }); }
This function first makes an HTTP POST request to BACKEND_URL using the fetch call, converting the cart data into a JSON payload.
If the server responds successfully (HTTP 200), the response is processed and logged to the console, and an alert confirms that the abandoned cart notification was sent. The cart is then reset.
If the request fails – due to network issues or a server-side problem (such as HTTP 5XX errors) – the function catches the error, logs it to the console, and alerts the user that something went wrong. This way, the function ensures that both successful and failed attempts to notify the backend are handled gracefully, keeping the user informed throughout the process.
The remaining code in shopping_cart.html handles the CSS styling for a clean and visually appealing layout, JavaScript logic for calculating the cart’s total value, and timer management to simulate cart abandonment.
Processing abandoned cart notifications in the backend
When the UI posts abandoned cart data to BACKEND_URL, the Flask application (app.py) processes it using the following function:@app.route('/abandoned-cart', methods=['POST']) def abandoned_cart(): """ Endpoint to receive abandoned cart data including user information. It sends email notification to the concerned user. """ try: # Get cart data from request cart_data = request.json # Extract user information user_info = cart_data.get('user', {}) user_email = user_info.get('email', 'unknown') # Log the received data logger.info(f"Abandoned cart received from {user_email} at {datetime.datetime.now()}, Total items: {len(cart_data.get('items', []))}") # Send email about the abandoned cart html_message = _generate_abandoned_cart_email(cart_data) _send_email(f"{user_info.get('name', user_email)} <{user_email}>", "Your cart is waiting...", html_message) # Return success response return jsonify({ "status": "success", "message": f"Abandoned cart notification sent to: {user_info.get('email')}", "timestamp": datetime.datetime.now().isoformat(), }), 200 except Exception as e: logger.error(f"Error processing abandoned cart: {str(e)}") return jsonify({"status": "error", "message": str(e)}), 500
This API endpoint (/abandoned-cart) listens for POST requests when a user abandons their cart. It extracts the cart details from the request’s JSON payload, retrieves the user’s email and name, and logs the event along with the timestamp and number of items.
Next, it generates an email using _generate_abandoned_cart_email(cart_data), which converts the cart details into a neat HTML email template. The email is then sent to the user_email via _send_email(), using the subject “Your cart is waiting…” to remind the user about their pending purchase.
If successful, the function returns a JSON response confirming that the email was sent. If an error occurs, such as an issue with the request or email service, it logs the error and returns an HTTP 500 Internal Server Error response, which the UI can use to inform the user about the notification status.
Designing the email template
Abandoned cart reminder emails must not only be informative but also visually appealing. A well-designed HTML email with images presents the cart details clearly and increases the chances of the user returning to complete their purchase. The _generate_abandoned_cart_email(...) function takes care of that:
def _generate_abandoned_cart_email(cart_data: Dict[str, Any]) -> str: """ Generate an HTML email for an abandoned cart using the provided cart data. Args: cart_data: Dictionary containing cart information including user details and items Returns: HTML string for the email """ try: # Extract data with error handling user_name = cart_data.get('user', {}).get('name', 'Valued Customer') first_name = user_name.split()[0] if ' ' in user_name else user_name items = cart_data.get('items', []) total_value = cart_data.get('totalValue', 0) # Format timestamp if available timestamp_str = cart_data.get('timestamp', '') timezone_offset = cart_data.get('timezoneOffset', 0) # Represent the user's time zone if timestamp_str: try: timestamp = datetime.datetime.fromisoformat(timestamp_str.replace('Z', '+00:00')) - datetime.timedelta(minutes=timezone_offset) abandonment_time = f"on <b>{timestamp.strftime('%B %d at %I:%M %p')}</b>" except (ValueError, TypeError): abandonment_time = 'recently' else: abandonment_time = 'recently' # Generate the HTML content with minimal, combined CSS html = f"""<!DOCTYPE html> <html> <head> <meta name="viewport" content="width=device-width, initial-scale=1.0"> <style> /* CSS styling here */ </style> </head> <body> <div class="container"> <div class="header"> <h1>Your cart is waiting!</h1> </div> <div class="content"> <p>Hello {first_name},</p> <p>We noticed you left some items in your cart {abandonment_time}. Don't worry, we've saved them for you!</p> <h2>Your Cart Items:</h2>""" # Add each item to the email for item in items: item_name = item.get('name', 'Product') item_price = item.get('price', 0) item_quantity = item.get('quantity', 1) item_image = item.get('image', '') item_description = item.get('description', '') # Format image tag with fallback image_tag = f'<img src="{item_image}" alt="{item_name}" style="max-width:100%; max-height:100%;">' if item_image else item_name[0].upper() html += f""" <div class="item"> <div class="img">{image_tag}</div> <div class="details"> <h3>{item_name}</h3> <p style="font-size:14px">{item_description}</p> <p style="color:#666">Quantity: {item_quantity}</p> <p style="font-weight:bold">${item_price:.2f}</p> </div> </div>""" # Add total and call to action html += f""" <div class="total">Total: ${total_value:.2f}</div> <div style="text-align:center"> <a href="#" class="btn">Complete Your Purchase</a> </div> <p>If you have any questions about your order, please don't hesitate to contact our customer service team.</p> <p>Thank you for shopping with us!</p> </div> <div class="footer"> <p>© 2025 Your Company Name. All rights reserved.</p> </div> </div> </body> </html>""" return html except Exception as e: # Return a simple fallback email if anything goes wrong return """<!DOCTYPE html> <html> <body style="font-family:Arial;text-align:center;max-width:600px;margin:auto;padding:20px"> <h1>Your Cart Is Waiting!</h1> <p>Hello there,</p> <p>You have items waiting in your cart. Click below to complete your purchase!</p> <a href="#" style="display:inline-block;background:#eb5454;color:white;padding:10px 20px;text-decoration:none;border-radius:4px;font-weight:bold">Complete Your Purchase</a> </body> </html>"""
This function constructs an HTML email reminding a user about their abandoned cart. It first extracts key details from the provided data, including the user’s name, cart items, and total price. If a timestamp is available, it converts it to the user’s time zone (since server and client time zones would be different) and formats it into a friendly date-time string (such as “on March 25 at 3:49 PM”). Otherwise, it defaults to “recently.”
The email informs the user that their cart has been saved and lists the items they left behind, including the product name, quantity, price, description, and an image. The total value of the cart is prominently displayed, followed by a Complete Your Purchase button to encourage the user to return and finish checkout.
If an error occurs, such as missing data or formatting issues, the function falls back to a simple email with a basic message and purchase link. This ensures that even if the detailed version fails, users still receive a reminder to complete their transaction.
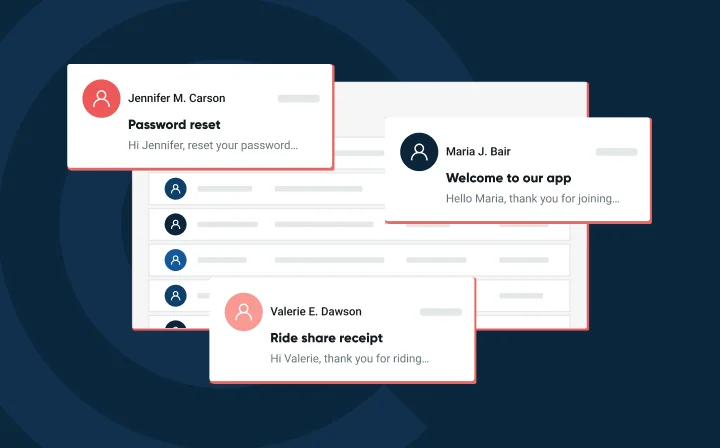
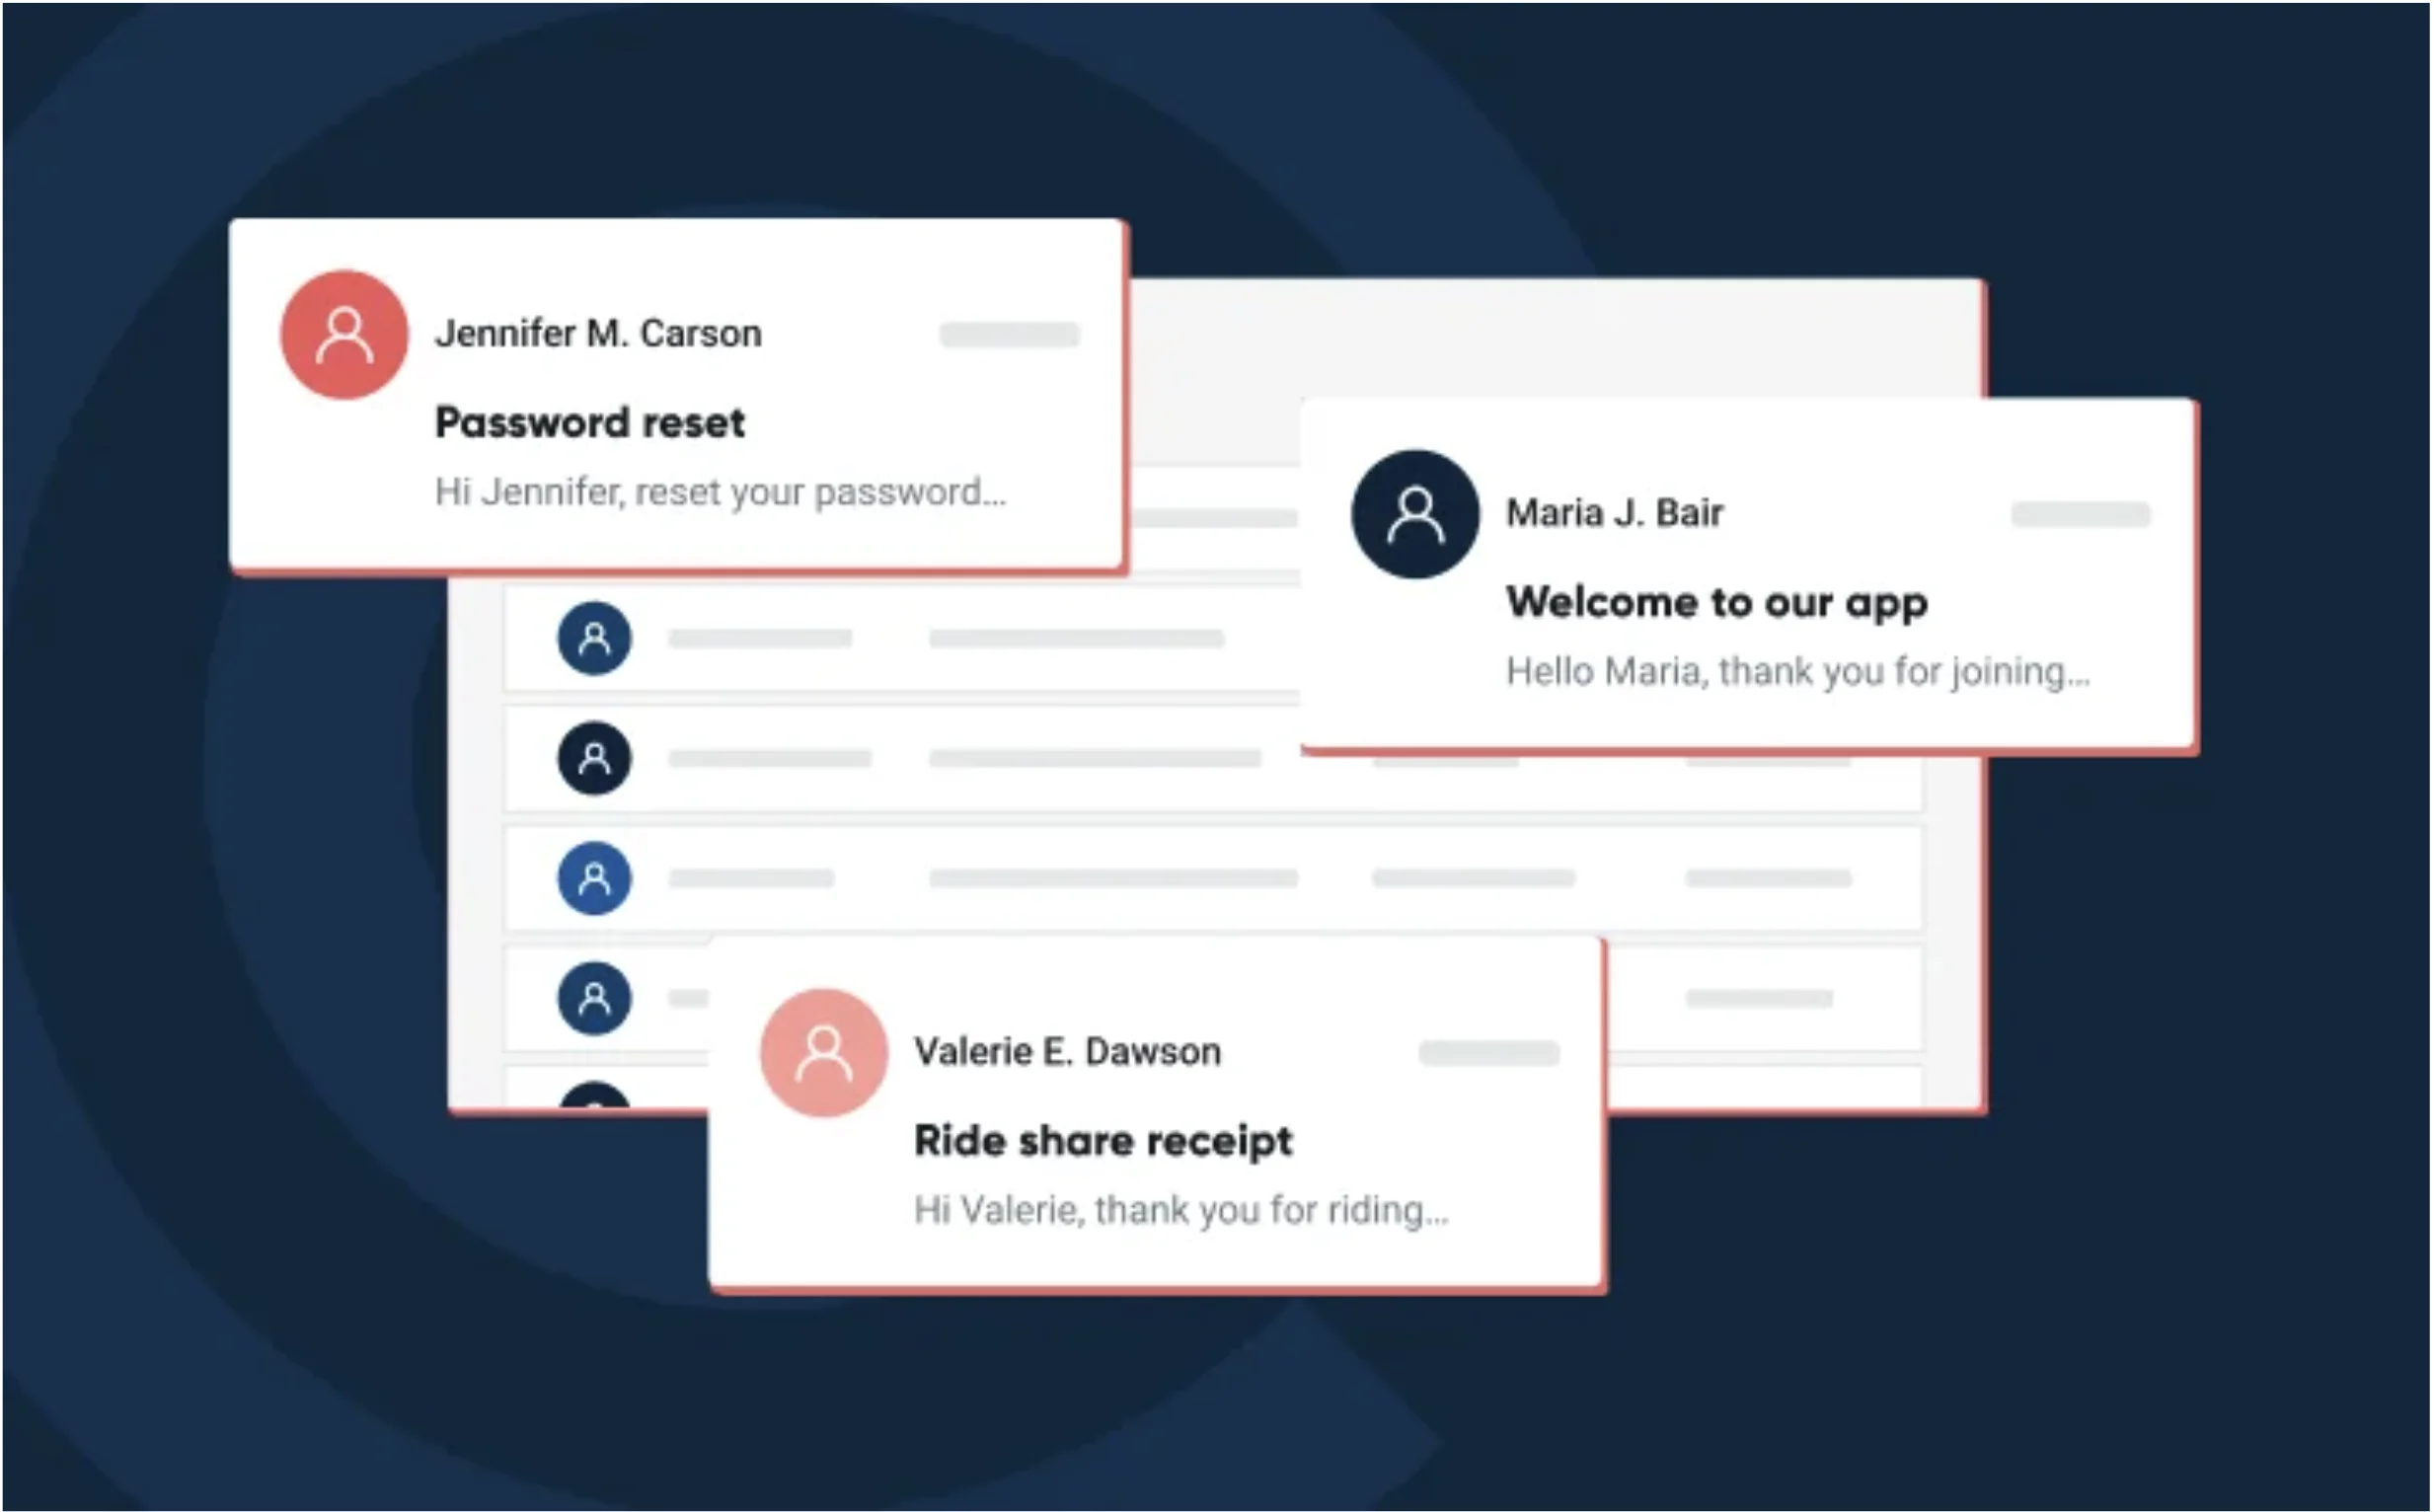
Navigate to Send > Sending > Templates in your Mailgun account to design your own email templates:
Implementing the email sending functionality with Mailgun’s API
Once the email content is generated, it needs to be delivered reliably. The _send_email(...) function handles sending abandoned cart notifications using Mailgun’s API:
def _send_email(to_address: str, subject: str, html_message: str): """ Sends a single email to the given email address using Mailgun API. :param to_address: :param subject: :param message: """ api_key = os.getenv("MAILGUN_API_KEY") # Get API key from the `.env` file resp = requests.post(MAILGUN_API_URL, auth=("api", api_key), data={"from": FROM_EMAIL_ADDRESS, "to": to_address, "subject": subject, "html": html_message}) if resp.status_code == 200: # Success logging.info(f"Successfully sent an email to '{to_address}' via Mailgun API.") else: # Error raise RuntimeError(f"Could not send the email, reason: {resp.text}")
This function reads MAILGUN_API_KEY and then sends an email via Mailgun’s API using an HTTP POST request. The request includes essential email details, including sender address, recipient address, subject, and HTML content generated by the _generate_abandoned_cart_email(...) function.
If the request is successful (resp.status_code == 200), it logs a success message. Otherwise, it raises an exception with the response details.
It’s important to understand that _send_email(...) deliberately does not handle errors, leaving it to the calling function (abandoned_cart(), which serves the /abandoned-cart endpoint), so that it can catch exceptions and return an appropriate HTTP response. If the email is sent successfully, abandoned_cart() returns an HTTP 200 response confirming the notification was sent. If an error occurs, such as an invalid API key or network failure, it returns an HTTP 500 response, ensuring the UI is informed of the issue.
Testing the workflow
Now that you’ve explored all the key components, it’s time to test the abandoned cart email workflow end to end.
First, make sure your Flask server is running and that the UI is accessible in your browser at http://localhost:5000/. You can adjust the abandoned cart timeout in the settings panel at the bottom left of the page as required.
Next, add a few items to your cart. Each time you add an item, the countdown cart timer resets and starts over. Once you’re done, click the cart icon to view the slide-out panel, which displays the selected products, their prices, and the Proceed to Checkout button:

Instead of proceeding with checkout, allow the timer to finish its countdown. Once the countdown reaches zero, an alert should pop up on the UI confirming that the abandoned cart notification was sent. The alert message should read:Abandoned cart notification sent successfully!
At the same time, your Flask app’s terminal should log messages like this:INFO:__main__:Abandoned cart received from <redacted-email> at 2025-03-24 14:02:00.077949, Total items: 3 INFO:root:Successfully sent an email to 'Name <redacted-email>' via Mailgun API.
Finally, check your inbox for the abandoned cart email. If everything worked correctly, you should receive this message:

Note: If you’re using Mailgun’s free plan, the email may end up in the Spam folder.
Congratulations! You’ve successfully implemented and tested the abandoned cart email notification workflow using Mailgun’s API.
Monitoring and managing emails
Once your abandoned cart emails are being sent, it’s important to monitor their delivery, track engagement, and handle any failures effectively. Mailgun provides built-in reporting tools to monitor sent emails, open rates, and failures.
To access these insights, navigate to Send > Reporting > Metrics in your Mailgun dashboard:

Here, you’ll find a graphical breakdown of key email statistics, such as:
Sent count: Total number of emails attempted
Delivered count: Emails successfully received by recipients
Opened count: Number of emails opened by recipients (if open tracking is enabled)
Failed count: Emails that failed due to issues like invalid addresses or spam filtering
For deeper analysis, the Logs tab provides detailed records of each email’s status, while the Bounce Classification tab helps diagnose failures.
High bounce rates can negatively impact your email deliverability. To reduce bounces, regularly review the Bounce Classification tab in Mailgun, remove invalid emails, and use suppression lists to avoid resending to bounced addresses.
Wrapping up
In this tutorial, you learned how to implement an abandoned cart email workflow using Mailgun. The process covered building a simple UI to simulate an ecommerce site, sending cart data to the backend, processing it with Flask, generating email templates, sending notifications via the Mailgun API, and tracking delivery metrics. Transactional emails like these help recover lost sales and improve customer engagement.
You can find the entire code for this tutorial in this GitHub repository.
Now, you can put this knowledge into action – integrate Mailgun into your projects and start using transactional emails to enhance user experience. Try the Mailgun API for free today!