Dev Life
Building transactional email workflows for order confirmations with Mailgun’s API
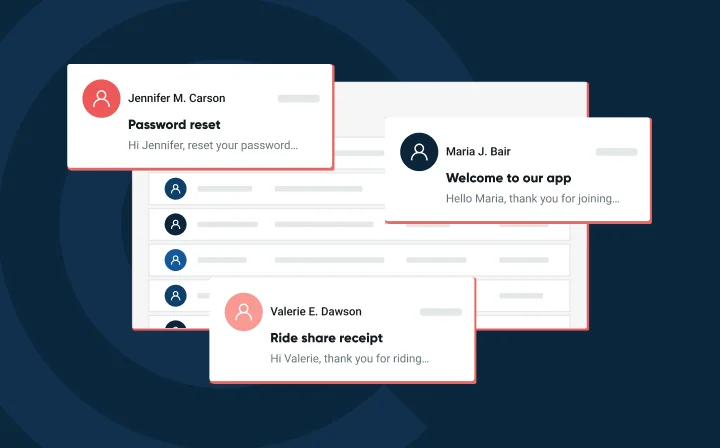
Unlike marketing emails, transactional emails (such as order confirmations, shipping notifications, and password resets) are triggered by specific user actions and provide real-time updates on their interactions with your platform. They help build trust, cut down on support questions, and make for a smooth shopping experience.
Order confirmations are particularly important, as they let your customers know their purchase was successful and provide the user with a record of the transaction details.
In this tutorial, you’ll learn how to build a transactional email workflow for order confirmations using Mailgun’s API.
Implementing transactional email workflows for order confirmations
Before you begin, make sure you have a Mailgun account and Node.js installed on your machine.
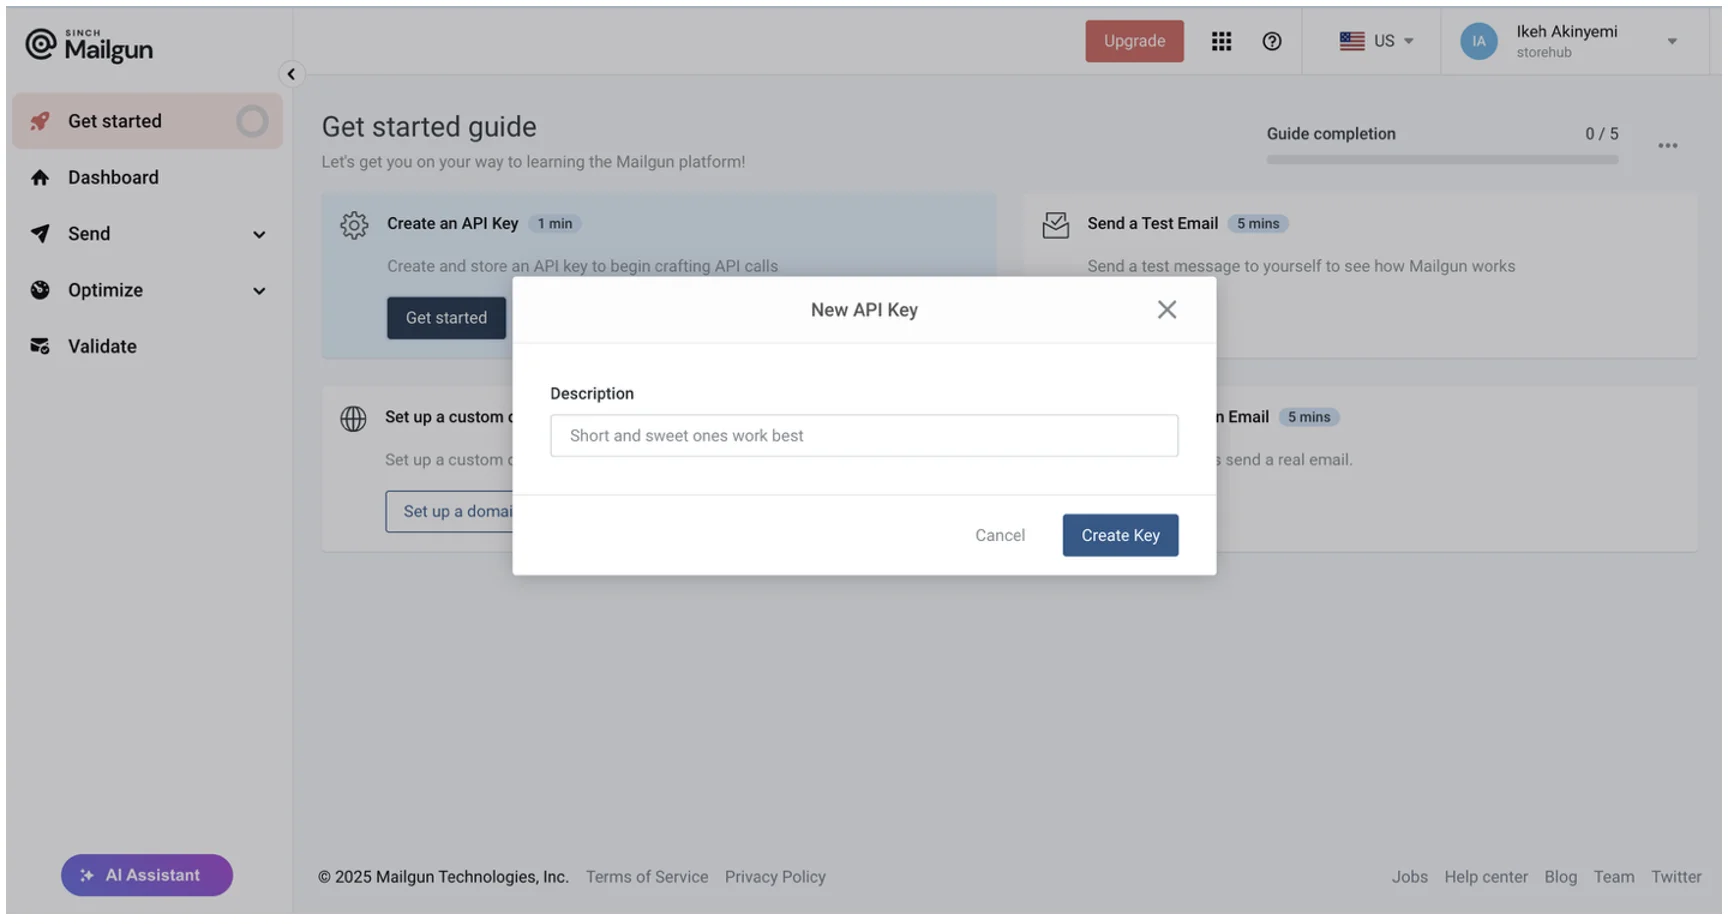
Once your account is registered and activated, click Get started and then Create an API Key to provide a short description of the key. Once it’s generated, copy and save the API key somewhere safe.
This key will be used to authenticate your requests to Mailgun’s API.
To keep things simple, clone the following UI repository and set up the environment variables by running the following npm commands:
                                $ git clone https://github.com/Ikeh-Akinyemi/draftdev-mailgunnerrn$ cd draftdev-mailgunner; npm install rn$ echo -e "MAILGUN_API_KEY=your_api_key_here
MAILGUN_DOMAIN=your_domain_here
PORT=8080" >> .env
This command adds the mailgun.js, form-data, cors, dotenv, and express libraries for use in the backend server and creates some placeholder values for the Mailgun API key and domain in a .env file that you’ll update during the tutorial.
The Mailgun domain gives you the option of setting up your own custom domain or using a sandbox for testing purposes. You’ll use a sandbox domain in this tutorial. You can find Mailgun’s sandbox domain by navigating to Send > Sending > Domain settings on your dashboard and clicking the Select button in the API integration option:
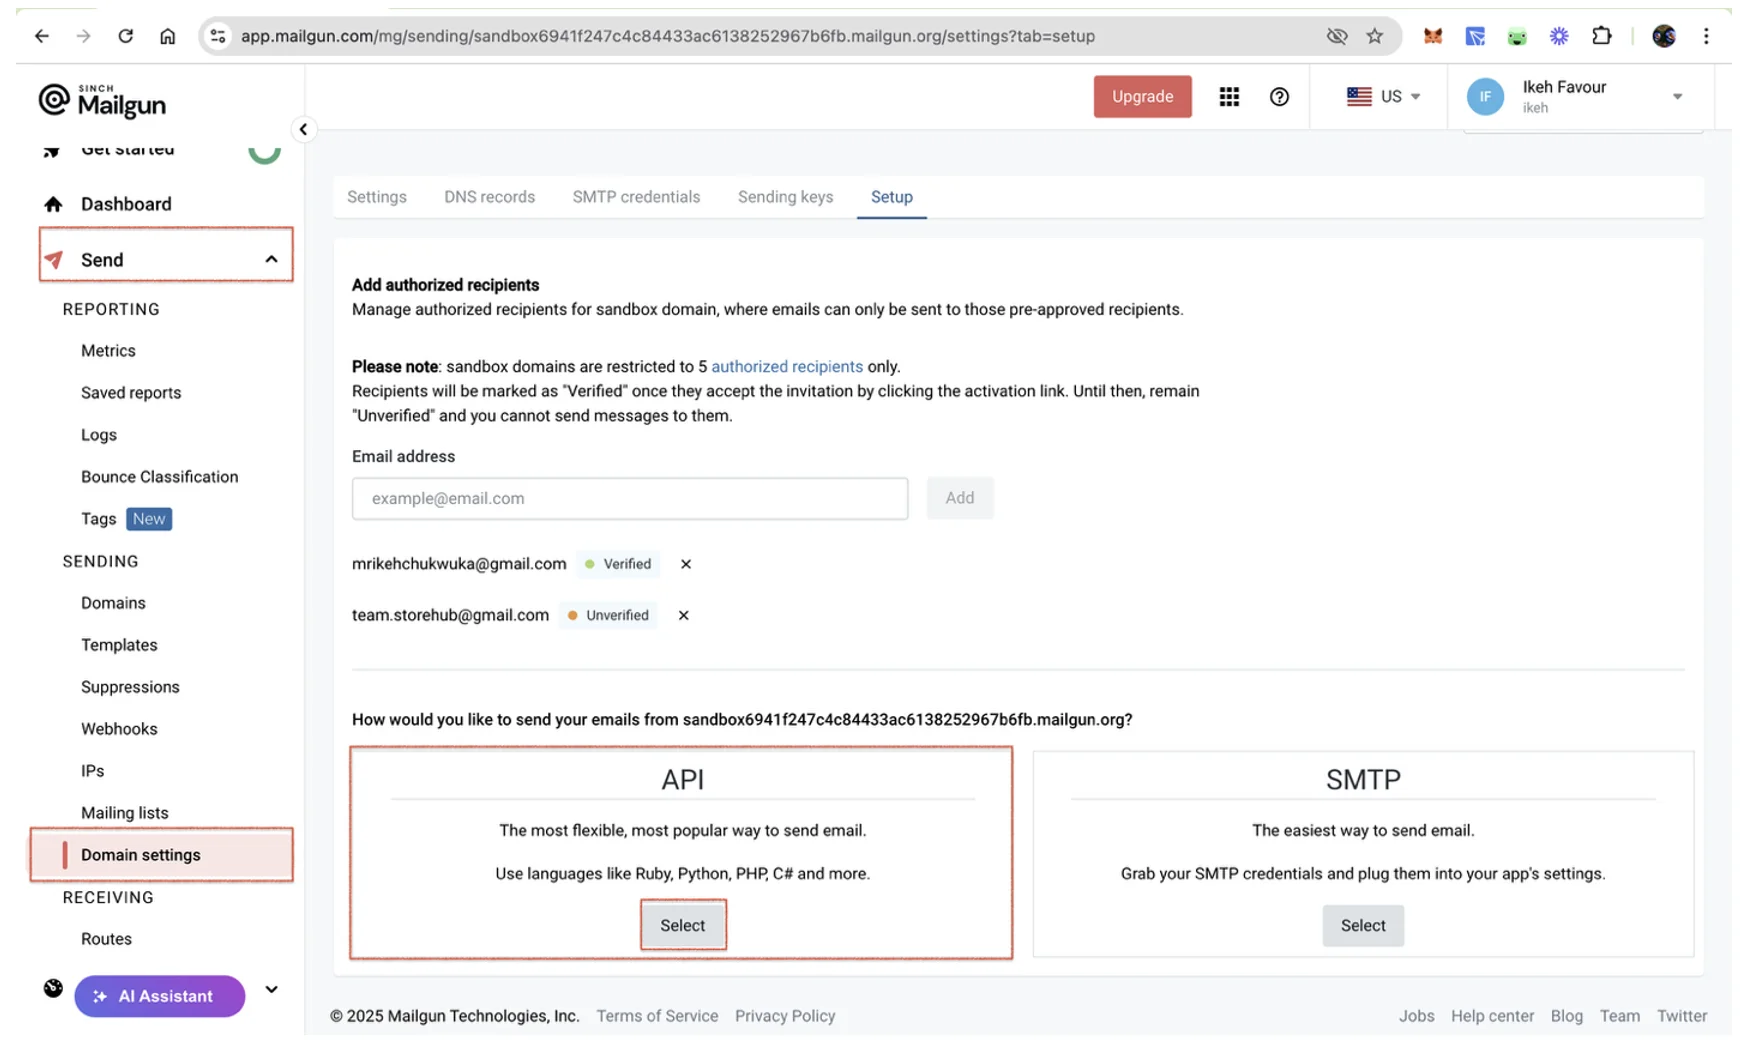
Your sandbox domain is included in the boilerplates provided for Mailgun setup. Remember to update the value of MAILGUN_DOMAIN (currently your_domain_here) inside the .env file.
If you want to set up a custom domain, follow the instructions detailed in this YouTube tutorial.
The application interface
In this scenario, you’ll be working with a simple shopping cart application built with HTML, CSS, and JavaScript. The application allows users to add items to their cart, adjust quantities, and proceed to checkout. When the user confirms their purchase, the application sends a request to the backend to process the order and send a confirmation email. To preview the UI, open the ui/index.html file in the browser or run the Python command python3 -m http.server -d=./ui:
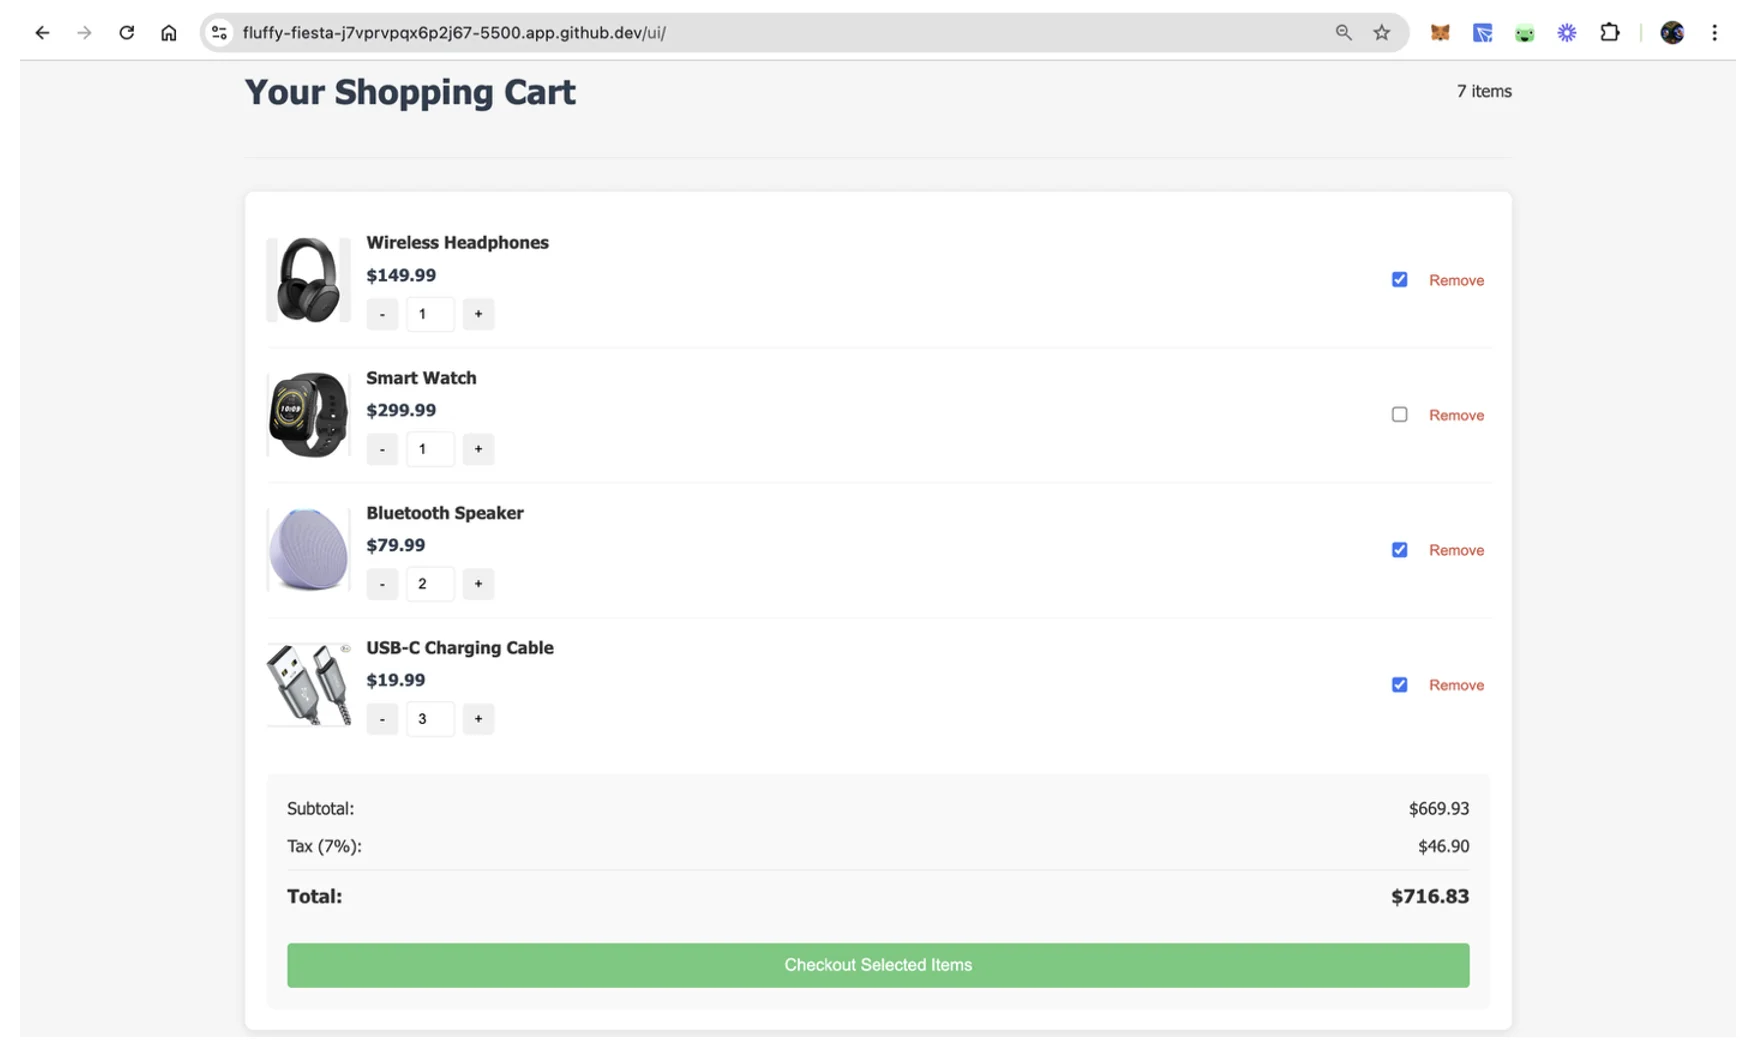
This UI is designed to be intuitive, with a focus on providing a seamless checkout experience. The backend handles the heavy lifting, including processing orders and sending confirmation emails.
Setting up the Mailgun connection
To integrate Mailgun into your backend, you need to initialize the Mailgun client using your API key. Here’s how to set up the connection in your Node.js backend:
const formData = require('form-data');rnconst Mailgun = require('mailgun.js');rnrnconst mailgun = new Mailgun(formData);rnconst mg = mailgun.client({ username: 'api', key: process.env.MAILGUN_API_KEY });rnconst MAILGUN_DOMAIN = process.env.MAILGUN_DOMAIN;
This code initializes the Mailgun client, which will be used to send transactional emails. Make sure to update the value of MAILGUN_API_KEY (currently your_api_key_here) inside your .env file before continuing.
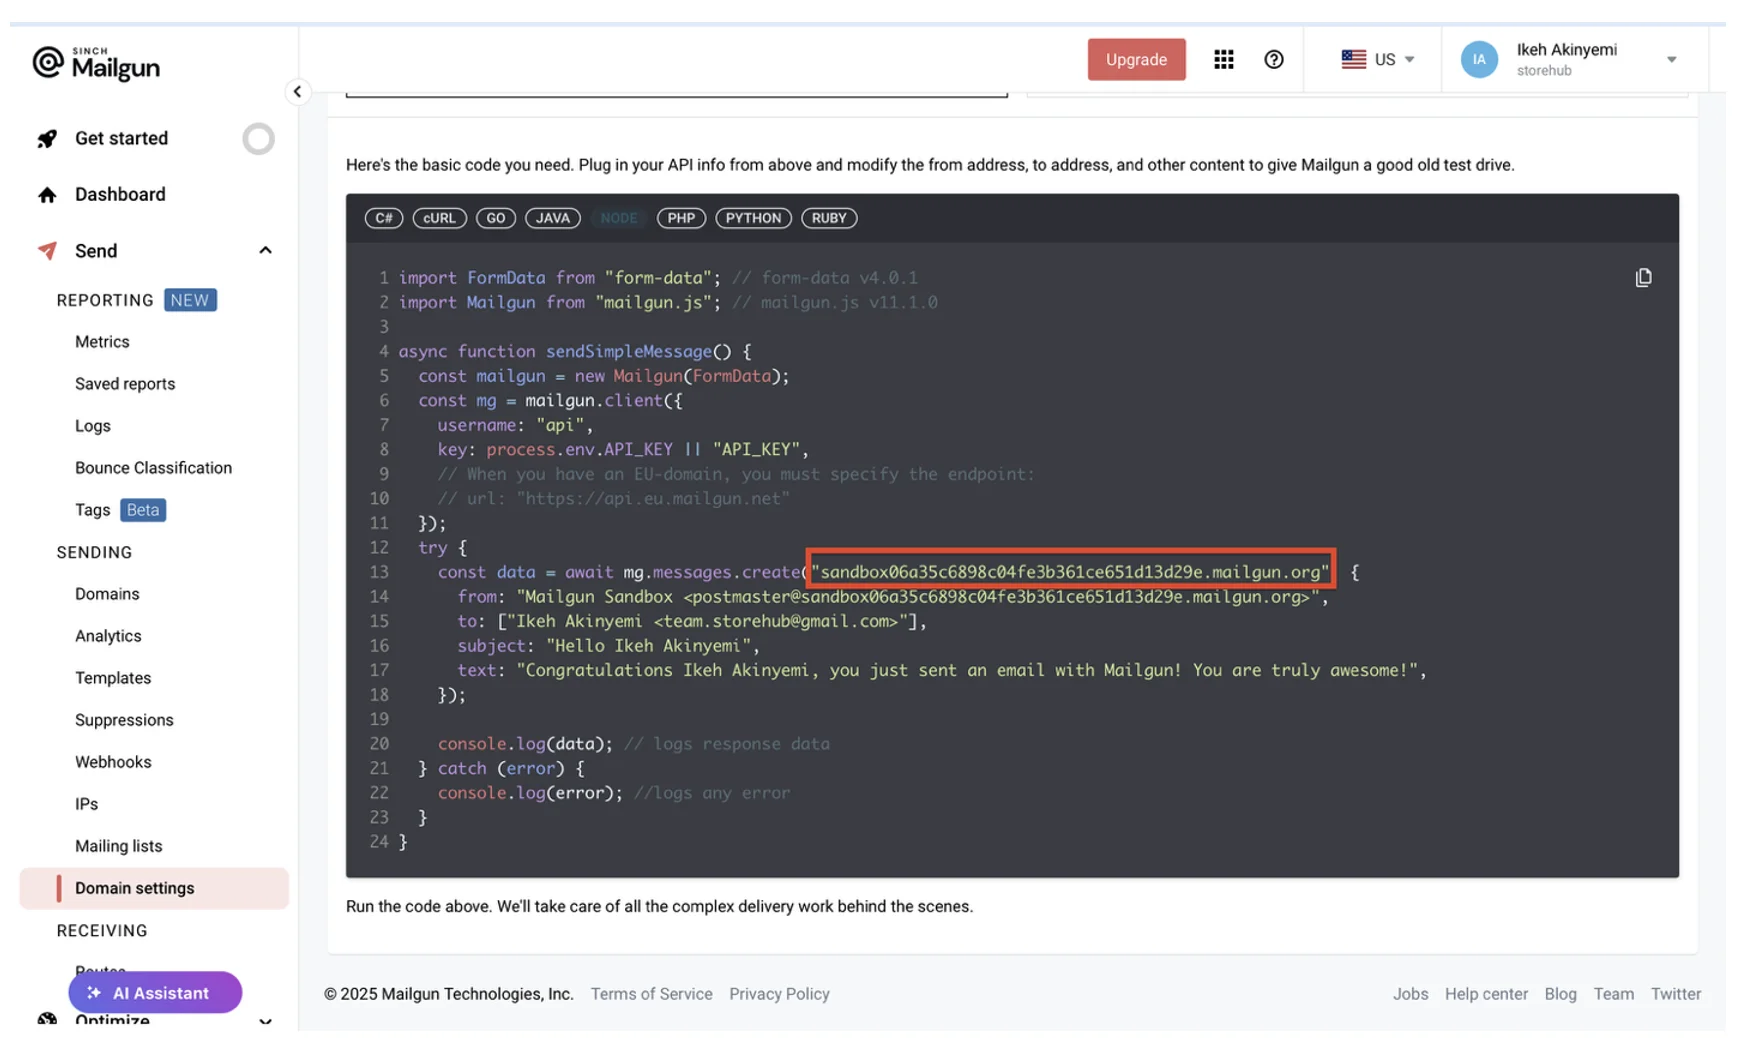
Test the connection by sending a sample test email:
mg.messages.create('<your-domain.com>', {rn from: "Excited User <mailgun@your-domain.com>",rn to: ["test@example.com"],rn subject: "Hello",rn text: "Testing some Mailgun awesomeness!"rn})rn.then(msg => console.log(msg)) // logs response datarn.catch(err => console.error(err)); // logs any error
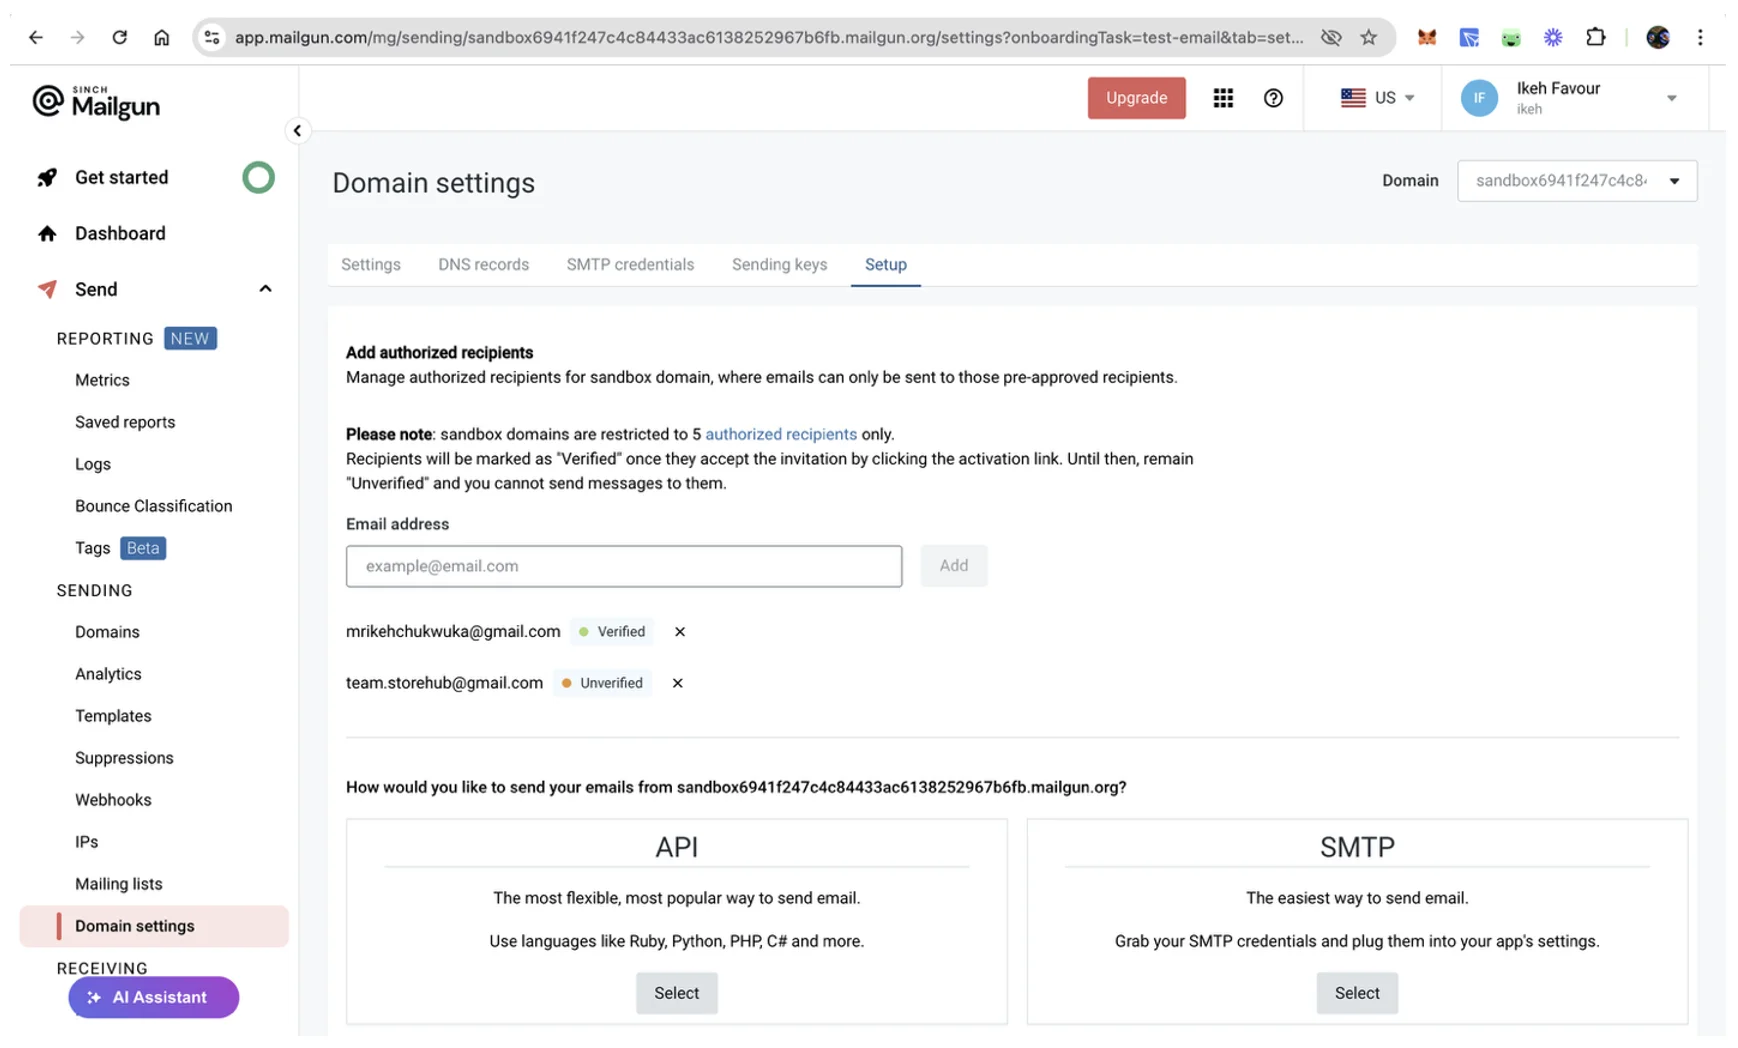
You can use the sandbox domain provided by Mailgun for testing, but you need to add at least one verified email for testing (up to five). To verify your test email address, go to Send > Sending > Domain settings in your Mailgun dashboard. Then, enter your email address in the designated input field and click Add. Mailgun will send a verification email to this address.
Check your inbox and click the I Agree verification link to complete the process and register as an authorized test recipient:
Designing the email template
Transactional emails often require dynamic content, like the user’s name, order details, and shipping information, which is why you need to create an HTML template with placeholders for dynamic data. Here’s an example of a simple order confirmation template:
<!DOCTYPE html>rn<html>rn<head>rn <title>Order Confirmation</title>rn</head>rn<body>rn <h1>Thank you for your order, {{name}}!</h1>rn <p>Your order number is {{orderNumber}}.</p>rn <p>We will ship your items to {{shippingAddress}}.</p>rn</body>rn</html>
You can use a templating engine like Handlebars or EJS to replace the placeholders with actual data before sending the email. You can also use Mailgun’s intuitive visual builder to create beautiful, responsive email templates without any coding knowledge.
In this article, you’ll use the simplest form of templating: string interpolation using JavaScript template literals. This approach allows you to set up an HTML email template populated with the necessary dynamic data:
function emailTemplate(order) {rn // Format items for emailrn const itemsList = order.items.map(item => {rn return `rn <tr>rn <td style="padding: 10px 0; border-bottom: 1px solid #eee;">rn ${item.name}rn </td>rn <td style="padding: 10px 0; border-bottom: 1px solid #eee; text-align: center;">rn ${item.quantity}rn </td>rn <td style="padding: 10px 0; border-bottom: 1px solid #eee; text-align: right;">rn $${item.price.toFixed(2)}rn </td>rn <td style="padding: 10px 0; border-bottom: 1px solid #eee; text-align: right;">rn $${(item.price * item.quantity).toFixed(2)}rn </td>rn </tr>rn `;rn }).join('');rn};
This code iterates over an order’s items to generate a table-like receipt of the customer’s order. The returned value, itemsList, is a string literal that will be used to build the rest of the email template like this:
function emailTemplate(order) {rn ...rnrn // Create email HTML templatern const emailHtml = `rn <!DOCTYPE html>rn <html>rn <head>rn <style>rn body { font-family: Arial, sans-serif; line-height: 1.6; color: #333; }rn .container { max-width: 600px; margin: 0 auto; }rn .header { background-color: #f8f9fa; padding: 20px; text-align: center; }rn .content { padding: 20px; }rn .order-details { margin-top: 20px; }rn .order-table { width: 100%; border-collapse: collapse; }rn .order-table th { text-align: left; padding: 10px 0; border-bottom: 2px solid #ddd; }rn .footer { margin-top: 30px; text-align: center; font-size: 14px; color: #777; }rn .total-row { font-weight: bold; }rn </style>rn </head>rn <body>rn <div class="container">rn <div class="header">rn <h2>Order Confirmation</h2>rn <p>Thank you for your purchase!</p>rn </div>rnrn <div class="content">rn <p>Hello ${order.customer.name},</p>rnrn <p>Your order has been confirmed. Here are your order details:</p>rnrn <div class="order-details">rn <p><strong>Order ID:</strong> ${order.id}</p>rn <p><strong>Order Date:</strong> ${new Date(order.createdAt).toLocaleString()}</p>rnrn <table class="order-table">rn <thead>rn <tr>rn <th>Item</th>rn <th style="text-align: center;">Qty</th>rn <th style="text-align: right;">Price</th>rn <th style="text-align: right;">Total</th>rn </tr>rn </thead>rn <tbody>rn ${itemsList}rn <tr>rn <td colspan="3" style="text-align: right; padding-top: 20px;"><strong>Subtotal:</strong></td>rn <td style="text-align: right; padding-top: 20px;"><strong>$${order.subtotal.toFixed(2)}</strong></td>rn </tr>rn <tr>rn <td colspan="3" style="text-align: right;"><strong>Tax:</strong></td>rn <td style="text-align: right;"><strong>$${order.tax.toFixed(2)}</strong></td>rn </tr>rn <tr class="total-row">rn <td colspan="3" style="text-align: right; padding-top: 10px;"><strong>Total:</strong></td>rn <td style="text-align: right; padding-top: 10px;"><strong>$${order.total.toFixed(2)}</strong></td>rn </tr>rn </tbody>rn </table>rn </div>rnrn <div style="margin-top: 30px;">rn <p><strong>Shipping Address:</strong></p>rn <p>rn ${order.shipping.address}<br>rn ${order.shipping.city}, ${order.shipping.state} ${order.shipping.zipCode}rn </p>rn </div>rnrn <div style="margin-top: 30px;">rn <p><strong>Payment Method:</strong> ${order.payment.method} (ending in ${order.payment.last4})</p>rn </div>rnrn <div style="margin-top: 30px;">rn <p>If you have any questions about your order, please contact our customer support.</p>rn <p>Thank you for shopping with us!</p>rn </div>rn </div>rnrn <div class="footer">rn <p>This is an automated email, please do not reply to this message.</p>rn <p>© 2025 Your Company. All rights reserved.</p>rn </div>rn </div>rn </body>rn </html>rn `;rnrn return emailHtml;rn}
Here, you combine the receipt with the rest of an HTML template string containing customer details. The HTML contains basic styling for the email template.
Learn more from our transactional email templates page, including downloading free templates.
Implementing the email sending functionality
Now that your template is ready, it’s time to write the function that sends the email using Mailgun’s API. Here’s how you can implement this functionality in your backend:
async function sendOrderConfirmationEmail(order) {rn try {rnrn let emailHtml = emailTemplate(order)rnrn // Send email via Mailgunrn const response = await mg.messages.create(MAILGUN_DOMAIN, {rn from: `Your Store <orders@${MAILGUN_DOMAIN}>`,rn to: order.customer.email,rn subject: `Order Confirmation #${order.id}`,rn html: emailHtml,rn 'o:tag': ['order-confirmation'],rn 'o:tracking': truern });rnrn console.log('Email sent successfully:', response);rn return response;rnrn } catch (error) {rn console.error('Error sending confirmation email:', error);rn throw error;rn }rn}
This function takes an order object, constructs the email content, and sends it using Mailgun’s API. The o:tag and o:tracking options allow you to track the email’s delivery and engagement.
Now, let’s test the implementation with a simple order object to see if it works:
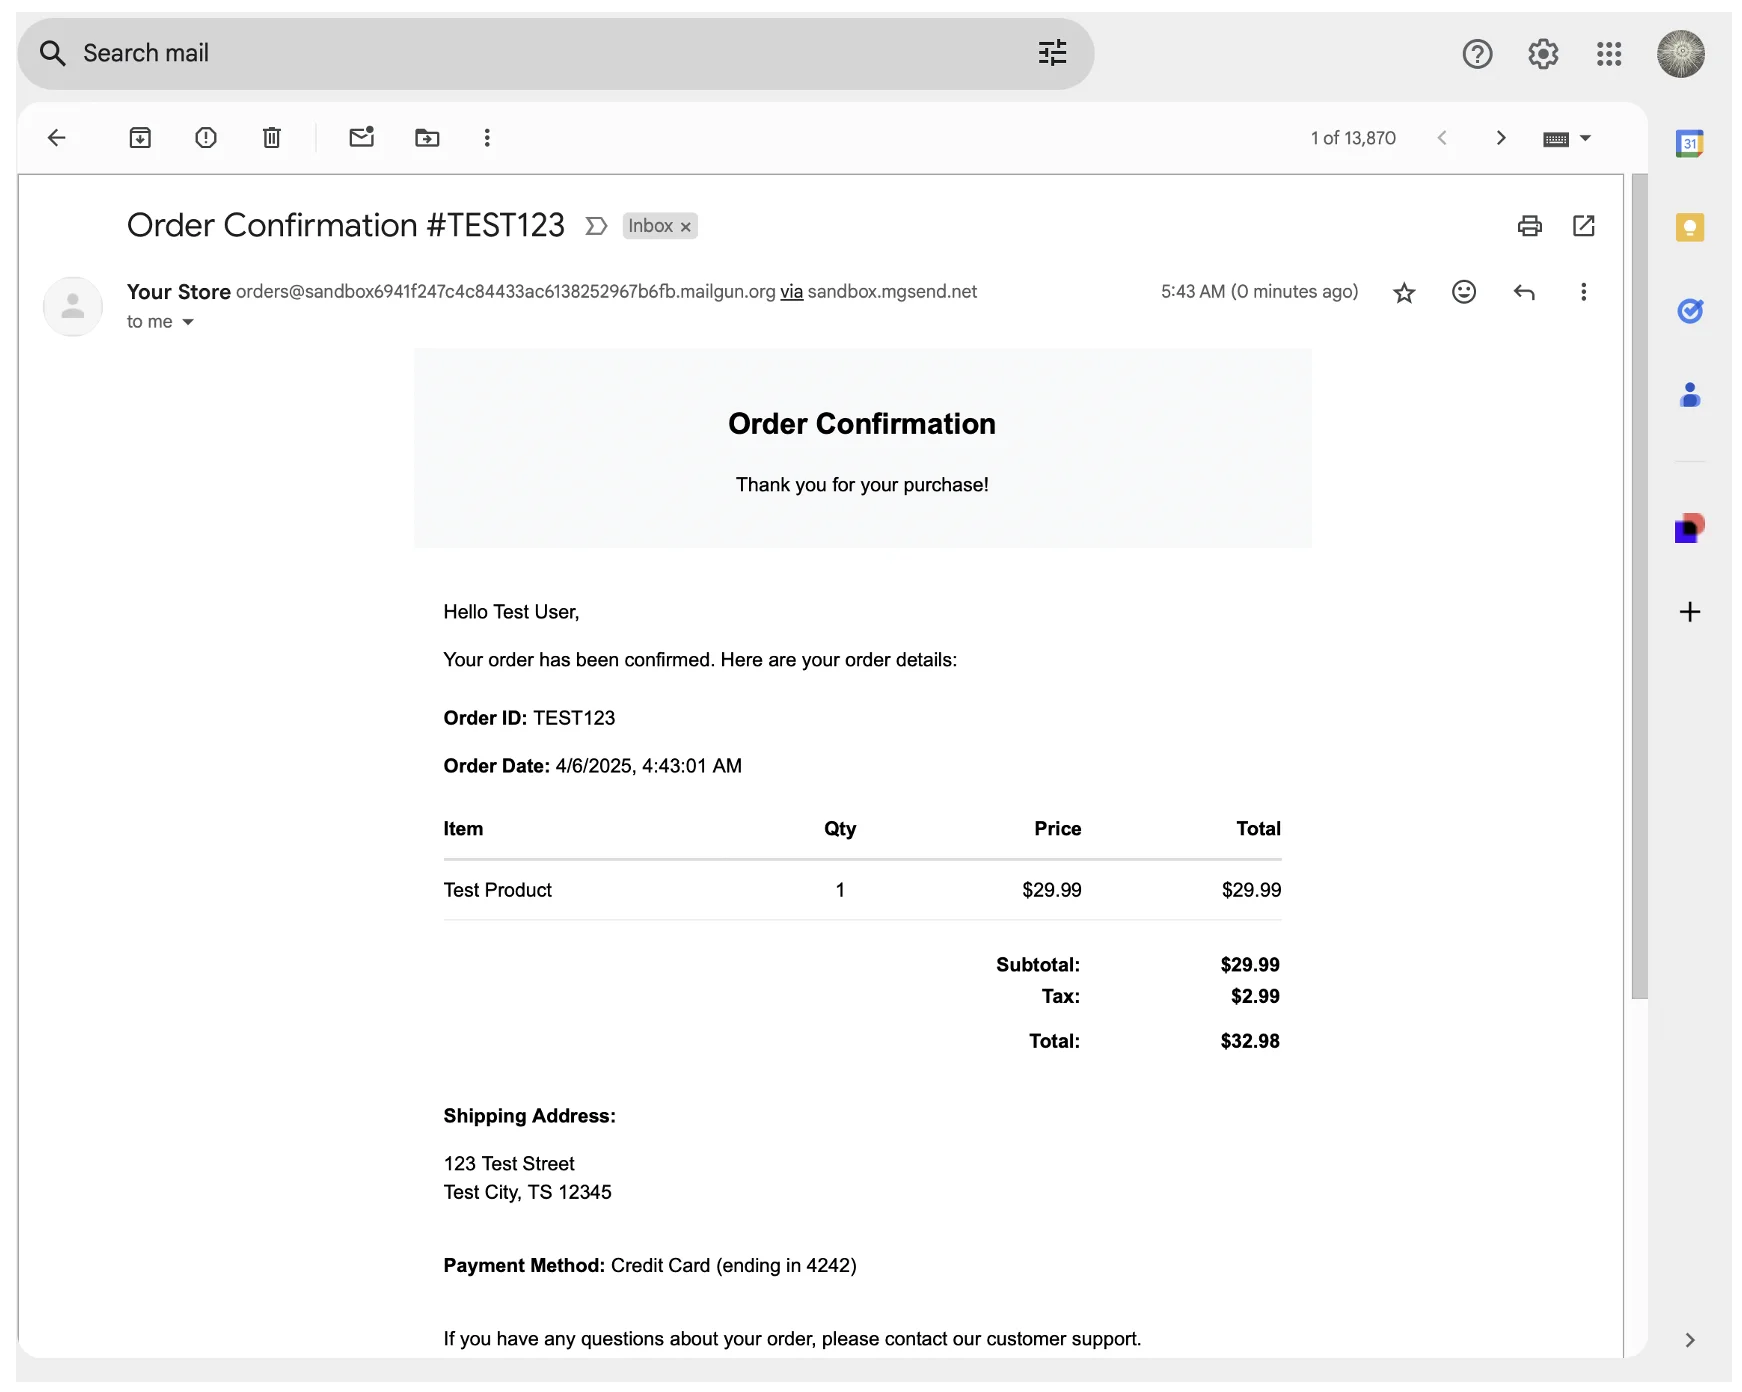
const testOrder = {rn id: "TEST123",rn customer: {rn name: "Test User",rn email: "your-verified-email@example.com" // Use one of your verified emails for testingrn },rn items: [rn { name: "Test Product", quantity: 1, price: 29.99 }rn ],rn subtotal: 29.99,rn tax: 2.99,rn total: 32.98,rn shipping: {rn address: "123 Test Street",rn city: "Test City",rn state: "TS",rn zipCode: "12345"rn },rn payment: {rn method: "Credit Card",rn last4: "4242"rn },rn createdAt: new Date()rn};rnrnsendOrderConfirmationEmail(testOrder)rn .then(response => {rn console.log('Test email sent successfully!');rn console.log('Message ID:', response.id);rn console.log('Message status:', response.status);rn })rn .catch(error => {rn console.error('Failed to send test email:', error.message);rn });
Run this code with node ./src/server.js and check your inbox (remember to use a verified email for the testOrder.customer.email value if you’re using Mailgun’s sandbox domain). You should receive a basic order confirmation email with the test data:
In this setup, any error that occurs is bubbled up to the caller, and the .catch method logs it to the standard output. This approach allows you to quickly identify and troubleshoot any issues that might occur during the email sending process.
In the next section, you’ll connect this to your frontend so you can send real order data from customer checkouts.
Integrating with application events
To ensure that the email workflow is triggered automatically when an order is confirmed, you need to set up an event listener or route in your application.
Here, you’ll set up an Express.js application and define a route that handles order confirmations while calling the sendOrderConfirmationEmail function:
const express = require('express');rnconst cors = require('cors');rn...rnrn// Load environment variablesrnrequire('dotenv').config();rnrn// Initialize Expressrnconst app = express();rnconst PORT = process.env.PORT || 3000;rnrn// Middlewarernapp.use(cors());rnapp.use(express.json());rnrnconst orders = [];rnrnapp.post('/api/orders', async (req, res) => {rn try {rn // Validate required fieldsrn if (!req.body.items || !req.body.customer || !req.body.customer.email) {rn return res.status(400).json({ rn success: false, rn error: 'Missing required order information' rn });rn }rnrn // Generate order IDrn const orderId = Date.now().toString(36) + Math.random().toString(36).substr(2, 5).toUpperCase();rnrn // Create order objectrn const order = {rn id: orderId,rn ...req.body,rn status: 'confirmed',rn createdAt: new Date()rn };rnrn // Save order (to database in a real app)rn orders.push(order);rnrn // Send confirmation emailrn await sendOrderConfirmationEmail(order);rnrn // Return success responsern res.status(201).json({rn success: true,rn order: {rn id: order.id,rn status: order.status,rn createdAt: order.createdAtrn },rn message: 'Order created successfully and confirmation email sent.'rn });rnrn } catch (error) {rn console.error('Error processing order:', error);rn res.status(500).json({rn success: false,rn error: 'Failed to process order'rn });rn }rn});
The /api/orders route handles incoming order requests, creates an order object, and sends a confirmation email using the sendOrderConfirmationEmail function. The rest of the route includes a simple error reporting logic, but in production, you might want to implement a retry mechanism or a more robust error handler.
Testing the workflow
To test the setup so far, you need to modify the /ui/index.html file. First, find the line of code where the orderData object is defined and update the customer’s email property (orderData.customer.email) to use one of your verified emails. You also need to update the api constant to point to the URL of your server.
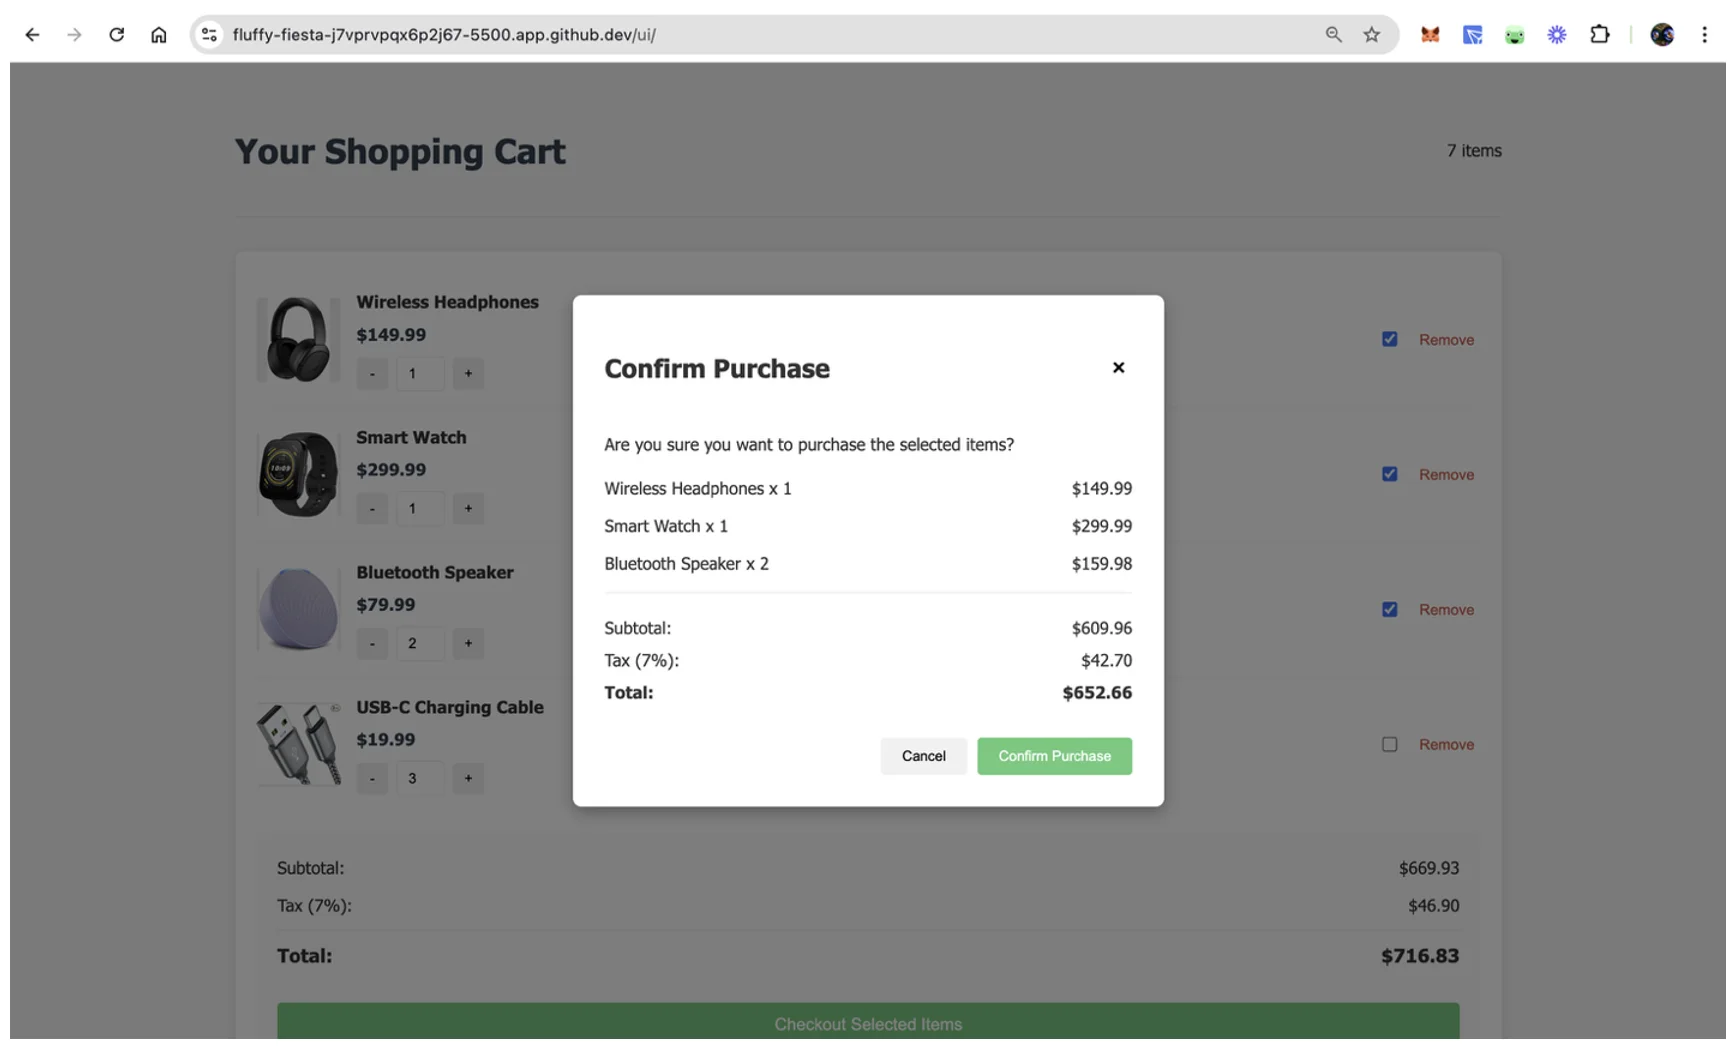
Then, open the /ui/index.html file in a browser and trigger the checkout process by selecting items for checkout and clicking the Checkout Selected Items button. This should open a confirmation dialog where you can click Confirm Purchase to complete the checkout process:
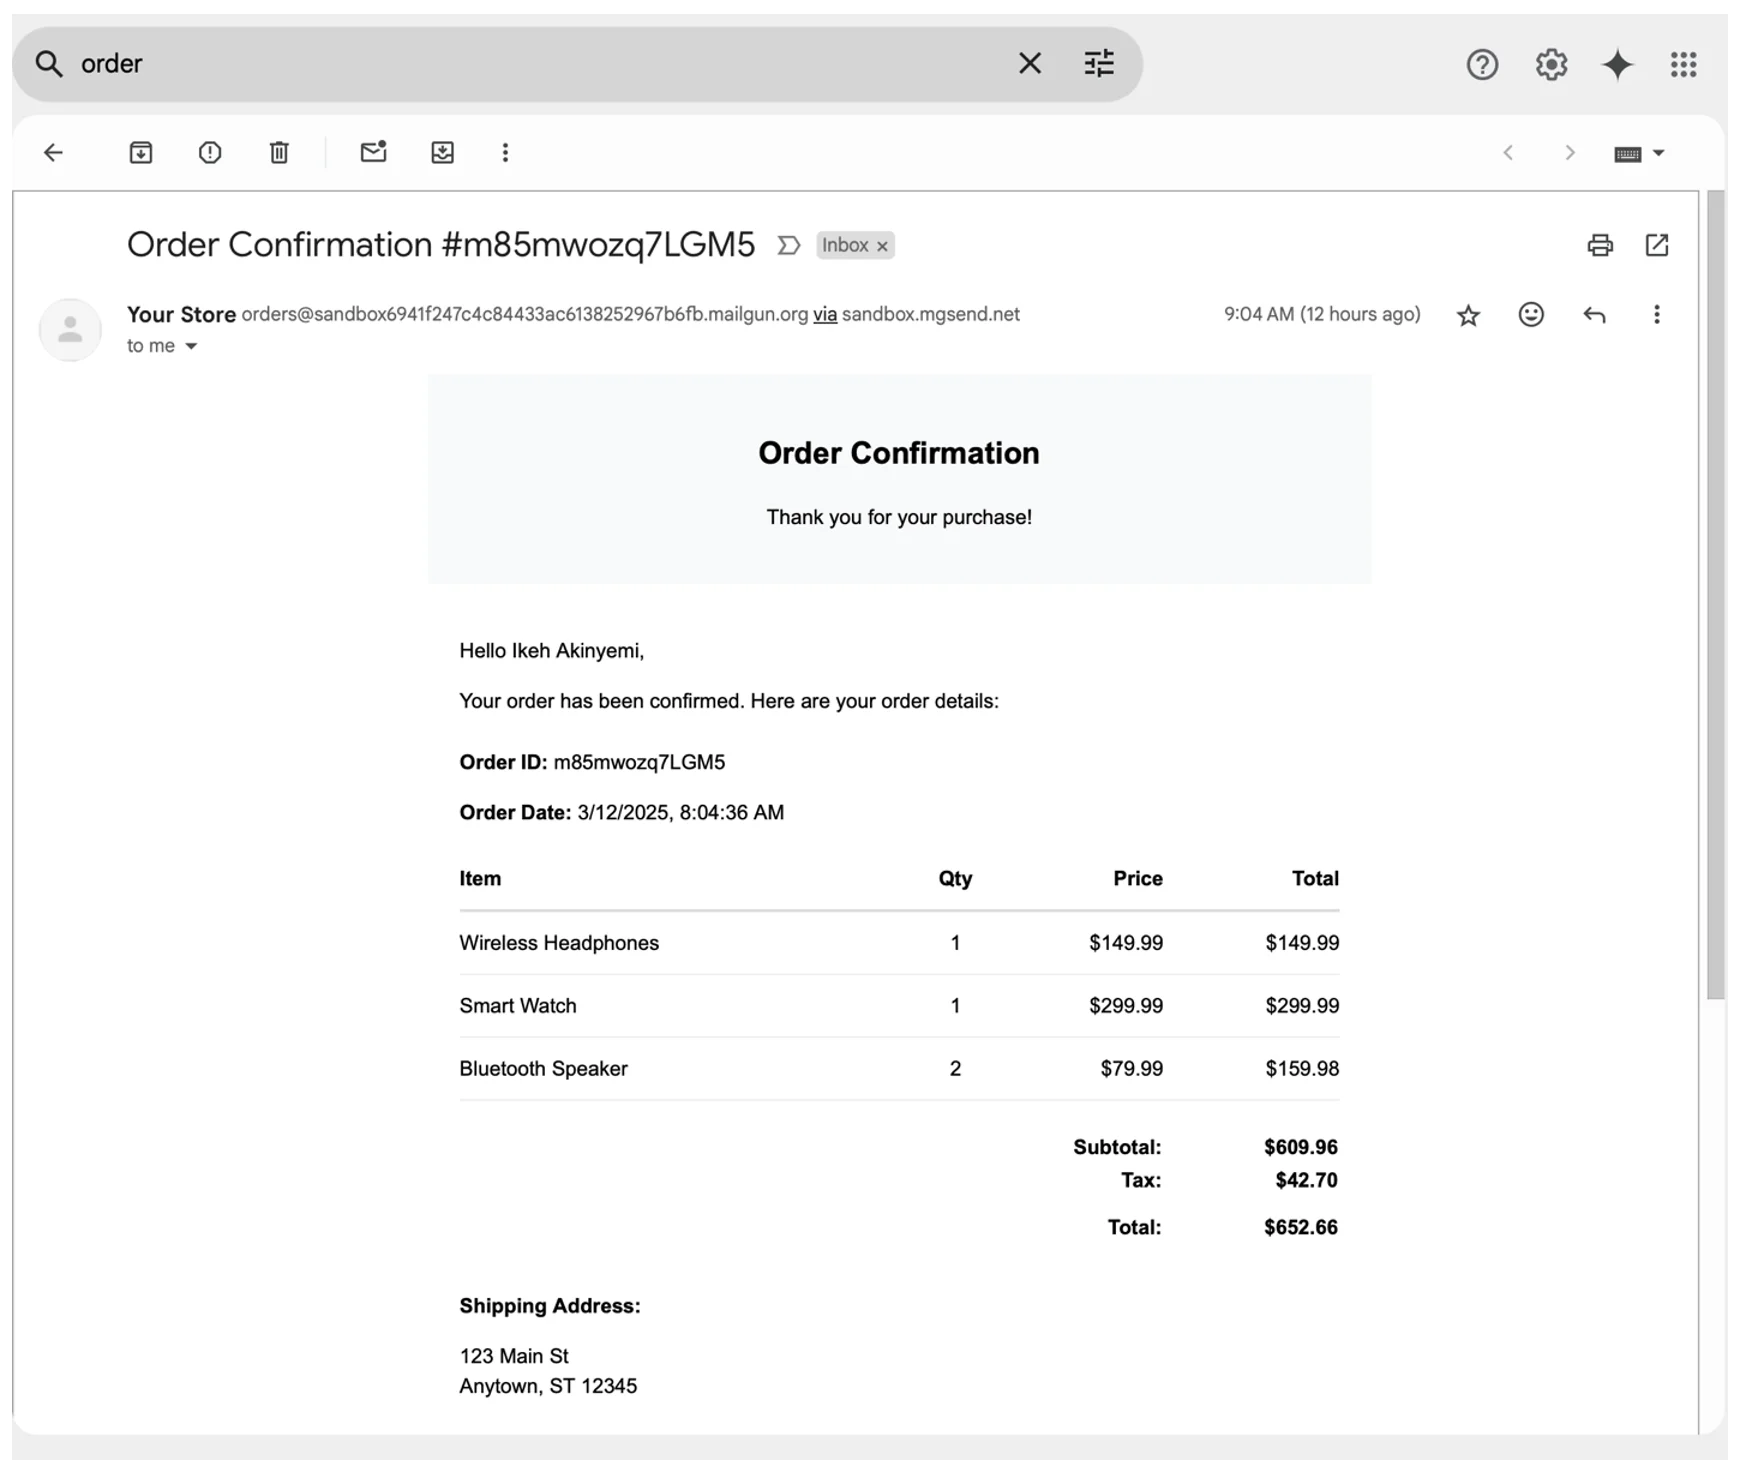
Check your email inbox and verify that the email was sent and correctly rendered with the dynamic content. If you used the sandbox domain, you may need to check your spam folder:
Remember to test how your application handles errors, such as invalid email addresses or API downtimes, by intentionally using incorrect values and verifying that your error handling works as expected.
All the code used in this tutorial is available on GitHub.
Monitoring and managing emails
Mailgun provides detailed metrics and tracking features that allow you to monitor the performance of your transactional emails. You can track delivery rates and open rates in addition to handling bounces or failures directly from the Mailgun dashboard.
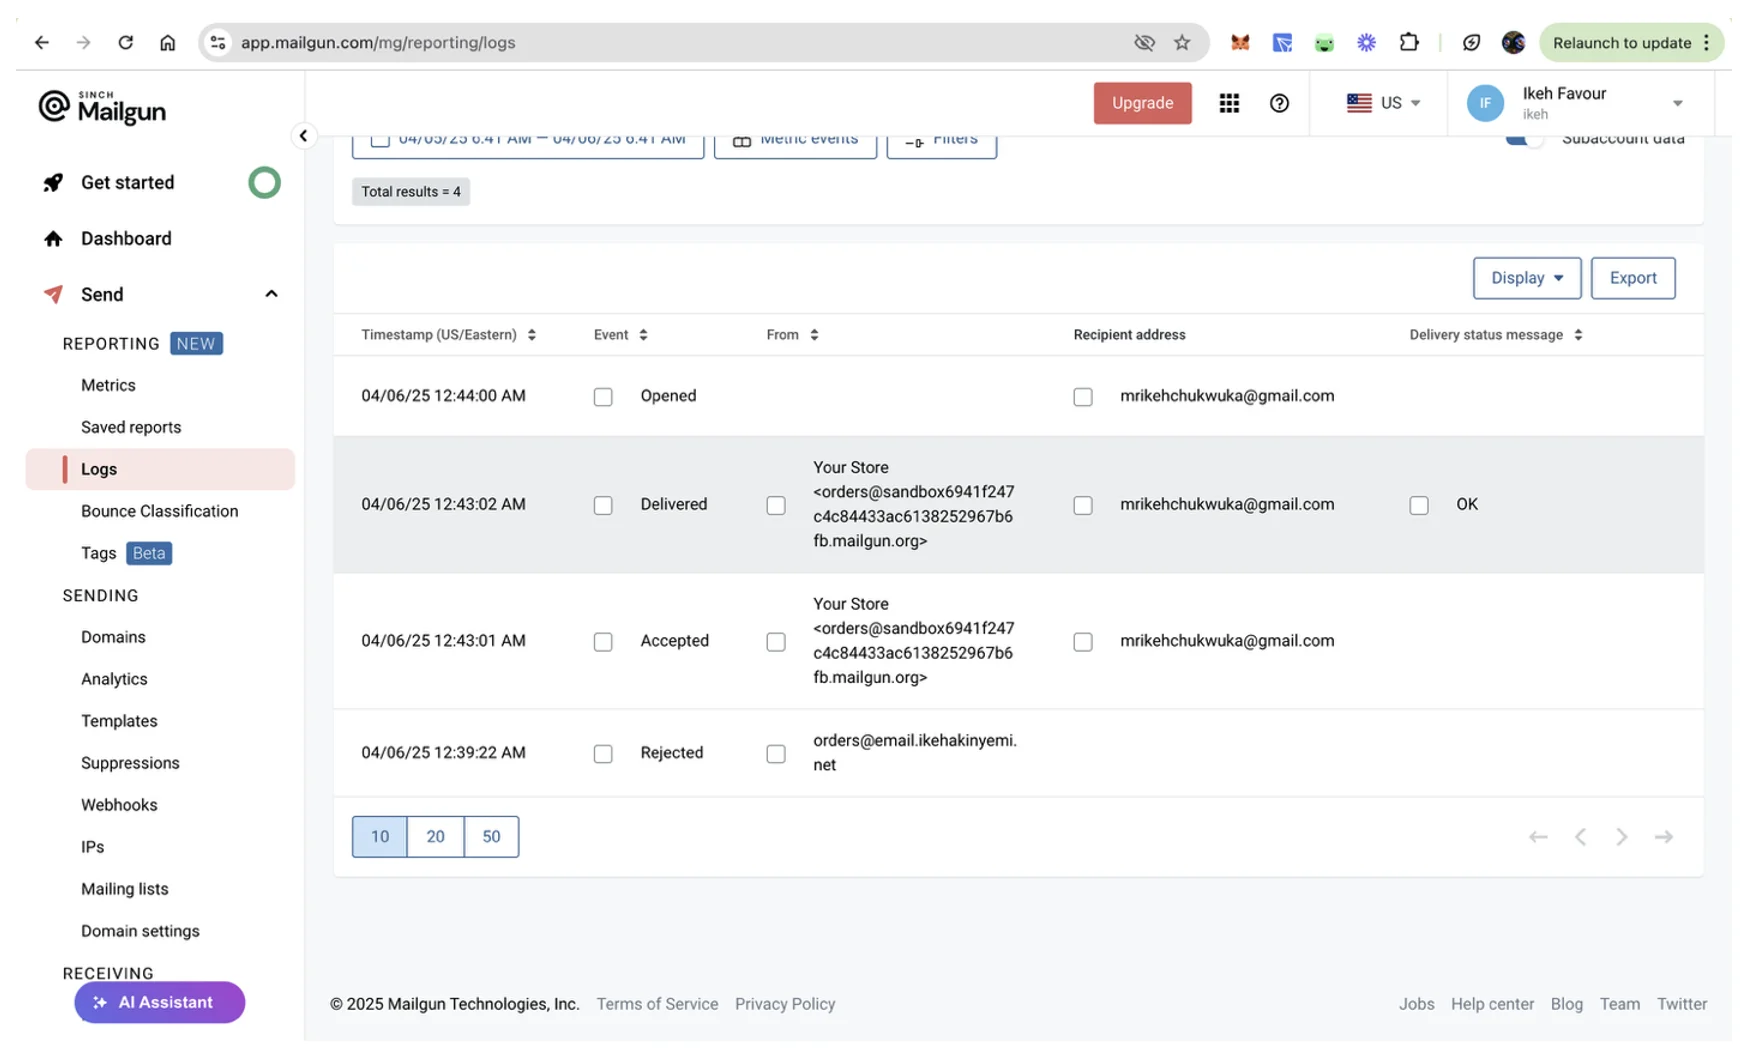
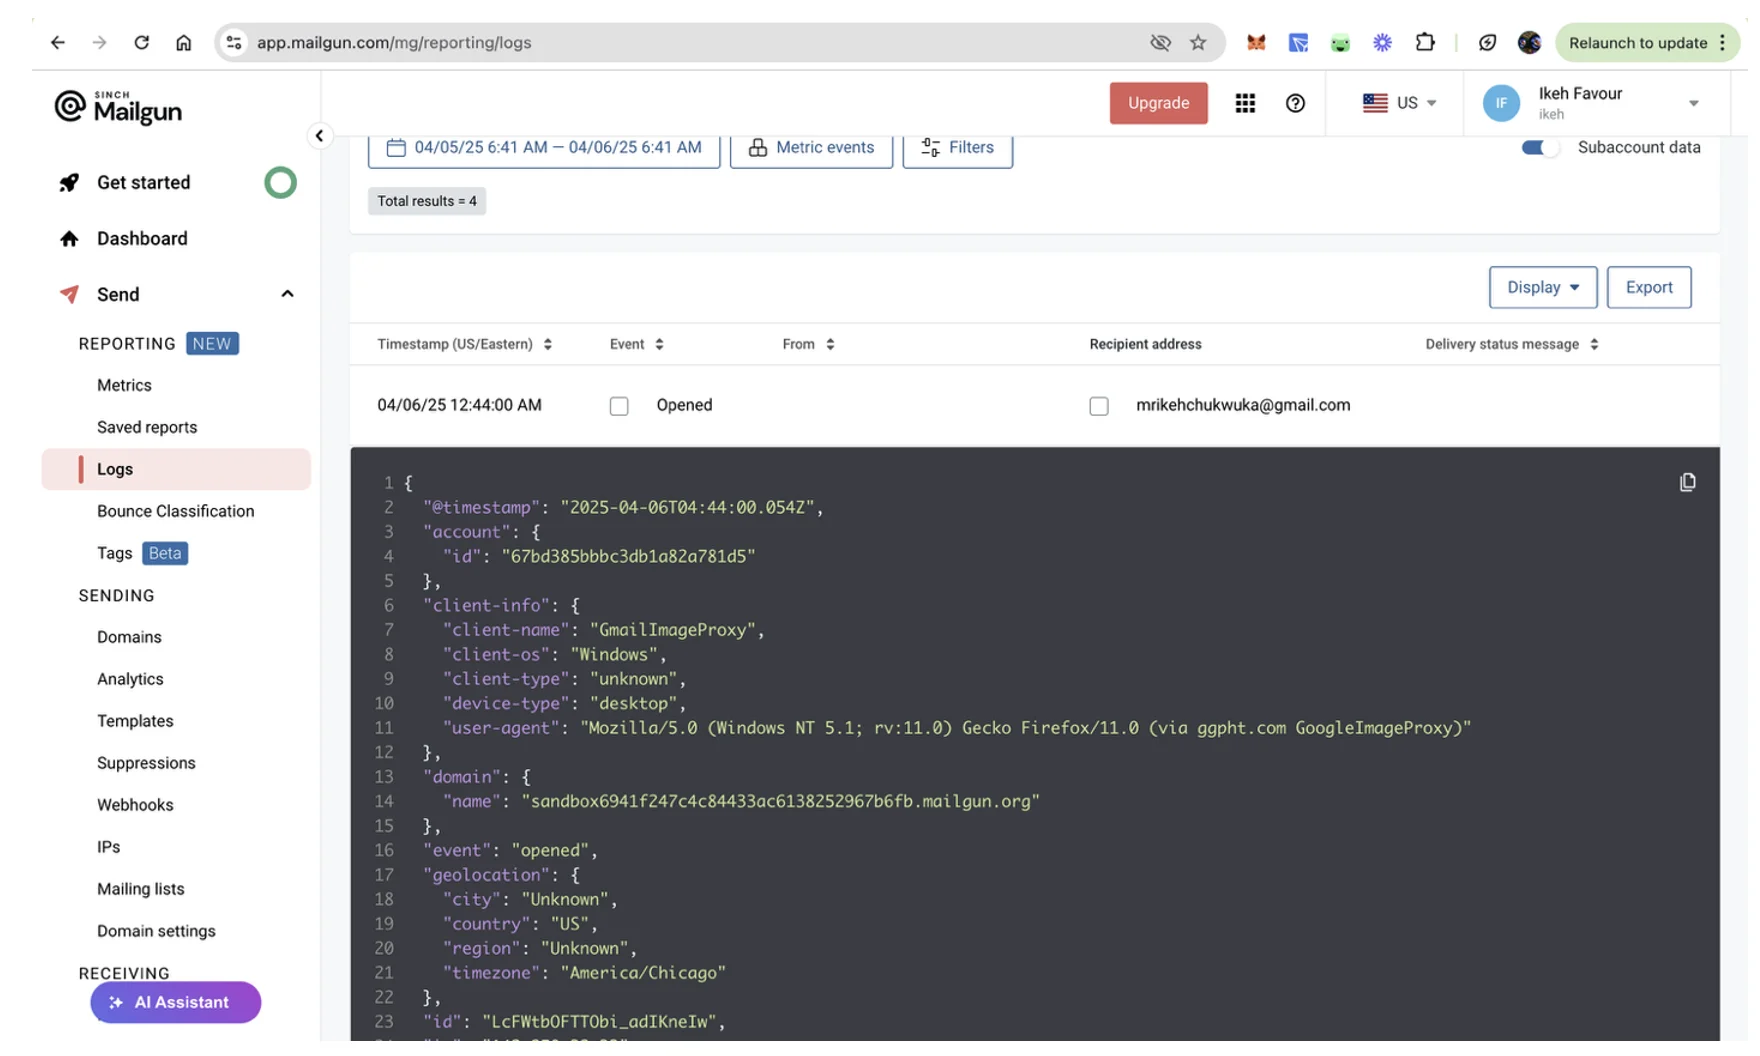
To access the logs of each email sent, navigate to the Send > Reporting > Logs section in your Mailgun account. Here, you can see the timestamp and status of each email sent, including whether it was delivered, opened, or rejected:
You can click any log entry to view its full details, like geolocation for opened emails, delivery-status for delivered emails, and others:
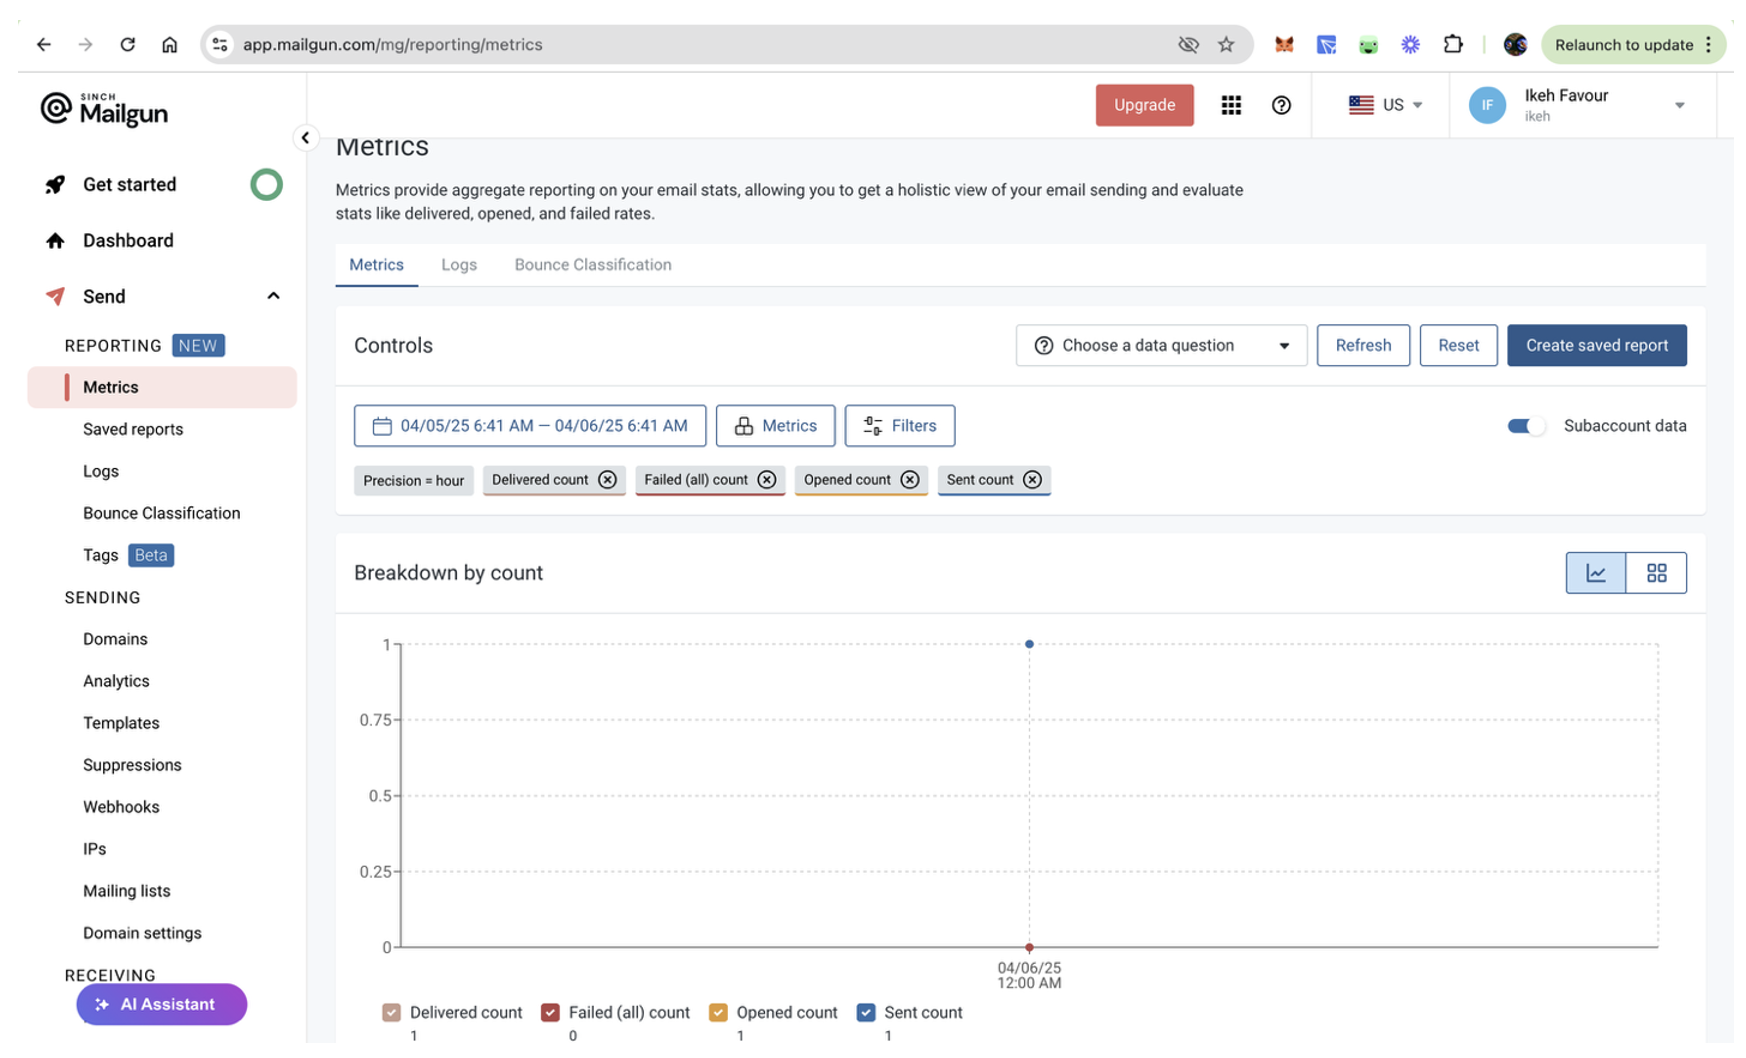
You can also go to Send > Reporting > Metrics to view a graphical breakdown of key email metrics, including the sent, delivered, failed, and opened count:
Wrapping up
You’ve just built a working order confirmation workflow with Mailgun’s API.
Transactional emails like these keep customers informed right after checkout, cutting down on support tickets and improving trust without extra overhead. Order confirmations aren’t the only workflows that matter to consumers. Check out our tutorial on password resets to keep optimizing your transactional emails.