Dev Life
Building transactional email workflows for shipping notifications with Mailgun’s API
When you order something online, you expect to know exactly where it is and when it will arrive. Transactional email workflows help make this type of timely communication possible.
Unlike marketing emails that promote products, transactional emails are sent in response to a user’s action, like placing an order or getting a shipping update. They provide real-time details that keep users in the loop every step of the way.
In this article, you’ll learn how to build a transactional email workflow for shipping notifications using Mailgun’s API. The workflow will incorporate BullMQ, a powerful job queue system, to queue and process email notifications separately from the main application logic and improve scalability and performance. This is useful for high-traffic applications where sending emails directly within a request-response cycle could slow down the system.
Implementing transactional email workflows for shipping notifications with Mailgun’s API
To follow along, you need these tools and accounts:
- A Mailgun account
- Node.js and Docker installed on your local machine
- A code editor (this tutorial uses VS Code) and a web browser
Before diving into the implementation, let’s take a look at the workflow:
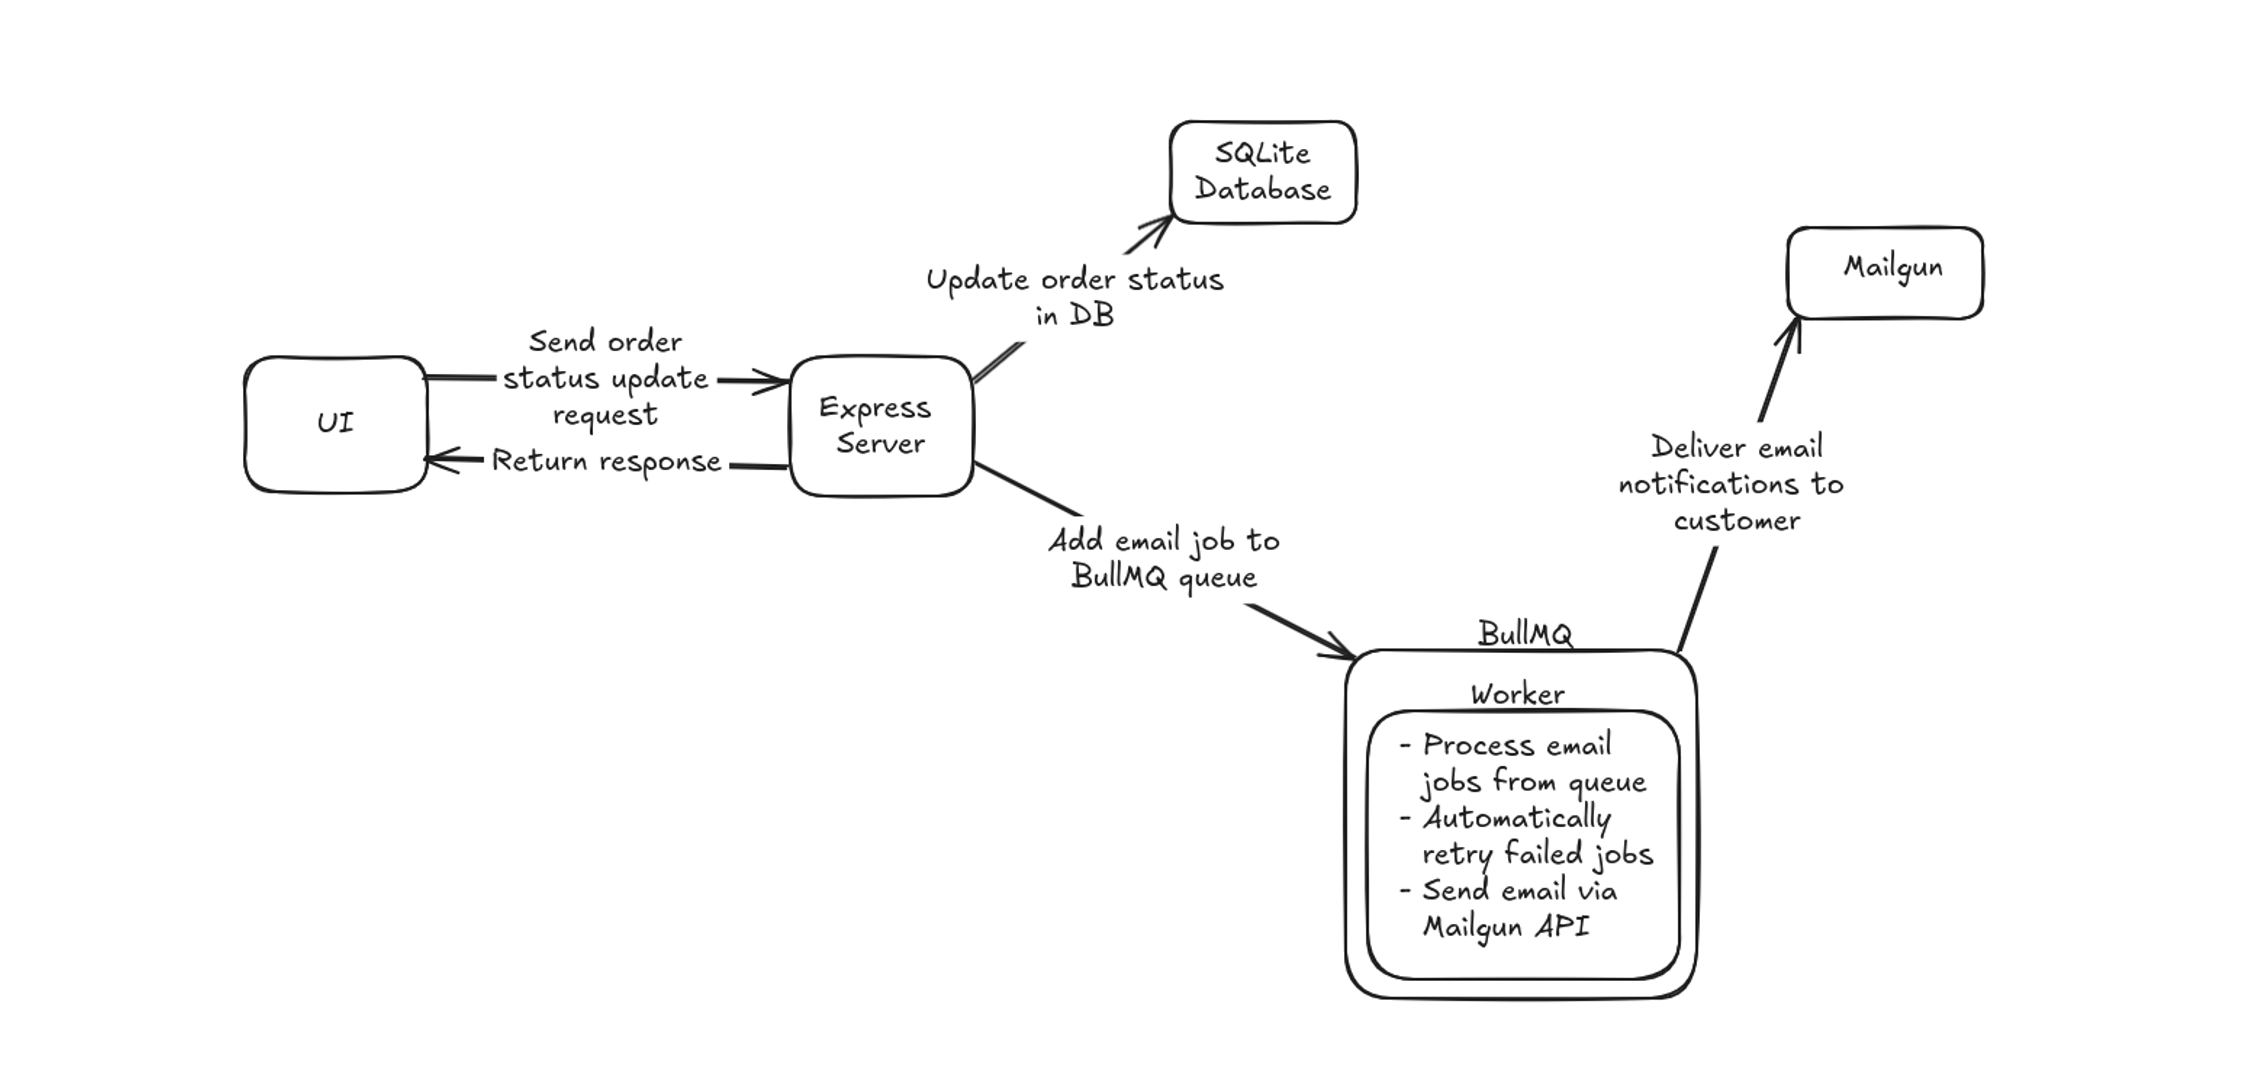
Here’s how the process works:
- The shipping team (or anyone managing shipping updates) sends an HTTP request to update the order status
- The Express server updates the order status in the SQLite database and queues a job in BullMQ
- A BullMQ worker processes jobs from the queue and interacts with the Mailgun API to send an email to the customer
- The worker automatically retries failed jobs
- Mailgun delivers the email to the customer
Mailgun account setup
To use the Mailgun API, you need a Mailgun domain and an API key for authentication. Mailgun provides two types of domains: sandbox domains for testing and custom domains for use in production environments.
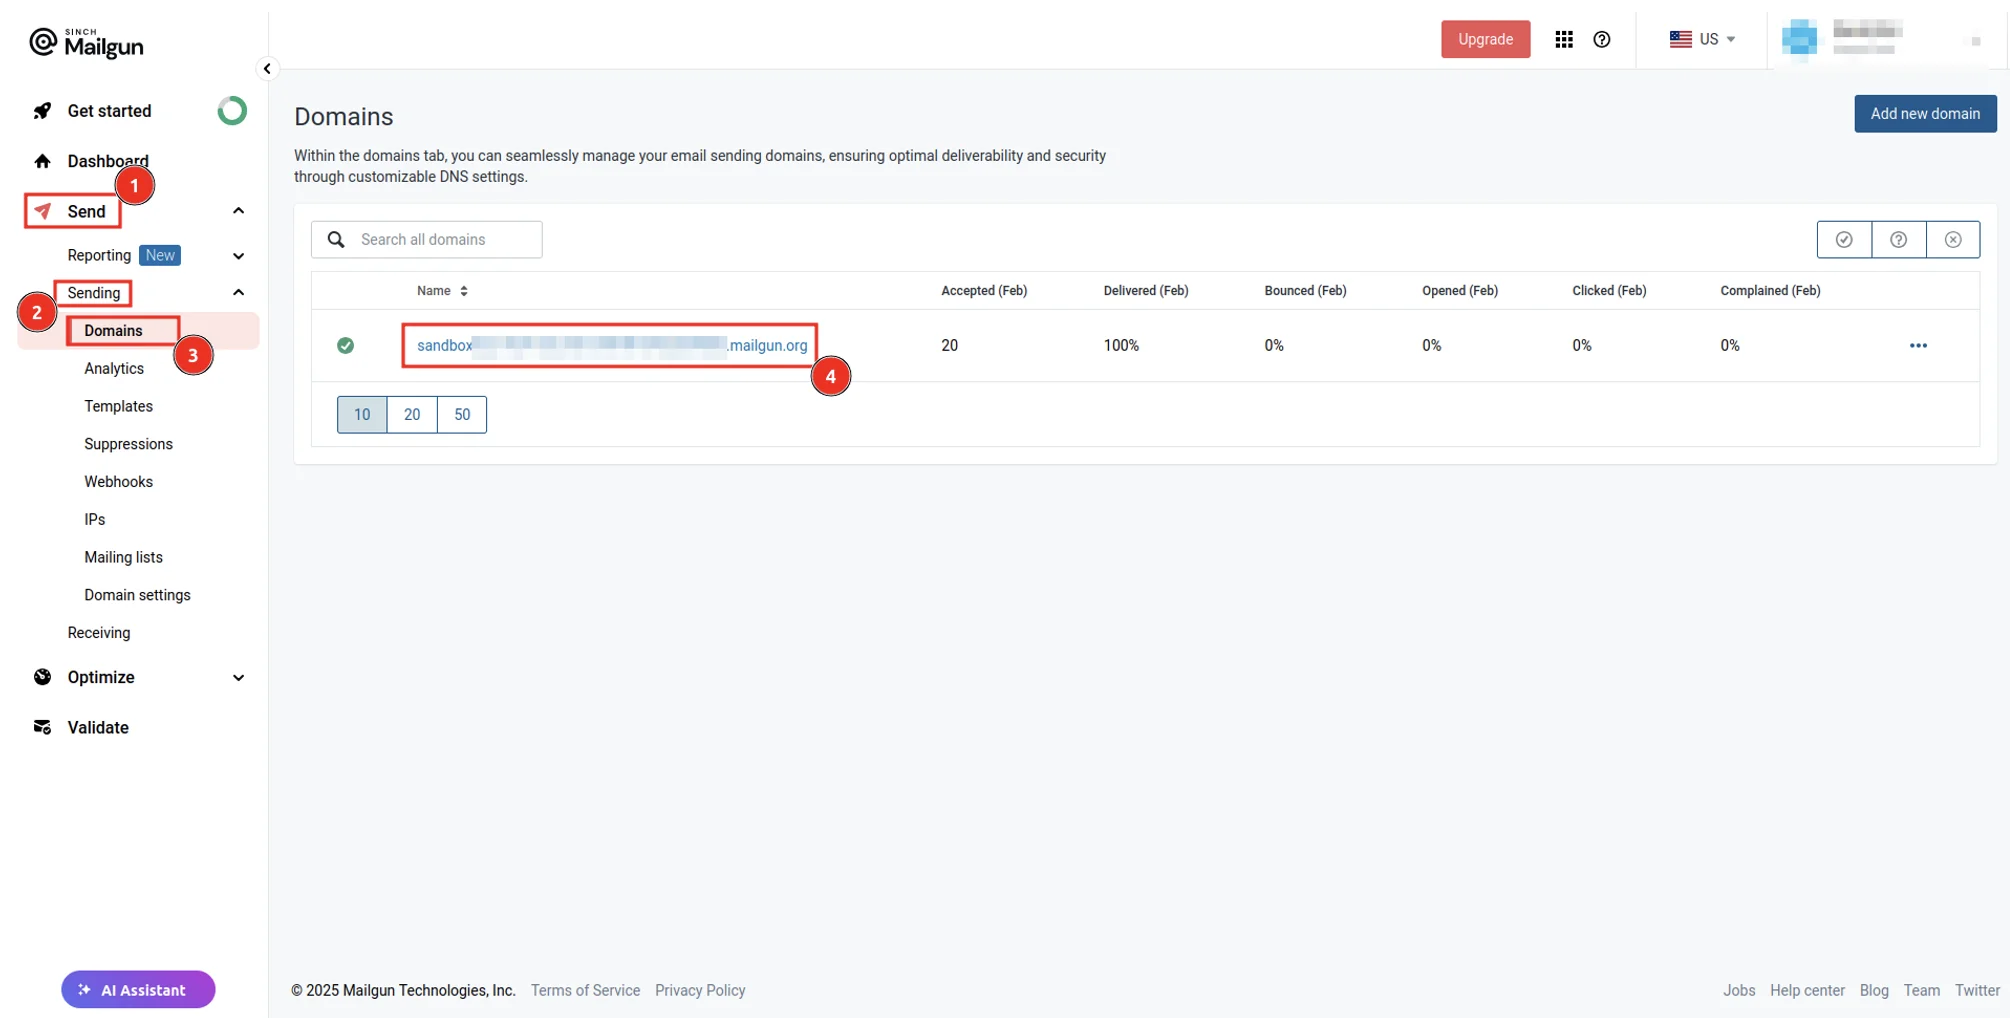
In this guide, you’ll use a sandbox domain. Each Mailgun account is automatically provisioned with one, so you don’t have to create it manually. To obtain your sandbox domain, log in to your Mailgun account, then navigate to Send > Sending > Domains in the sidebar. Copy your domain:
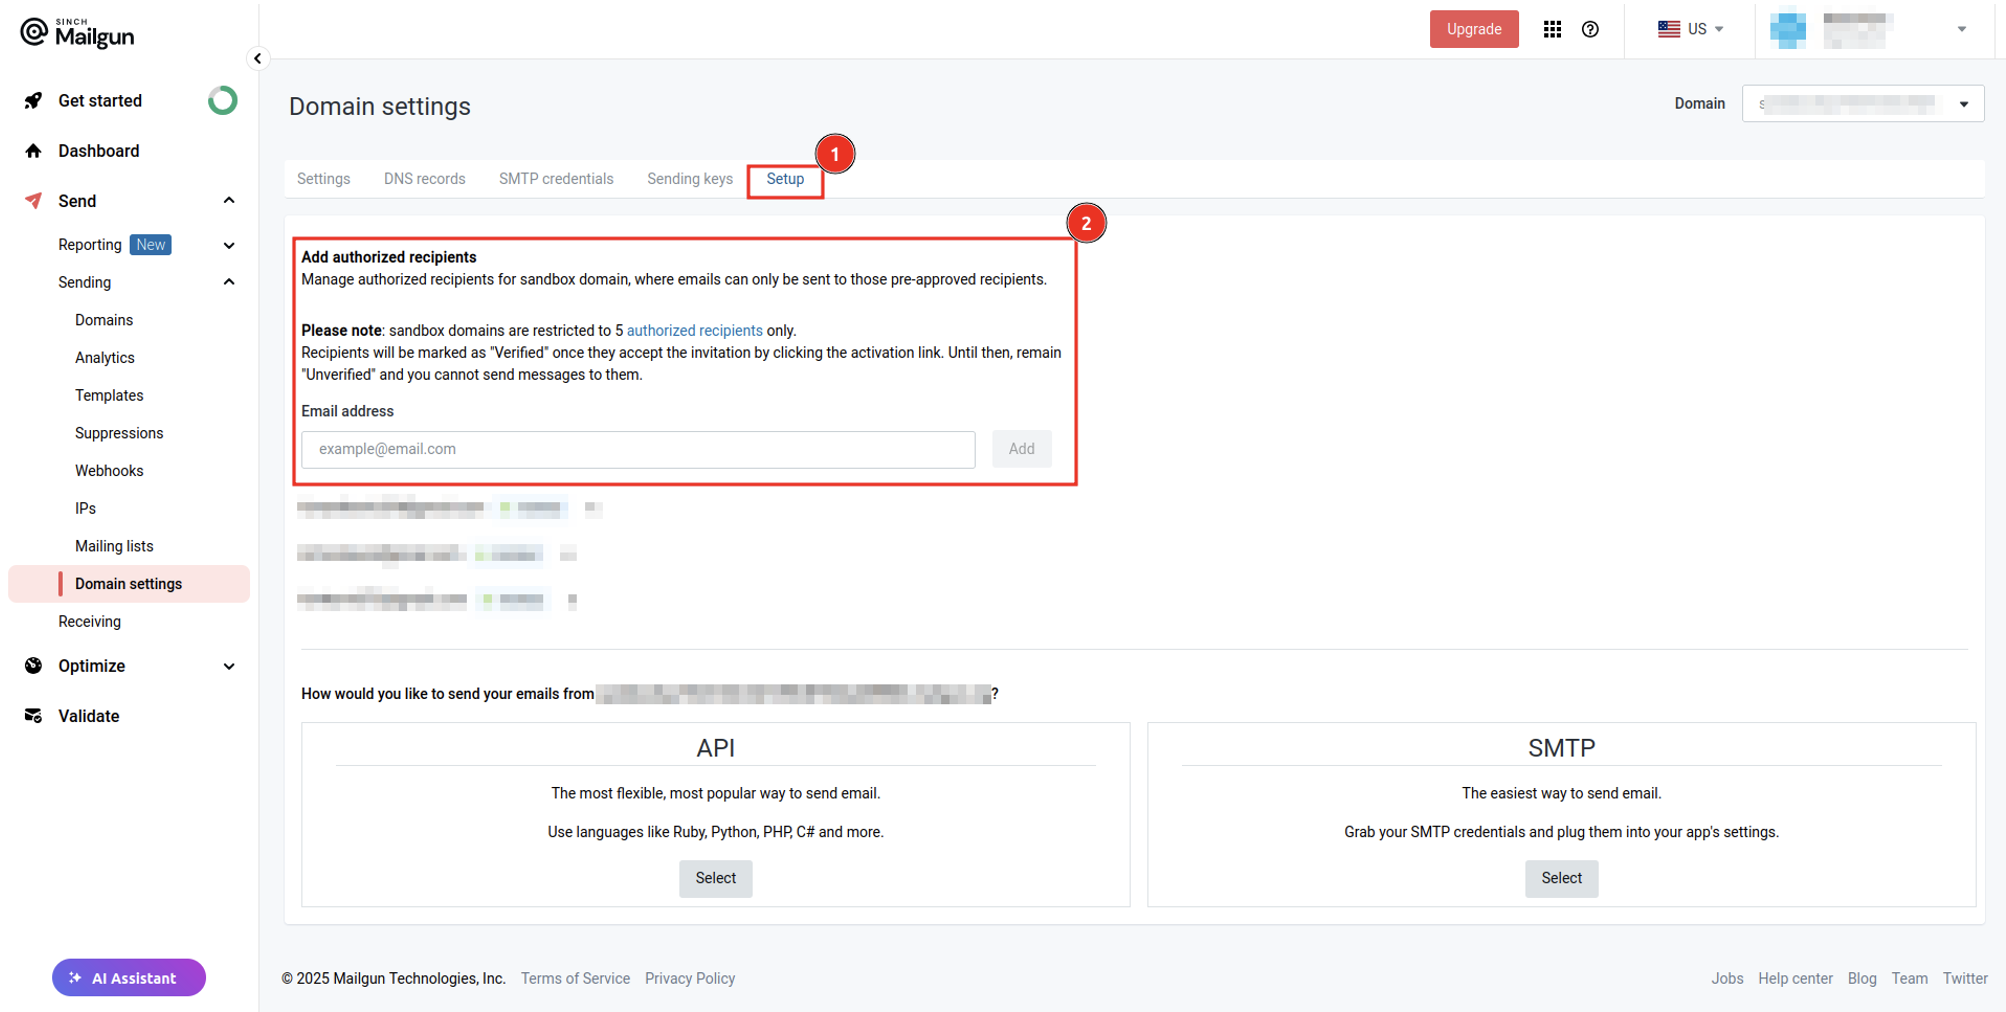
By default, a sandbox domain can only send emails to authorized recipients. To set up an email as an authorized recipient, click your domain name on the Domains page to view its settings. On the Setup tab, under Add authorized recipients, add the email address that you want to send emails to. Make sure to follow the instructions sent to the email address you provided to set it up as an authorized recipient:
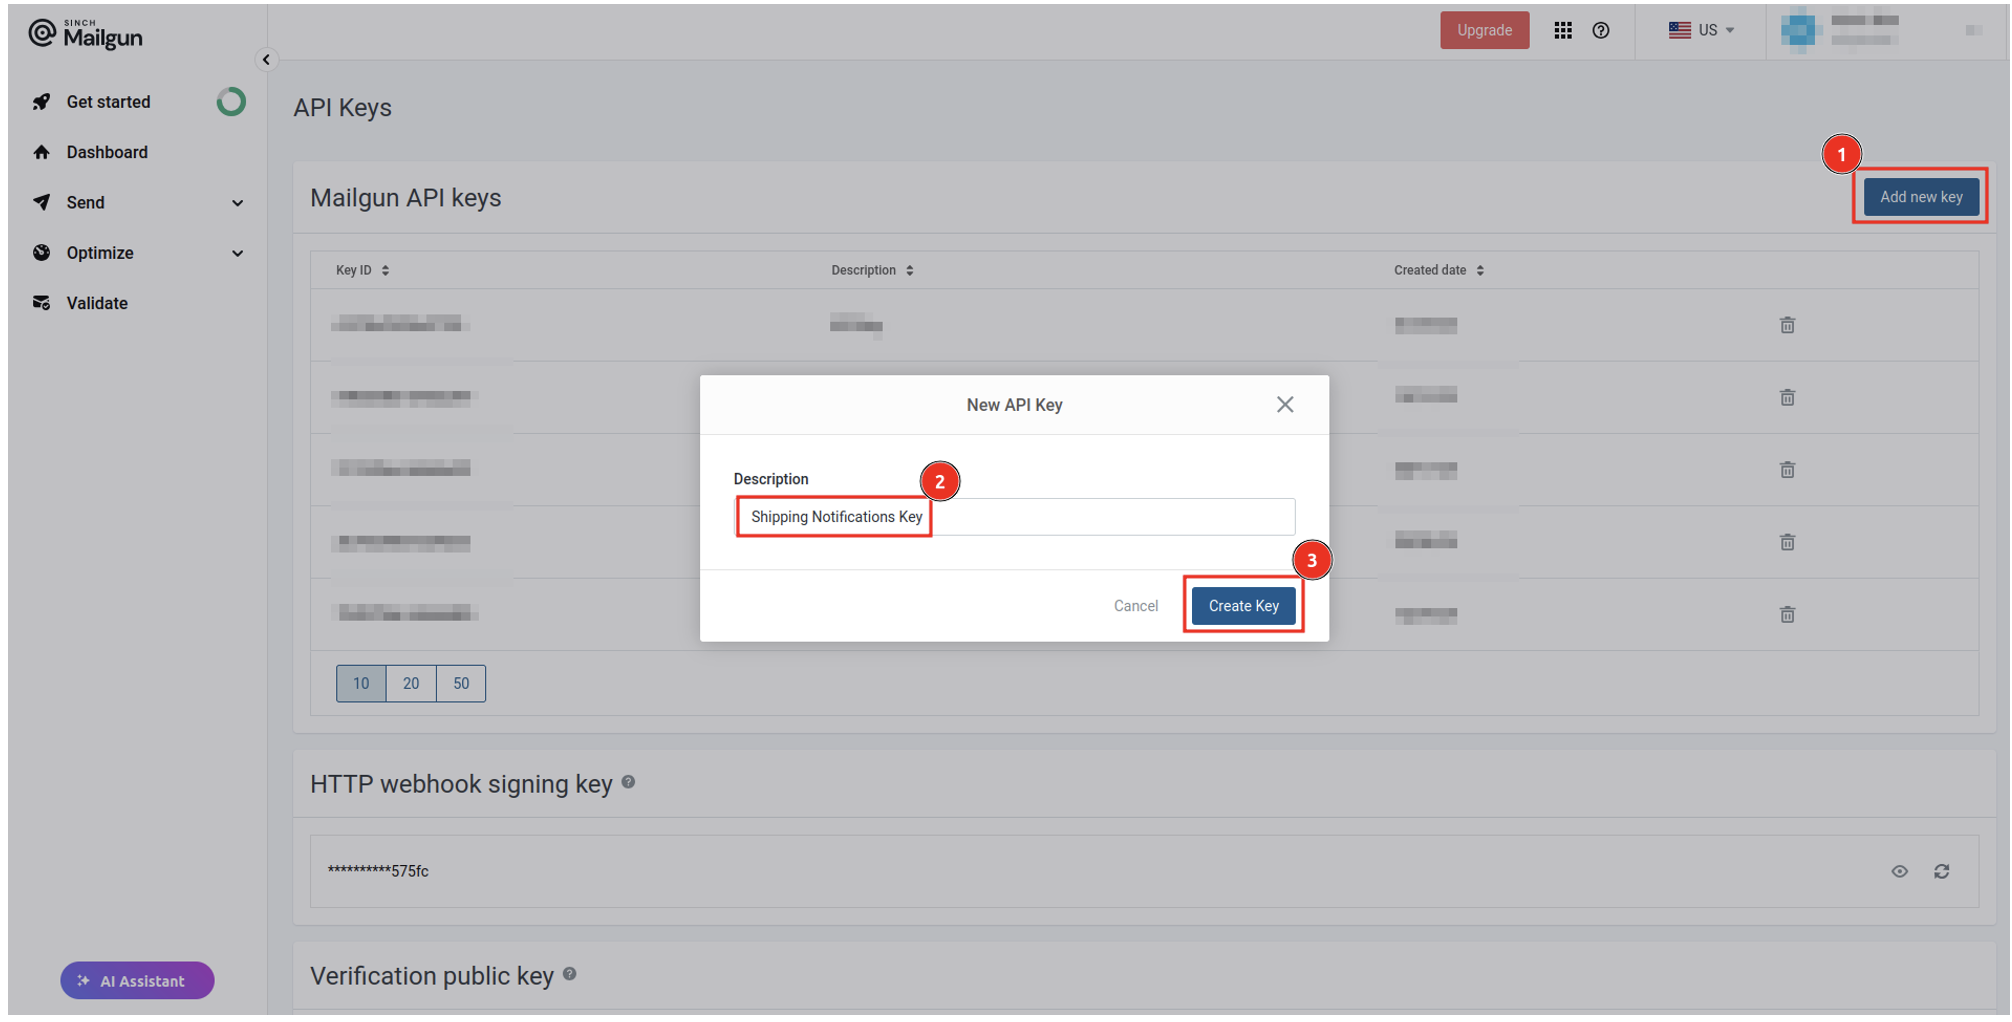
To obtain your API key, navigate to the API Keys page and click Add new key to create a new API key. Provide a name for the key and click Create Key, then make sure to copy the value of your key because it’ll only be displayed once:
Setting up the starter template
To keep this tutorial focused on building transactional email workflows, we’ve prepared a starter template for you to build on. Clone the template to your local machine by running the following command in your terminal:
git clone --single-branch -b starter-template https://github.com/kimanikevin254/mailgun-transactional-email-workflows.git
Here are the key files in the project:
src/controllers/order.controller.ts containstwo methods:indexrenders the admin UI, which is defined insrc/views/admin.ejsupdateOrderStatusupdates the order status in the database
src/database/entity/order.entity.tsdefines the order entitysrc/database/entity/user.entity.tsdefines the user entitysrc/database/seed.tsseeds the database with a sample user and orderdocker-compose.yml runsRedis in Docker, which is required by BullMQ
Install all the dependencies using the following command:
npm install
Next, rename the .env.example file to .env and replace the placeholder values for MAILGUN_DOMAIN and MAILGUN_API_KEY with the credentials you obtained from the Mailgun dashboard. For the MAIL_FROM variable, provide your email address as the value.
Next, open the src/database/seed.ts file and replace the placeholder details in the userInfo constant with your details. For the email, make sure to provide one that you added as an authorized recipient.
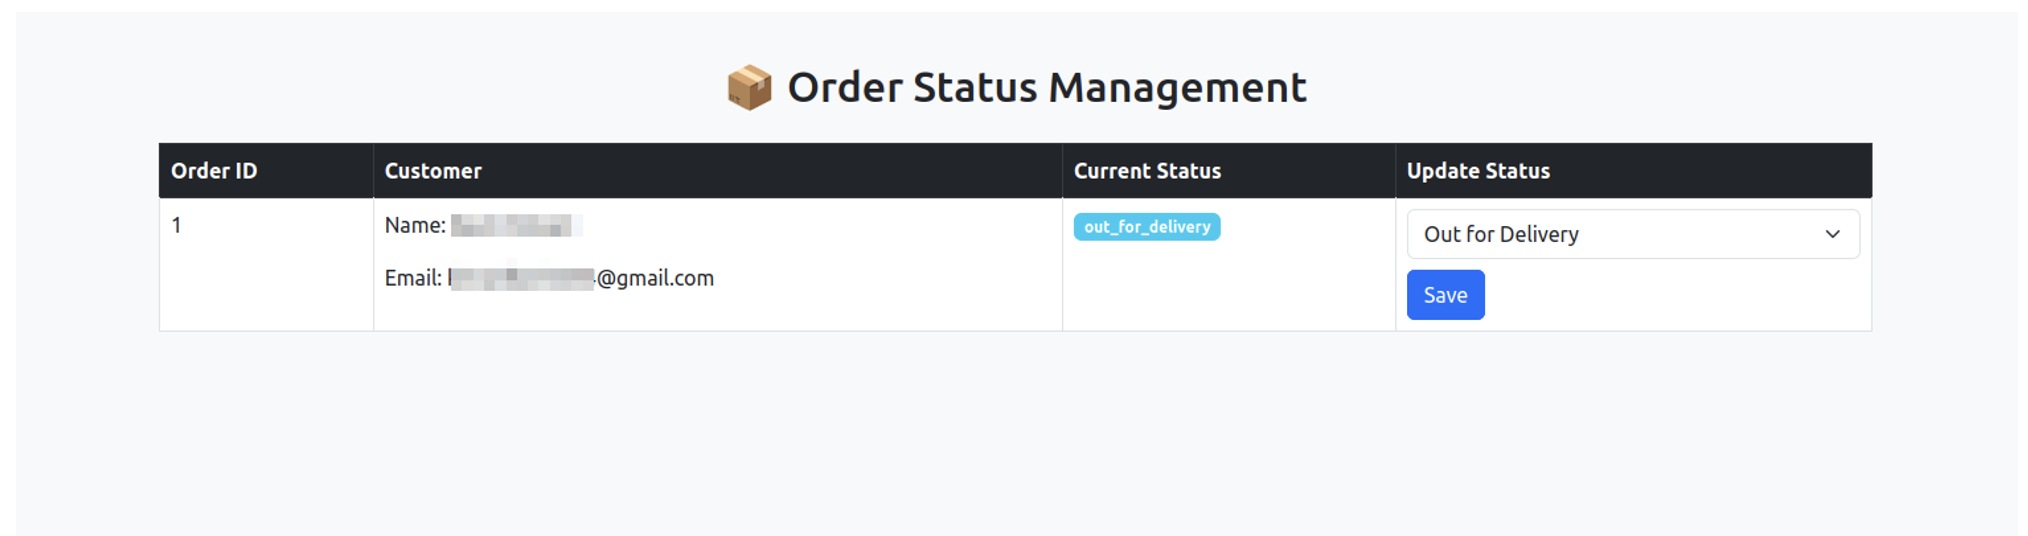
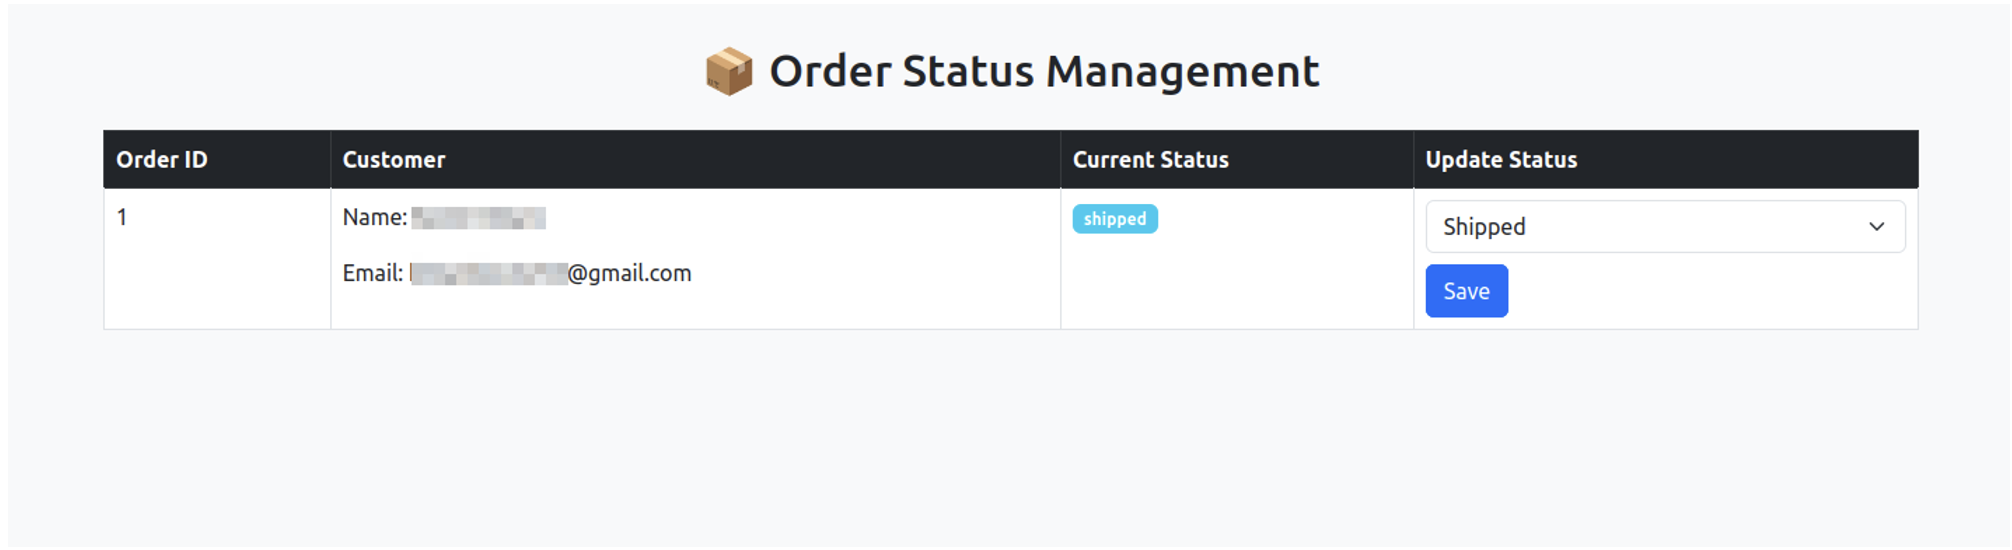
Finally, seed the database by executing the command npm run db:seed in your terminal. You can now run the project using the command npm run dev and navigate to http://localhost:3000 in your browser to view and update the order status:
In the next section, you’ll implement a workflow that automatically sends an email to the user once the order status is updated.
Designing the email templates
Well-designed email templates improve readability, enhance user experience, and ensure your emails look professional across different devices. In this section, you’ll create templates that make your transactional emails clear, engaging, and effective.
An order goes through three states (shipped, out for delivery, and delivered), as defined in the OrderStatus type in src/types/index.ts. You’ll create a corresponding email template for each state to keep customers informed at every step.
To do this, create a file at src/email-templates/html/shipped.html and add the following code:
u003c!DOCTYPE htmlu003ernu003chtmlu003ernu003cheadu003ern u003cmeta charset=u0022UTF-8u0022 /u003ern u003ctitleu003eOrder Shippedu003c/titleu003ernu003c/headu003ernu003cbody style=u0022font-family: Arial, sans-serif; background-color: #f4f4f4; padding: 20px; text-align: center;u0022u003ernrn u003cdiv style=u0022background: #ffffff; padding: 20px; border-radius: 8px; max-width: 600px; margin: auto; box-shadow: 0 2px 10px rgba(0, 0, 0, 0.1);u0022u003ernrn u003cdiv style=u0022background-color: #007bff; color: white; padding: 15px; font-size: 22px; font-weight: bold; border-top-left-radius: 8px; border-top-right-radius: 8px;u0022u003ern Your Order Has Been Shipped! ✈️rn u003c/divu003ernrn u003cdiv style=u0022padding: 20px; font-size: 16px; color: #333; text-align: left;u0022u003ern u003cp style=u0022margin: 0 0 10px;u0022u003eHello, u003c%= name %u003eu003c/pu003ern u003cp style=u0022margin: 0 0 10px;u0022u003eYour order has been shipped and is on its way to you. 📦u003c/pu003ern u003cp style=u0022margin: 0 0 10px;u0022u003eu003cstrongu003eTracking Number:u003c/strongu003e u003c%= trackingNumber %u003eu003c/pu003ern u003cp style=u0022margin: 0 0 10px;u0022u003eYou can track your package below. We hope you enjoy your purchase!u003c/pu003ernrn u003ca href=u0022https://yourwebsite.com/track?trackingNumber=u003c%= trackingNumber %u003eu0022rn style=u0022background-color: #007bff; color: white; text-decoration: none; padding: 12px 18px; border-radius: 5px; display: inline-block; margin-top: 15px; font-weight: bold;u0022u003ern Track Your Shipmentrn u003c/au003ern u003c/divu003ernrn u003cdiv style=u0022background-color: #f4f4f4; padding: 10px; font-size: 14px; color: #555; border-bottom-left-radius: 8px; border-bottom-right-radius: 8px;u0022u003ern Thank you for shopping with us! 🛒rn u003c/divu003ern u003c/divu003ernu003c/bodyu003ernu003c/htmlu003ern
This email template is used to notify customers that their order has been shipped. It includes placeholders for the customer’s name and tracking number, which will be dynamically filled by EJS when rendering the template. The templates for the other two order statuses will follow the same format.
Create a template to notify users that their order is out for delivery by creating a file named out_for_delivery.html in the src/email-templates/html folder and adding the following code:
u003c!DOCTYPE htmlu003ernu003chtmlu003ernu003cheadu003ern u003cmeta charset=u0022UTF-8u0022 /u003ern u003ctitleu003eOut for Deliveryu003c/titleu003ernu003c/headu003ernu003cbody style=u0022font-family: Arial, sans-serif; background-color: #f4f4f4; padding: 20px; text-align: center;u0022u003ernrn u003cdiv style=u0022background: #ffffff; padding: 20px; border-radius: 8px; max-width: 600px; margin: auto; box-shadow: 0 2px 10px rgba(0, 0, 0, 0.1);u0022u003ernrn u003cdiv style=u0022background-color: #28a745; color: white; padding: 15px; font-size: 22px; font-weight: bold; border-top-left-radius: 8px; border-top-right-radius: 8px;u0022u003ern Your Order Is Out for Delivery! 🚚rn u003c/divu003ernrn u003cdiv style=u0022padding: 20px; font-size: 16px; color: #333; text-align: left;u0022u003ern u003cp style=u0022margin: 0 0 10px;u0022u003eHello, u003c%= name %u003eu003c/pu003ern u003cp style=u0022margin: 0 0 10px;u0022u003eGood news! Your package is out for delivery and will arrive soon. 📦u003c/pu003ern u003cp style=u0022margin: 0 0 10px;u0022u003eu003cstrongu003eTracking Number:u003c/strongu003e u003c%= trackingNumber %u003eu003c/pu003ern u003cp style=u0022margin: 0 0 10px;u0022u003eWe appreciate your business and can't wait for you to receive your order!u003c/pu003ernrn u003ca href=u0022https://yourwebsite.com/track?trackingNumber=u003c%= trackingNumber %u003eu0022rn style=u0022background-color: #28a745; color: white; text-decoration: none; padding: 12px 18px; border-radius: 5px; display: inline-block; margin-top: 15px; font-weight: bold;u0022u003ern Track Your Packagern u003c/au003ern u003c/divu003ernrn u003cdiv style=u0022background-color: #f4f4f4; padding: 10px; font-size: 14px; color: #555; border-bottom-left-radius: 8px; border-bottom-right-radius: 8px;u0022u003ern Thank you for choosing us! 🛍️rn u003c/divu003ern u003c/divu003ernu003c/bodyu003ernu003c/htmlu003e
Lastly, create a template to notify users that their order has been delivered by creating a file named delivered.html in the src/email-templates/html folder and adding the following code:
u003c!DOCTYPE htmlu003ernu003chtmlu003ernu003cheadu003ern u003cmeta charset=u0022UTF-8u0022 /u003ern u003ctitleu003eOrder Deliveredu003c/titleu003ernu003c/headu003ernu003cbody style=u0022font-family: Arial, sans-serif; background-color: #f4f4f4; padding: 20px; text-align: center;u0022u003ernrn u003cdiv style=u0022background: #ffffff; padding: 20px; border-radius: 8px; max-width: 600px; margin: auto; box-shadow: 0 2px 10px rgba(0, 0, 0, 0.1);u0022u003ernrn u003cdiv style=u0022background-color: #ffc107; color: white; padding: 15px; font-size: 22px; font-weight: bold; border-top-left-radius: 8px; border-top-right-radius: 8px;u0022u003ern Your Order Has Been Delivered! 🎉rn u003c/divu003ernrn u003cdiv style=u0022padding: 20px; font-size: 16px; color: #333; text-align: left;u0022u003ern u003cp style=u0022margin: 0 0 10px;u0022u003eHello, u003c%= name %u003eu003c/pu003ern u003cp style=u0022margin: 0 0 10px;u0022u003eWe're happy to inform you that your package has been successfully delivered. 🎁u003c/pu003ern u003cp style=u0022margin: 0 0 10px;u0022u003eu003cstrongu003eTracking Number:u003c/strongu003e u003c%= trackingNumber %u003eu003c/pu003ern u003cp style=u0022margin: 0 0 10px;u0022u003eWe hope you enjoy your purchase! If you have any questions, feel free to contact us.u003c/pu003ernrn u003ca href=u0022https://yourwebsite.com/track?trackingNumber=u003c%= trackingNumber %u003eu0022rn style=u0022background-color: #ffc107; color: white; text-decoration: none; padding: 12px 18px; border-radius: 5px; display: inline-block; margin-top: 15px; font-weight: bold;u0022u003ern Track Your Orderrn u003c/au003ern u003c/divu003ernrn u003cdiv style=u0022background-color: #f4f4f4; padding: 10px; font-size: 14px; color: #555; border-bottom-left-radius: 8px; border-bottom-right-radius: 8px;u0022u003ern Thank you for shopping with us! 🛍️rn u003c/divu003ern u003c/divu003ernu003c/bodyu003ernu003c/htmlu003e
To manage and render email templates dynamically, you need to create a class that loads and organizes templates for different order statuses. This class will retrieve the right template and render it with customer-specific data. To do this, create a new file named index.ts in the src/email-templates folder and add the following code:
import { readFileSync } from u0022fsu0022;rnimport { EmailTemplate, OrderStatus } from u0022../typesu0022;rnimport ejs from u0022ejsu0022;rnrnexport class EmailTemplateManager {rn private templates: Mapu003cOrderStatus, EmailTemplateu003e;rnrn constructor() {rn this.templates = new Map();rn this.loadTemplates();rn }rnrn private loadTemplates() {rn // Load each template for different statusesrn const statuses: OrderStatus[] = [rn u0022shippedu0022,rn u0022out_for_deliveryu0022,rn u0022deliveredu0022,rn ];rn const subjects: Recordu003cOrderStatus, stringu003e = {rn shipped: u0022Your Order Has Been Shipped! ✈️u0022,rn out_for_delivery: u0022Your Order is Out for Delivery! 🚚u0022,rn delivered: u0022Your Order Has Been Delivered! 🎉u0022,rn };rnrn statuses.forEach((status) =u003e {rn const htmlTemplate = readFileSync(rn `src/email-templates/html/${status}.html`,rn u0022utf-8u0022rn );rnrn this.templates.set(status, {rn subject: subjects[status],rn html: htmlTemplate,rn });rn });rn }rnrn getTemplate(status: OrderStatus): EmailTemplate {rn const template = this.templates.get(status);rn if (!template) {rn throw new Error(`No template found for status: ${status}`);rn }rn return template;rn }rnrn renderTemplate(templateString: string, data: Recordu003cstring, anyu003e): string {rn return ejs.render(templateString, data); // Render the template with the provided datarn }rn}
This class initializes a private variable named templates that stores email templates in a Map for quick lookup based on order status. Using a Map ensures efficient retrieval and avoids repeatedly reading files from disk. The class also defines the following methods:
loadTemplates(private) reads HTML templates from files and stores them in the templates Map, along with their corresponding subject lines.getTemplateretrieves the email template for a given order status and throws an error if no template is found.renderTemplateuses EJS to dynamically render a template with provided data.
Implementing the email-sending functionality
With the email templates set up, the next step is to implement the functionality for sending notifications. This involves queuing email jobs and processing them asynchronously.
But before you can do this, you need to install a few dependencies by executing the following command:
npm i mailgun.js@11.1.0 form-data@4.0.2 bullmq@5.41.2 ioredis@5.5.0
Here’s an overview of each of these dependencies:
mailgun.jsis a Node.js client for interacting with the Mailgun API. You’ll use this to send transactional emails.form-datais a package required bymailgun.jsto handle form submissions when sending emails.bullmqis a job queue library for handling asynchronous tasks. This allows you to queue email notifications and process them in the background.ioredisis a Redis client for Node.js used by BullMQ to store and manage queued jobs.
Next, you need to define a Mailgun API client that you’ll use to send emails. To do this, create a new file at src/config/mailgun.config.ts and add the following code:
import FormData from u0022form-datau0022;rnimport Mailgun from u0022mailgun.jsu0022;rnrnconst mailgun = new Mailgun(FormData);rnexport const mgClient = mailgun.client({rn username: u0022apiu0022,rn key: process.env.MAILGUN_API_KEY,rn});
This code sets up and exports a Mailgun client using the mailgun.js library and form-data, allowing your application to send emails through the Mailgun API with the API key stored in environment variables.
Now, you need to define a Redis connection that will be used by BullMQ to store and manage background jobs. To do this, create a new file named redis.config.ts in the src/config folder and add the code below:
import IORedis from u0022ioredisu0022;rnrnexport const redisConfig = new IORedis({rn host: process.env.REDIS_HOST,rn port: parseInt(process.env.REDIS_PORT),rn maxRetriesPerRequest: null,rn});
You need to set up a BullMQ queue for the shipping notifications that will handle background email notification jobs using the Redis connection you defined in the previous step. To do this, create a new file named queues.config.ts in the src/config folder and add the following code:
import { Queue } from u0022bullmqu0022;rnimport { redisConfig } from u0022./redis.configu0022;rnrnexport const QUEUE_NAMES = {rn SHIPPING_NOTICATIONS: u0022shipping-notificationsu0022,rn};rnrnexport const JOB_NAMES = {rn SEND_NOTIFICATION: u0022send-notificationu0022,rn};rnrnexport const SHIPPING_NOTICATIONS_QUEUE = new Queue(rn QUEUE_NAMES.SHIPPING_NOTICATIONS,rn {rn connection: redisConfig,rn }rn);
This code also defines names for the queue and job type that can be used in other parts of the application to avoid hard-coded strings.
Lastly, create a new file at src/services/notifications.service.ts and add the following code:
import { Job, Queue, Worker } from u0022bullmqu0022;rnimport {rn QUEUE_NAMES,rn SHIPPING_NOTICATIONS_QUEUE,rn JOB_NAMES,rn} from u0022../config/queues.configu0022;rnimport { redisConfig } from u0022../config/redis.configu0022;rnimport { mgClient } from u0022../config/mailgun.configu0022;rnimport { IMailgunClient } from u0022mailgun.js/Interfacesu0022;rnimport { EmailTemplateManager } from u0022../email-templatesu0022;rnimport { MailgunMessageData } from u0022mailgun.jsu0022;rnimport { NotificationJob } from u0022../typesu0022;rnrnexport class NotificationService {rn private queue: Queue;rn private mailgunClient: IMailgunClient;rn private templateManager: EmailTemplateManager;rnrn constructor() {rn this.queue = SHIPPING_NOTICATIONS_QUEUE;rn this.mailgunClient = mgClient;rn this.templateManager = new EmailTemplateManager();rn this.setupWorker();rn }rnrn private setupWorker() {rn const worker = new Worker(rn QUEUE_NAMES.SHIPPING_NOTICATIONS,rn async (job) =u003e {rn console.log(`Processing job: ${job.id}`);rn await this.processNotification(job);rn },rn {rn connection: redisConfig,rn }rn );rnrn worker.on(u0022completedu0022, (job) =u003e {rn console.log(`Job ${job.id} completed successfully`);rn });rnrn worker.on(u0022failedu0022, (job, error) =u003e {rn console.log(`Job ${job?.id} failed`, error);rn });rn }rnrn private async processNotification(job: Jobu003cNotificationJobu003e) {rn const { email, trackingNumber, status, metadata } = job.data;rnrn try {rn const template = this.templateManager.getTemplate(status);rn const emailData: MailgunMessageData = {rn from: process.env.MAIL_FROM,rn to: email,rn subject: template.subject,rn html: this.templateManager.renderTemplate(template.html, {rn trackingNumber,rn ...metadata,rn }),rn };rnrn await this.mailgunClient.messages.create(rn process.env.MAILGUN_DOMAIN,rn emailDatarn );rn } catch (error) {rn console.log(error);rn throw error;rn }rn }rnrn async queueNotification(data: NotificationJob) {rn await this.queue.add(JOB_NAMES.SEND_NOTIFICATION, data, {rn attempts: 5, // number of retry attempts before failing permanentlyrn backoff: {rn type: u0022exponentialu0022, // Retry using exponential backoffrn delay: 5000, // Delay in ms before retryingrn },rn });rn console.log(u0022Job queued successfullyu0022);rn }rn}
This code defines a NotificationService class that handles email notifications using a job queue system with BullMQ and Mailgun. This class initializes three private properties: queue, which is the queue where email jobs are added; mailgunClient, which is the Mailgun client for sending emails; and templateManager, which is an instance of the TemplateManager class that you created previously to manage and retrieve email templates. This class also defines the following methods:
setupWorkercreates a worker that listens for new email jobs and processes them. It logs job completion or failure.processNotificationfetches the correct email template, populates it with dynamic data, and sends the email using Mailgun.queueNotificationadds a new email job to the queue, with retry attempts and exponential backoff for failed attempts. This method can be called from other parts of the application to add jobs to the queue.
Integrating with application events
To send email notifications when an order status is updated, you need to queue a job in the notification system. To do this, open the src/controllers/order.controller.ts file and add the following import statement to import the NotificationService class:
import { NotificationService } from "../services/notifications.service";
Next, define a private property inside the OrderController class to hold an instance of the NotificationService class:
private notificationService: NotificationService;
Initialize this property by adding the following code inside the constructor method:
this.notificationService = new NotificationService();
Lastly, add the following code inside the updateOrderStatus method after await this.orderRepository.save(order); to queue a job once the order status is successfully updated:
// Send notificationrnthis.notificationService.queueNotification({rn email: order.user.email,rn trackingNumber: order.trackingNumber,rn status,rn metadata: {rn name: order.user.name.split(u0022 u0022)[0],rn },rn});
The transactional email workflow is now complete. You can go ahead and test if everything is working as expected.
Testing the workflow
To ensure everything is working correctly, start Redis by running the following command in your terminal:
docker compose up -d
After running this command, you can verify that Redis is up and running by listing the containers:
docker ps
This command shows a list of active containers, and you should see the redis container running.
Next, run the Express server using the command npm run dev and navigate to http://localhost:3000 in your browser. On the application’s dashboard, update the order status to any of the available options. Once updated, you’ll receive an instant response:
In your terminal, you’ll get a log that notifies you that the email-sending job has been queued successfully and is being processed:
Job queued successfully

Processing job: 1
And when it’s done:
Job 1 completed successfully
You’ll then receive an email with the updated order status:
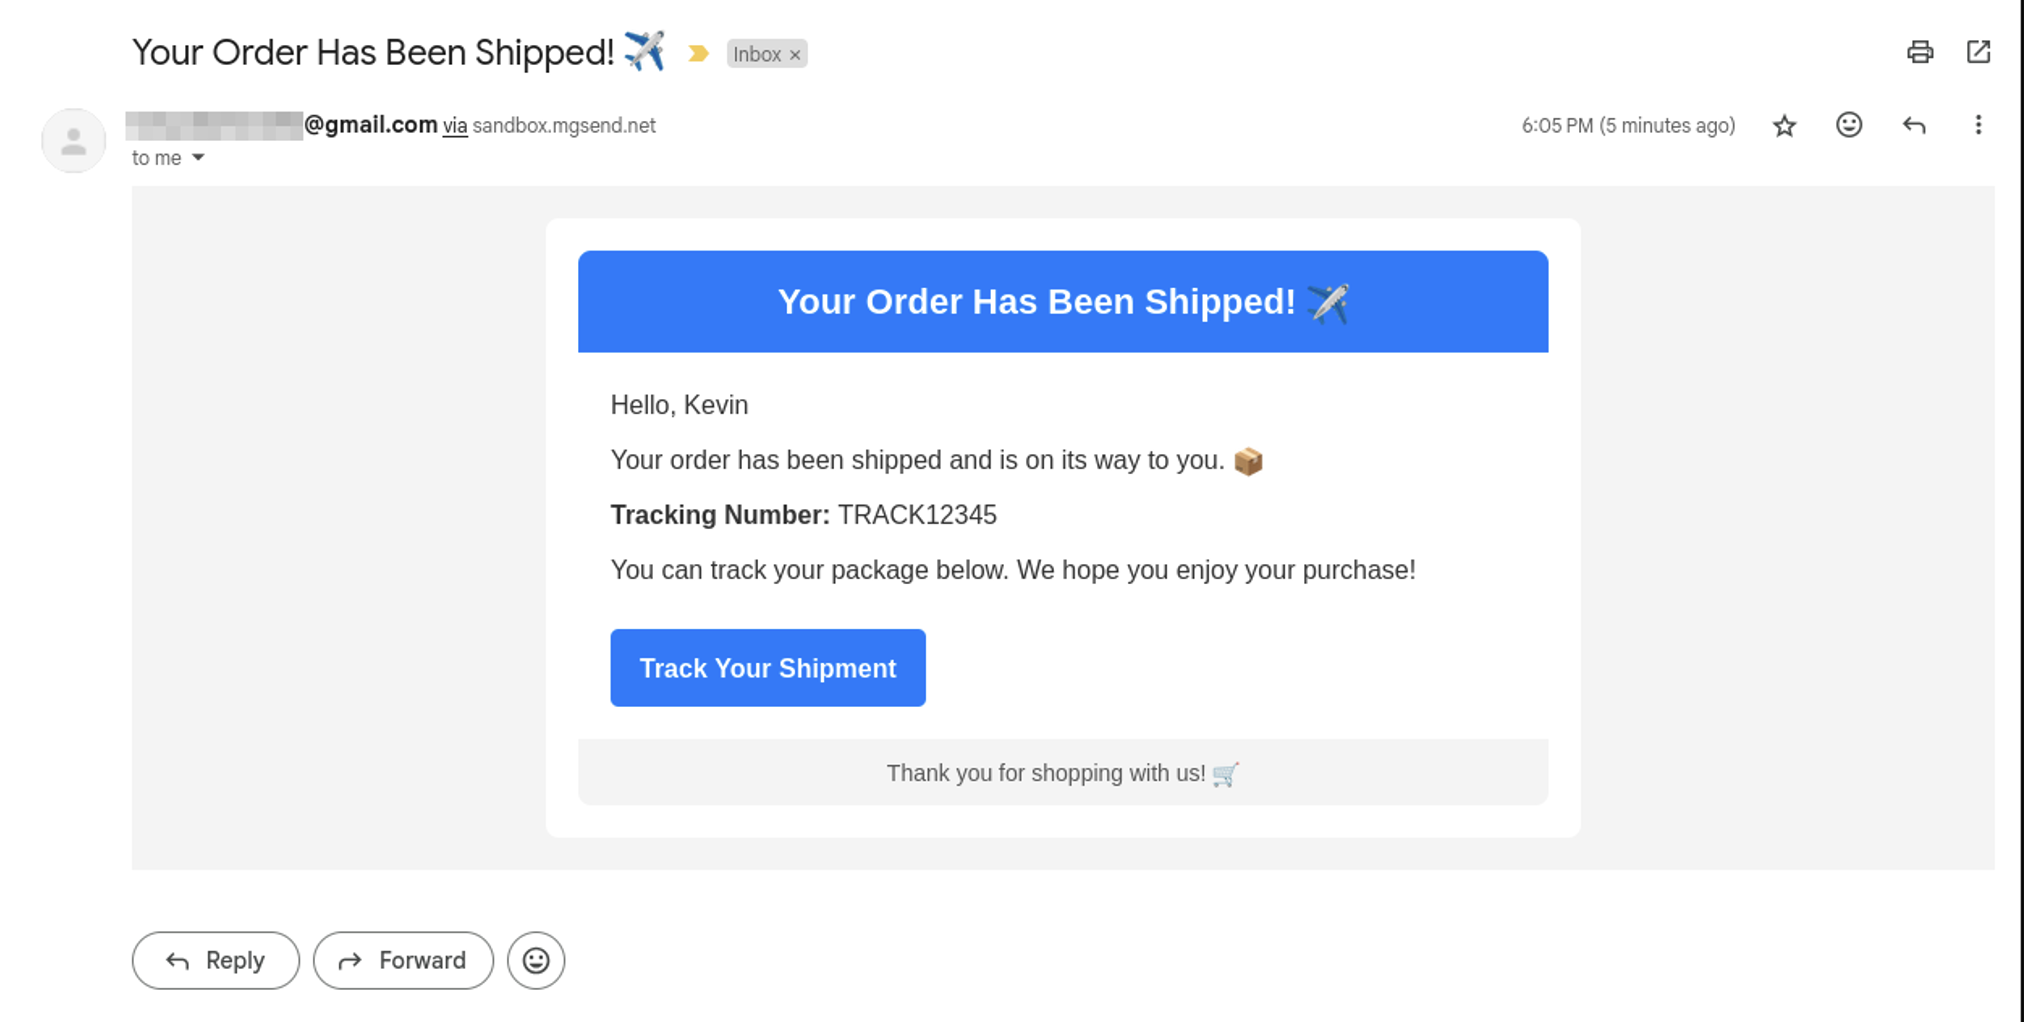
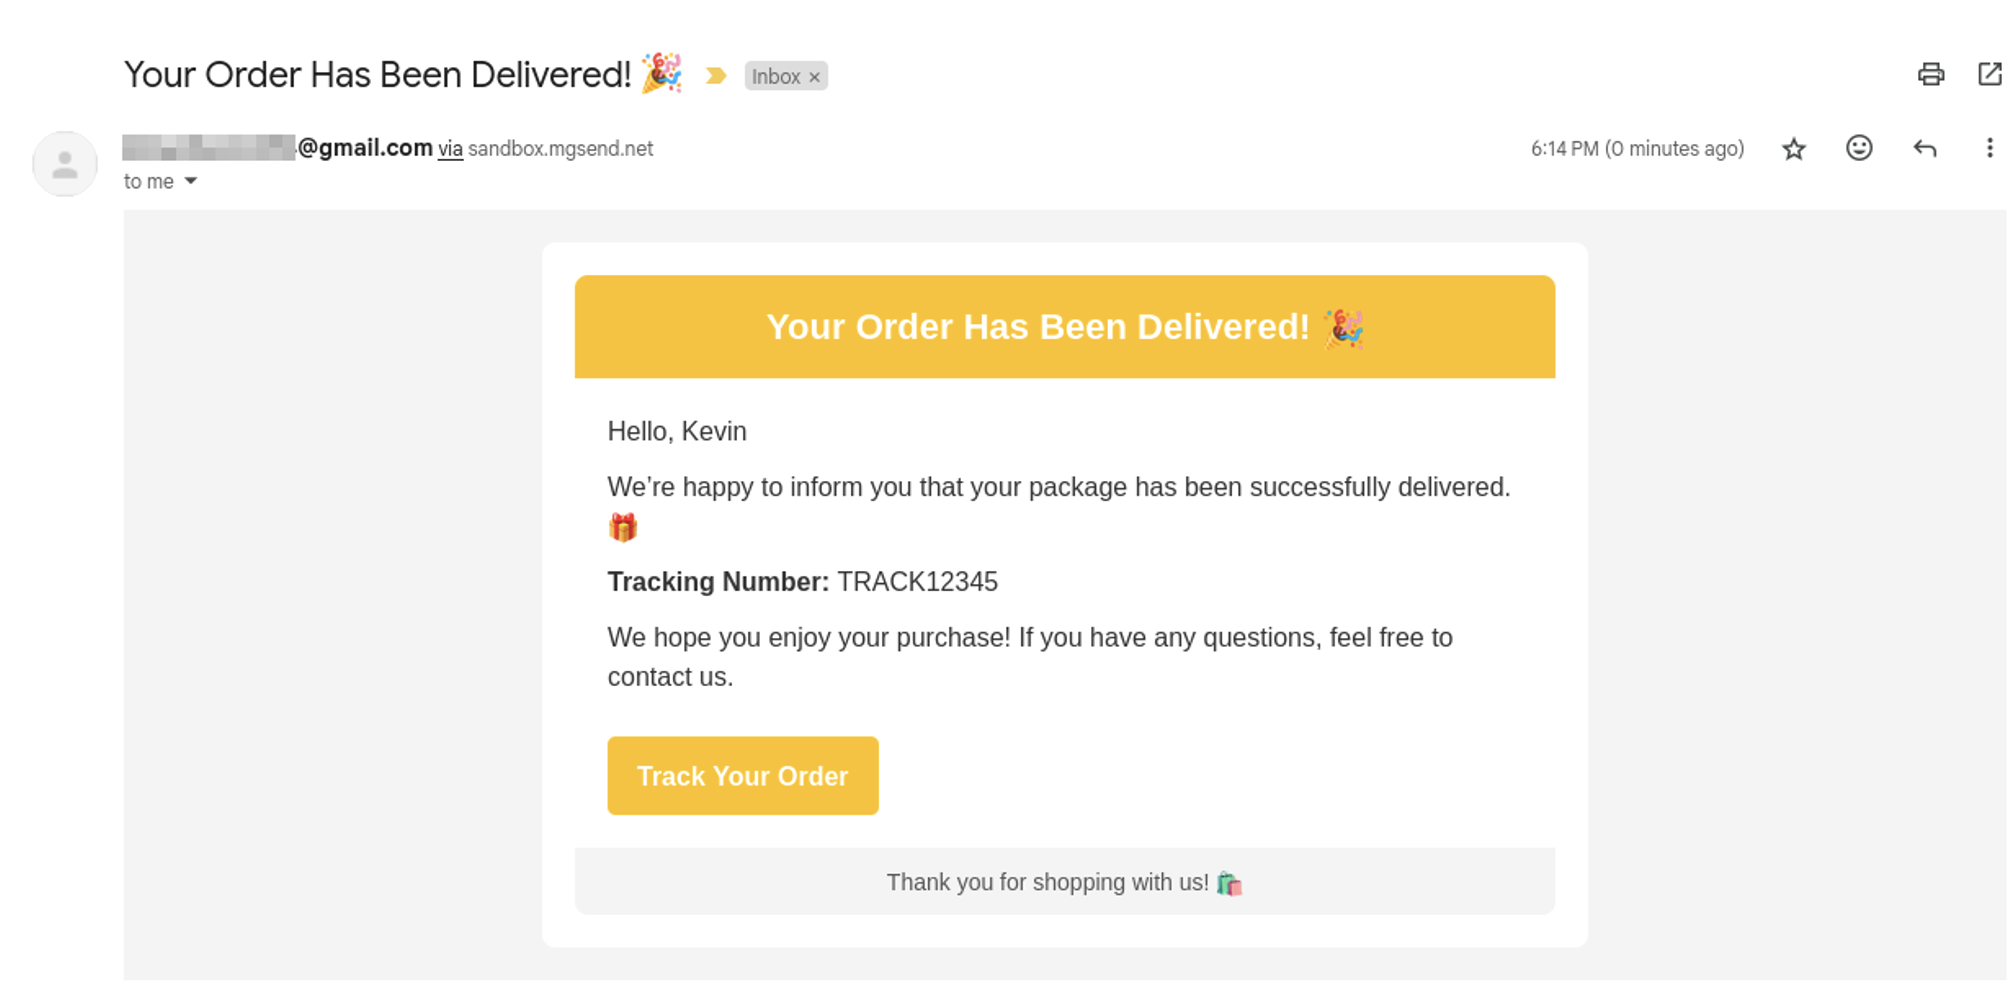
Every time you update the status of an order, the system will automatically send a corresponding email to the user, keeping them informed:
The full application code is available on GitHub.
Monitoring and managing emails
To ensure your transactional emails are reaching customers effectively, you need to monitor their delivery status and open rates and handle any failures. Mailgun provides a dashboard where you can track sent emails, check if they were delivered, opened, or clicked, and view bounce reports.
You can access this dashboard by navigating to Send > Reporting > Metrics in Mailgun:

However, open rates aren’t tracked automatically, and you need to configure them manually via your sending domain’s Settings tab:
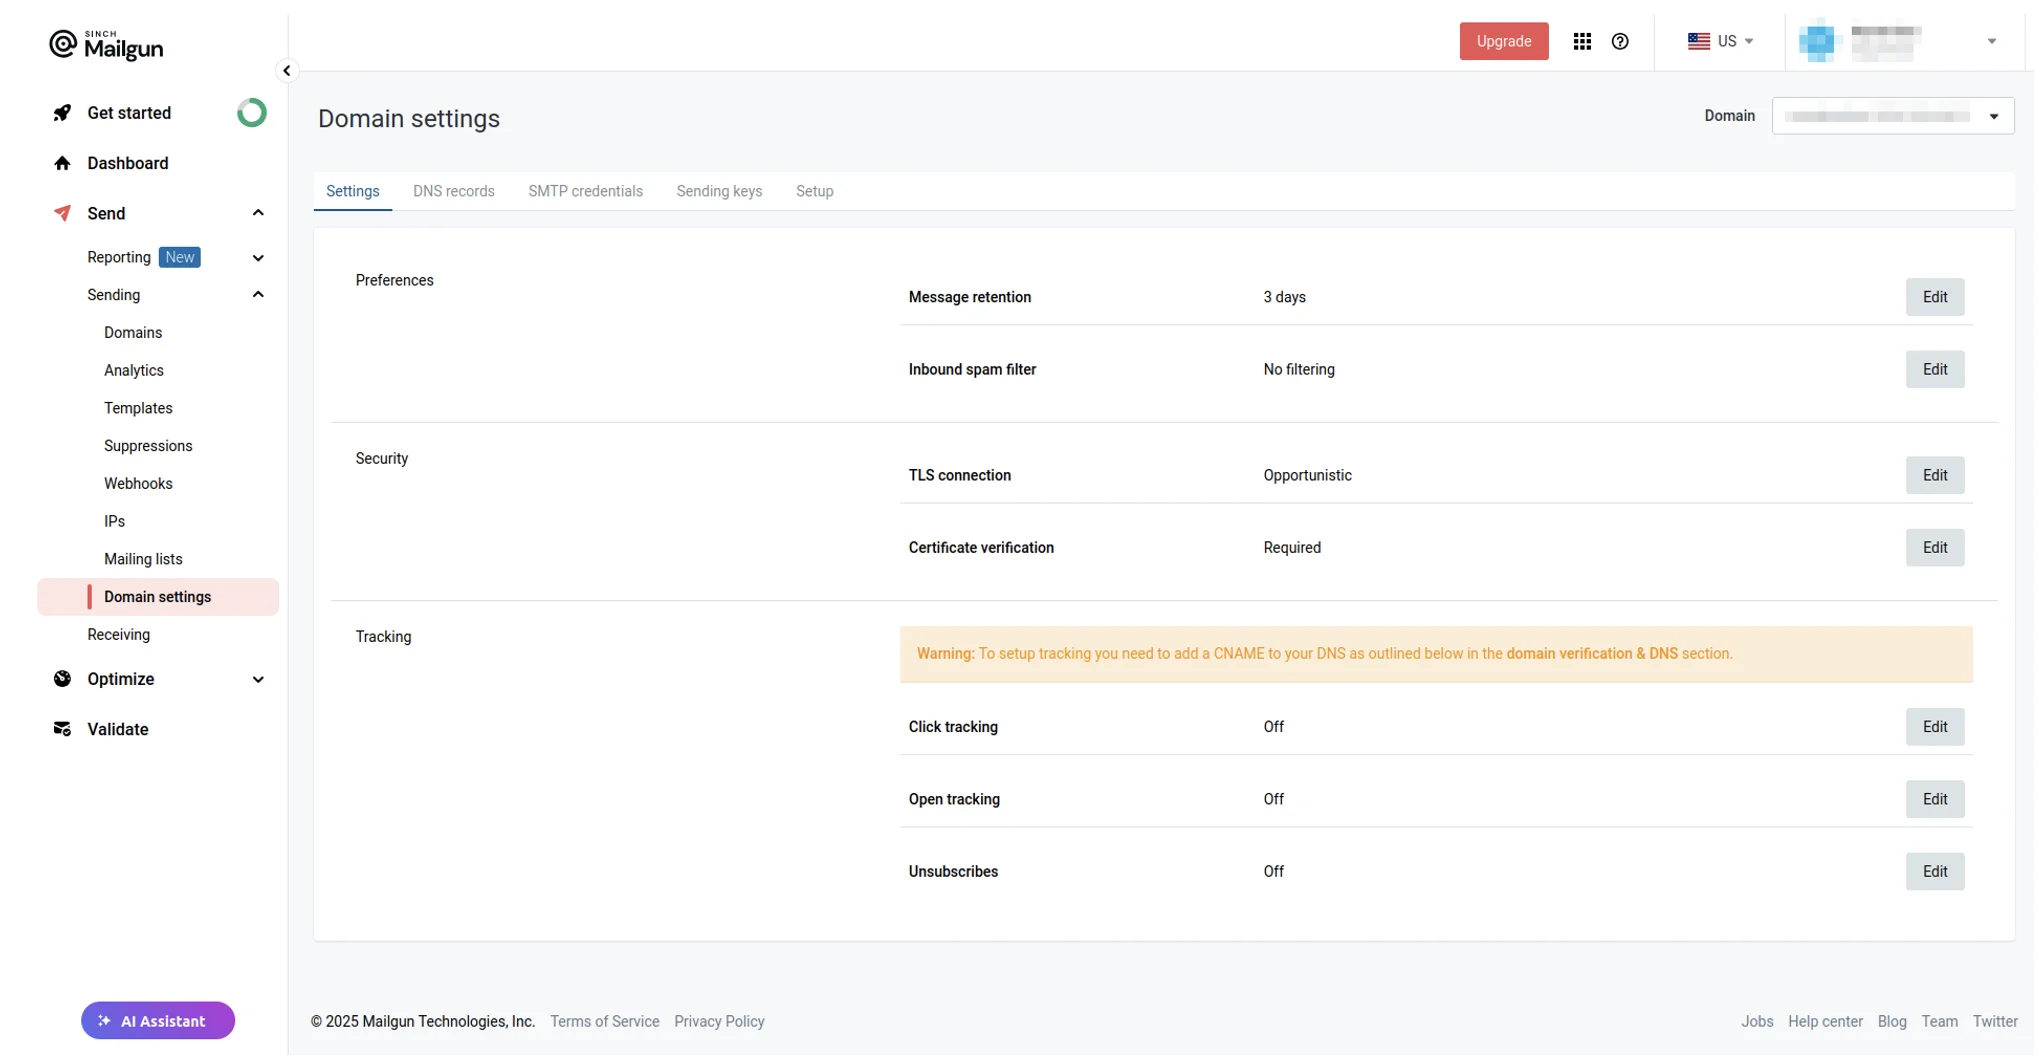
More information on how to track open and click rates is available in the official documentation.
Additionally, you can use webhooks to receive real-time notifications about failed deliveries and take appropriate action, such as retrying the email.
By actively monitoring your email performance, you can improve deliverability, reduce bounces, and ensure important notifications reach your customers.
Wrapping up
In this article, you learned how to set up a transactional email workflow for shipping notifications using Mailgun, BullMQ, and Redis. You learned how to set up Mailgun for sending emails, configure a job queue with BullMQ, and integrate it into an order update system to ensure customers receive real-time email notifications. This approach improves communication and enhances the overall customer experience.
Was this helpful? Be sure to subscribe to our newsletter for more tutorial content and deep dives like this one.