Dev Life
Verifying emails with node.js
From time to time, people on your mailing list might change jobs or email service providers. When they do, their emails change too, leaving invalid addresses on your list. These invalid emails can lead to high bounce rates, which harms your sender reputation and increases the chance of being blacklisted as spam.
Email validation helps prevent invalid emails by ensuring your emails reach real, active inboxes. By regularly verifying email addresses, you reduce the chances of being bounced, protect your reputation with internet service providers (ISPs), and increase the overall deliverability of your campaigns.
If you’re looking to validate a batch of email addresses, Mailgun offers a bulk email validation API that can help you do just that. In this tutorial, you’ll learn how to efficiently verify large lists of email addresses in Node.js applications with Mailgun and integrate the process into your application to ensure high deliverability.
Prerequisites
To follow along with this tutorial, you’ll need:
- Basic knowledge of Node.js
- A Mailgun account; to use bulk email validation, you must have a paid account
How to verify emails with Node.js and the Mailgun API
To verify emails with Node.js using the Mailgun API, you have to create a mailing list and add the emails you want to validate. You can then start a validation job on the mailing list and retrieve the results. But, before you can make requests to the Mailgun API, you need your authentication details from your dashboard. You also need to set up and verify a custom domain to create a mailing list.
Getting API keys and setting up a custom domain
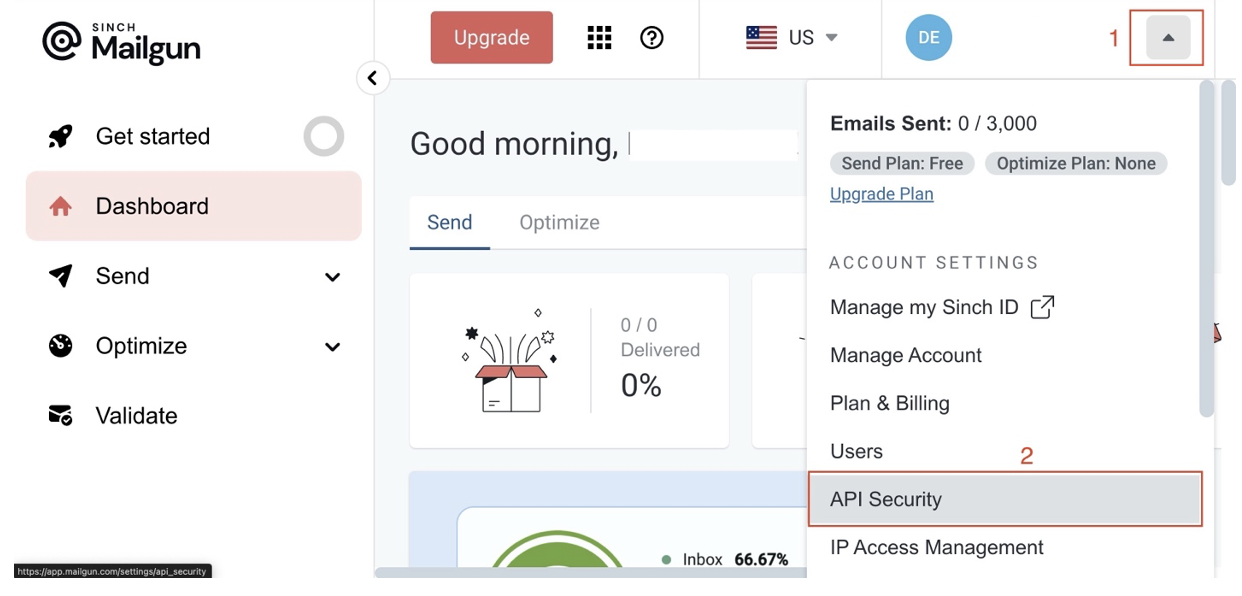
The Mailgun API authorizes requests using HTTP Basic Auth, which requires that you include a username and password in your Authorization header. To obtain the required details, log in to your Mailgun account, click the dropdown icon at the top right of your screen, and click API Security in the menu:
On the API Security page, click the Add new key button to reveal a modal with a form. Fill out the description on the form, click Create Key, copy the API key, and store it securely; this is your password, and you can only see it once:

Next, you can choose to add a custom domain to your Mailgun account and verify it. This step is optional and is only required in production environments. For this tutorial, you’ll use the default domain provided by Mailgun, which you can find by navigating to Send > Sending > Domains:
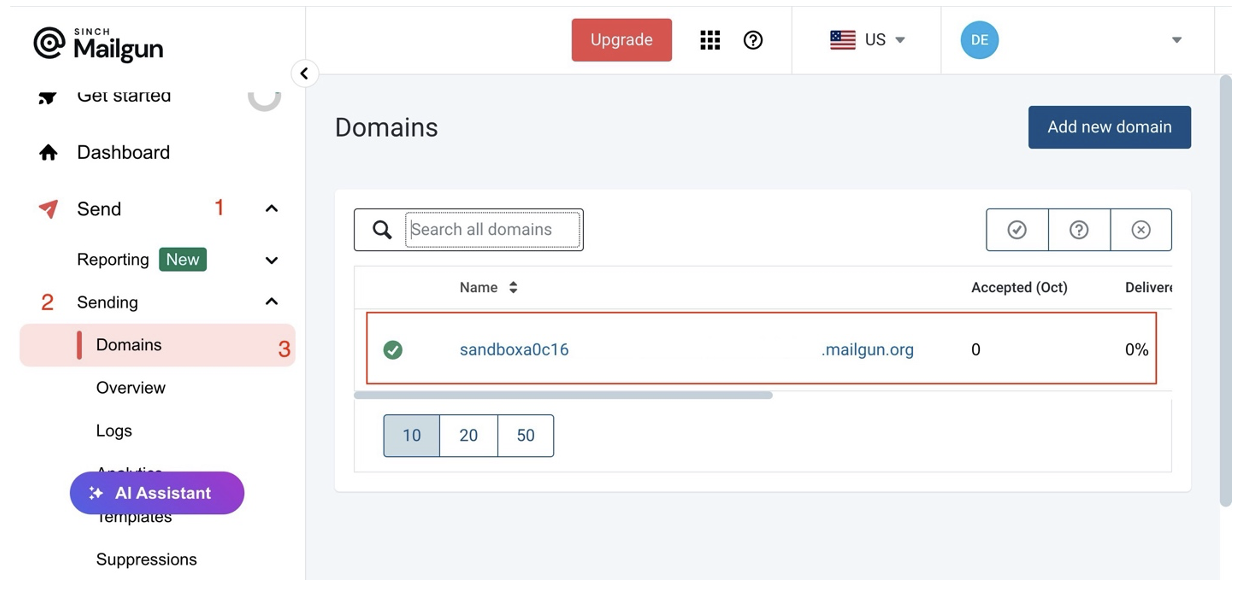
Note the default domain name; you’ll need it to create a mailing list.
After retrieving your authentication details and adding a custom domain (or noting the default), it’s time to set up a Node.js development environment where you’ll make requests to the Mailgun API.
Setting up your development environment
To set up a Node.js development environment, first create a new project directory and cd into it by running the following command:
mkdir bulk-email-validation && cd bulk-email-validationrnThen, initialize npm in your project by running this command:rnnpm init -yrnRun the following command to install the required dependencies:rnnpm install axios dotenv form-datarn
The installed dependencies include the following:
- Axios: This is a library that allows you to send requests and receive responses from an API. You’ll use Axios to communicate with the Mailgun API.
- Dotenv: This is a library that loads environmental variables to process.env. You’ll use it to manage your authentication details securely.
- Form-Data: This is a library that creates readable multipart/form-data streams. The Mailgun API only accepts data in multipart/form-data, so you need this library to submit forms to the API.
After installing these dependencies, create an index.js file and a .env file. In your .env file, store the following variables and replace the placeholder values with their actual values:
MAILGUN_USERNAME = apirnMAILGUN_PASSWORD = <API_KEY>rnThe value of your username must be api.rnIn your index.js file, add the following code block to import all the required dependencies and initialize dotenv:rnconst axios = require("axios");rnconst FormData = require("form-data");rnconst fs = require("node:fs");rnconst dotenv = require("dotenv");rndotenv.config();
This code block imports the dependencies required to make requests to the Mailgun API. In addition to the packages you installed earlier, the imports include the Node.js fs module, which you need to create a readable stream to the file containing your email list.
Now that your development environment is ready, you can validate email addresses in a mailing list.
Validating emails in a mailing list
As mentioned in the prerequisites, to use the bulk email validation service with Mailgun, you must have a paid account.
To create a validation job with the Mailgun API, you need to make a POST request to https://api.mailgun.net/v4/address/validate/bulk/${listId}, where listId is any arbitrary value you assign to the validation job.
This endpoint accepts a form with a CSV file containing the email addresses you want to validate. The CSV file’s column header for emails needs to be either email or email_address, and the format must be either raw CSV or gzip. You can include an unlimited number of email addresses in the file; however, the file size cannot exceed 25 MB.
The form key for the CSV file must be file, and the value must be a readable stream to the file path of your CSV file.
You can add the code block below to your index.js file to implement a function to create a bulk validation job:
const createBulkValidationJob = async (listId) => {rn try {rn // Create a new form data objectrn const form = new FormData();rnrn // Add the file to the formrn form.append("file", fs.createReadStream("PATH_TO_CSV_FILE"));rnrn const response = await axios.post(rn `https://api.mailgun.net/v4/address/validate/bulk/${listId}`,rn form,rn {rn headers: {rn ...file.getHeaders(),rn Authorization:rn "Basic " +rn Buffer.from(rn `${process.env.MAILGUN_USERNAME}:${process.env.MAILGUN_PASSWORD}`rn ).toString("base64"),rn },rn }rn );rnrn console.log(response.data);rn } catch (error) {rn console.error(error);rn }rn};rnCalling this function with a listId should return a response similar to this:rn{rn id: 'validation', // Arbitrary value you assigned to the validation jobrn message: 'The validation job was submitted.'rn}
Validating a mailing list takes time; to get the validation results, you have to make a request to the API with the id of your validation job.
Fetching validation results
To fetch the results of a validation job, you need to make a GET request to https://api.mailgun.net/v4/address/validate/bulk/${listId}, where the listId is the id you assigned to your validation job.
Add the following code block to your index.js file to implement a function to fetch your validation results:
const getValidationResults = async (listId) => {rn try {rn const response = await axios.get(rn `https://api.mailgun.net/v4/address/validate/bulk/${listId}`,rn {rn headers: {rn Authorization:rn "Basic " +rn Buffer.from(rn `${process.env.MAILGUN_USERNAME}:${process.env.MAILGUN_PASSWORD}`rn ).toString("base64"),rn },rn }rn );rnrn console.log(response.data);rn } catch (error) {rn console.error(error);rn }rn};rnCalling this function with a listId should return a response like this:rn{rn created_at: 1728170695,rn download_url: {rn "csv": "https://s3.aws-example.com/downloads/bulk_validation_oct_2024.csv.zip",rn "json": "https://s3.aws-example.com/downloads/bulk_validation_oct_2024.json.zip"rn },rn id: 'validation',rn quantity: 10,rn records_processed: 10,rn status: 'uploaded',rn summary: {rn result: {rn catch_all: 0,rn deliverable: 3,rn do_not_send: 0,rn undeliverable: 1,rn unknown: 6rn },rn risk: { high: 1, low: 3, medium: 0, unknown: 6 }rn }rn}
Here’s a breakdown of the results:
created_at: A timestamp of when the job was completed (1728170695).download_url: Links to download the results in CSV and JSON formats.Quantity:The total number of emails processed (10).Status: The validation job status (uploaded).Result: The outcome of email validation:- catch_all: No addresses are from catch-all domains.
deliverable: Three addresses are valid and deliverable.do_not_send: No addresses are flagged as “do not send.”undeliverable: One address is invalid or undeliverable.unknown: Six addresses couldn’t be verified.
Risk: A breakdown of email addresses by risk:high: One address is high-risk and likely undeliverable or problematic.low: Three addresses are considered low-risk and safe to use.medium: No addresses are medium-risk and might require caution.unknown: Six addresses couldn’t be classified.
Error handling and debugging
When using the Mailgun API for bulk email validation, you may encounter a few common errors. Here’s a breakdown of these errors and tips on how to troubleshoot them:
- List already exists: This 409 status code error indicates a validation job with the same listId as the one you’re trying to create already exists. You can fix this error by changing the listId and retrying your request.
- List CSV file missing: This 400 status code error indicates that the API couldn’t find the CSV file in your request because you’re using the wrong file key. Make sure your file key is set to file, then try again.
- CSV File must contain the key email or email_address: This 400 status code error indicates that your CSV file is missing an email or email_address column header. You can fix this error by editing your CSV file to contain either of these headers.
- CSV file is malformed: This 400 status code error indicates that your file is in an unsupported format. Make sure that the file containing your emails is in CSV or gzip format.
- unauthorized: This 401 status code error indicates an issue with your authentication credentials. You can fix this by ensuring your API keys are valid.
Best practices for bulk email validation
To ensure your bulk validation jobs work as expected, here are a few best practices you can follow:
- Respect API limits: Make sure you adhere to the limits imposed by the Mailgun API to ensure that all your requests are processed. For instance, CSV files must not exceed 25 MB; files larger than this will trigger a 400 response. Additionally, the maximum number of validation jobs that can run in parallel is five. Exceeding this limit will result in a 400 response.
- Use batching to avoid API limits: If you’re validating a large data set of emails, batch them into groups to manage the file size, but watch out for parallel processing limits.
- Check for specific status codes: Different errors require different handling strategies. For instance, a 400 Bad Request likely indicates an issue with the request format; do not retry. Instead, log the error and fix the request. A 500 Internal Server Error indicates a server-side issue, and you can retry after a backoff period.
Wrapping up
In this tutorial, you explored how to verify emails using Node.js and the Mailgun API. You learned how to create mailing lists, add members to those lists, and validate the email addresses in bulk.
Regular bulk email validation can significantly improve your email deliverability rates, maintain a clean, effective mailing list, ensure your messages reach their intended recipients, and help you maintain a good sender reputation.