Product
Understanding email address validation with external services
Discover how to validate individual and bulk email addresses with Mailgun’s email validations API and how it can help boost your email delivery and sender reputation.
Product
Bounce.
That’s not something you want to hear when sending out your email campaign.
You’ve done your market research, created a responsive HTML email template, written brilliant copy, and added eye-catching graphics. Your email marketing campaign is bound to s쳮d, right?
It all depends on your email deliverability and your email delivery rate. Deliverability describes what portion of your emails end up in the recipient’s Spam folder versus their inbox. But your delivery rate represents how many of your emails are even delivered.
You can crack the email delivery rate problem several ways, like implementing validation rules with regular expressions (regex) and other custom validations while collecting email addresses for campaigns. But at the end of the day, these options have their limitations. Don’t worry – that’s why Mailgun has you covered with our email validations API.
In this article, we’ll go over three ways to perform email validations on Mailgun. Then, we’ll discuss how to integrate the Mailgun API with an external client, like Salesforce, so that you can use our email validations API to superpower your digital marketing efforts across other platforms.
Email address validation, also called email verification, is a process that checks if an email address is deliverable – or, simply put, a valid email address.
For instance, many of your users may make spelling or formatting mistakes while typing in their emails, especially if they enter the information from mobile devices with small screens. Email validation catches these syntax errors or typos and assesses whether the bad data is an honest mistake, a purposeful misdirect, or a potential cybersecurity threat.
Email address validation is important because it can do the following:
Why leave your email campaign’s success up to chance when you can easily validate email addresses?
At Mailgun, we provide an email verification service fully integrated into our suite of email deliverability features and services. You won’t have to switch back and forth between different platforms and data sources to check if your email campaigns will bounce.
Our Email validations API can be queried at the following endpoint: https://api.mailgun.net/v4/address/validate. The API programmatically inspects multiple aspects of an email address to check the following:
We know how important it is for you to maintain a list of verified and deliverable email addresses to reduce the ratio of bounced emails that may harm your sender reputation.
Mailgun offers email address verifications in three ways:
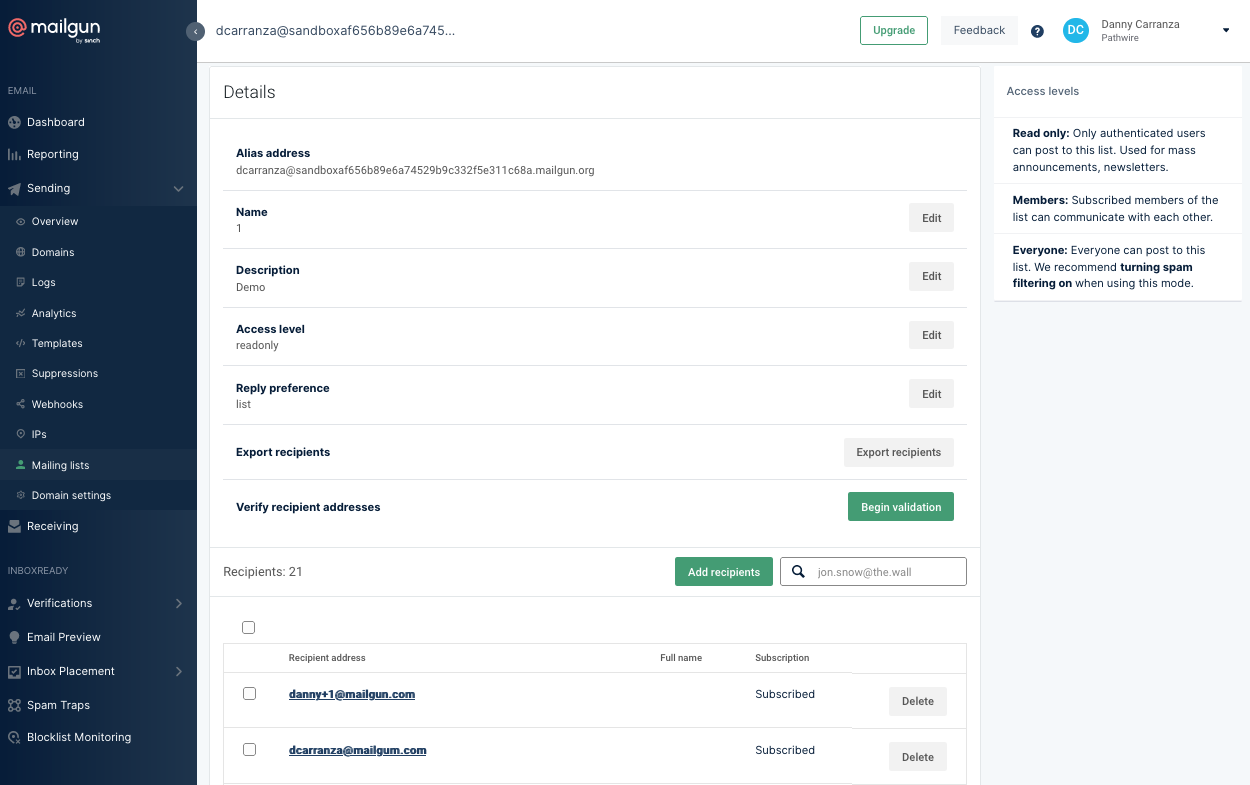
If you’re not ready to dive into the code, check out our Mailing List feature on our platform, as shown below. You can verify members of a Mailing List with the click of a button from your Control Panel. Remember that you can only have a maximum of 2.5 million members on your Mailing List.
If you’re up for some code, let’s go over how to perform a single email verification or a bulk email verification via our API below.
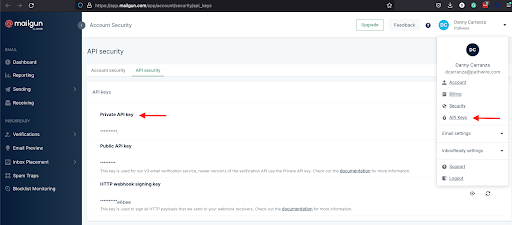
Before diving into the tutorials, make sure you’ve signed up for Mailgun if you haven’t already. Once you have an account, navigate the Dashboard, click on the API Security tab, and copy your Private API Key, as shown below. You’ll need this for authentication purposes.
The following tutorials will use our Mailgun API, so familiarity with RESTful APIs, curl, and JSON is highly encouraged, but not required.
Let’s start with the most basic use case: verifying one email address. We can make a GET request to the email validations API as follows:
                                curl --user 'api:PRIVATE_API_KEY' -G \
    https://api.mailgun.net/v4/address/validate \
    --data-urlencode address='foo@mailgun.net'
Remember to supply your Private API Key instead of the PRIVATE_API_KEY from the example above. In addition, you can supply the email address you’re verifying as a parameter for address.
If you’ve written your query correctly, you should get a response as follows:
                                {
    "address": "foo@mailgun.net",
    "is_disposable_address": false,
    "is_role_address": false,
    "reason": [],
    "result": "deliverable",
    "risk": "low"

}
The two most important parts of this response are the result and risk parameters.
The result parameter is our primary assessment of the email address you submitted for verification. It can contain the following values:
deliverable: The recipient address is valid and should accept an email from you.undeliverable: The recipient address is invalid and will result in a bounce if you send a message.do_not_send: The recipient address is highly risky and will negatively impact your sender reputation if you send a message to this address.catch_all: The validity of the recipient address cannot be determined as the Email Service Provider (ESP) accepts all emails, regardless of whether or not the recipient’s mailbox exists.unknown: The validity of the recipient address can’t be determined for several potential reasons. Please refer to the associated reason array returned in the response.The risk parameter is our assessment of how sending messages to a given address may impact your sender reputation. This parameter can contain the following values:
low: The email address is likely legitimate and sending an email to this address has a low likelihood of damaging your sender reputation if the address has been obtained in a legitimate manner. medium: This is our default or neutral state for risk calculation. An email address that isn’t deemed a low or high risk will default to a medium risk.high: An email address that has a high risk of damaging your sender reputation or when used for verification on your platform. You should examine this email address to challenge its validity.Here’s a brief explanation of the other parameters in the response body:
address: This returns the email address being verified.is_disposable_address: This key returns a value of true or false, based on whether or not the verified email is a disposable email address.is_role_address: This returns a value of true or false, based on whether or not the verified email address is a role address.reason: This array provides additional information if we can’t properly verify an email address, such as mailbox_does_not_exist or high_risk_domain. If your risk is medium or high, this array will provide an explanation.And that’s it for performing a basic email address validation. Note that you can also perform a single email verification via a POST request. Check out our API documentation for more details.
But what if you have hundreds (or thousands!) of email addresses to verify? Sending one at a time is an inefficient use of your time and computing resources.
Bulk verification allows you to verify a list of email addresses. Once the verifications have all been completed, you can access the results via a download_url link. Keep in mind, you must provide your list of email addresses as a raw CSV or GZIP. You also must upload your file as a multi-part/form-data where the file is defined by file.
Below, let’s look at two API requests to manage your bulk verifications:
Once you’ve prepped and uploaded your list of email addresses according to the specifications above, it’s easy to create a bulk email verification job. We’ll use a POST request to our email validations API as shown below:
Remember to substitute your Private API Key for YOUR_API_KEY, to name your list for LIST_NAME, and to insert the path of your file for file.
You should receive the following response:
                                {
 "id":"myemails"
 "message": "The validation job was submitted."
}
You’ll receive a message confirming your job was successfully submitted. The id is the list name you provided.
We promise your bulk verifications won’t take very long – think minutes, not hours. We’re able to do this because our email verification tool uses our cache of billions of email addresses as its primary source to enable lightning-fast verification. But just in case you need to check the status of your bulk verification job, you can use the following GET request:
                                curl -s --user 'api:YOUR_API_KEY' -G \
    https://api.mailgun.net/v4/address/validate/bulk/LIST_NAME
Remember to substitute your Private API Key for YOUR_API_KEY and to name your list for LIST_NAME. Here’s a sample response to your request:
                                {
  "created_at": "Tue, 26 Feb 2021 21:30:03 GMT",
  "download_url": {
    "csv": "<download_link>",
    "json": "<download_link>"
  },
  "id": "bulk_validations_sandbox_mailgun_org",
  "quantity": 207665,
  "records_processed": 207665,
  "status": "uploaded",
  "summary": {
    "result": {
      "deliverable": 181854,
      "do_not_send": 5647,
      "undeliverable": 12116,
      "catch_all" : 2345,
      "unknown": 5613
    },
    "risk": {
      "high": 17763,
      "low": 142547,
      "medium": 41652,
      "unknown": 5613
    }
  }
}
You can see a summary of your email verifications, including the result and risk breakdowns. You can also see your job’s status, which is the current state of the list verification request, like created, processing, completed, uploading, uploaded, and failed.
Once your bulk verification job has been successfully uploaded, you can use the download_url links to access details about each email address in your list.
And just like that, you’ve verified your emails and you’re ready to send off your email campaign.
Let’s look at how a Salesforce administrator can configure Salesforce for use with Mailgun’s email validation API. To do so, we’ll use External Services, which is a way to connect Salesforce to external APIs without using code. Then, we’ll run an email validation from Salesforce. We’ll do this with the following steps:
Let’s go over these steps in more detail. Keep in mind, you’ll need a Mailgun account with a plan that includes our Mailgun Optimize email validation functionality.
We’ll start by creating a Named Credential. To do so:
1. On the Salesforce platform, go to Setup > Named Credentials.
2. Click the New button to create a new Named Credential.
3. Specify the following values:
4. Click Save.
Now, let’s use External Services on the Salesforce platform to integrate the Mailgun API. We’ll do so with the following steps:
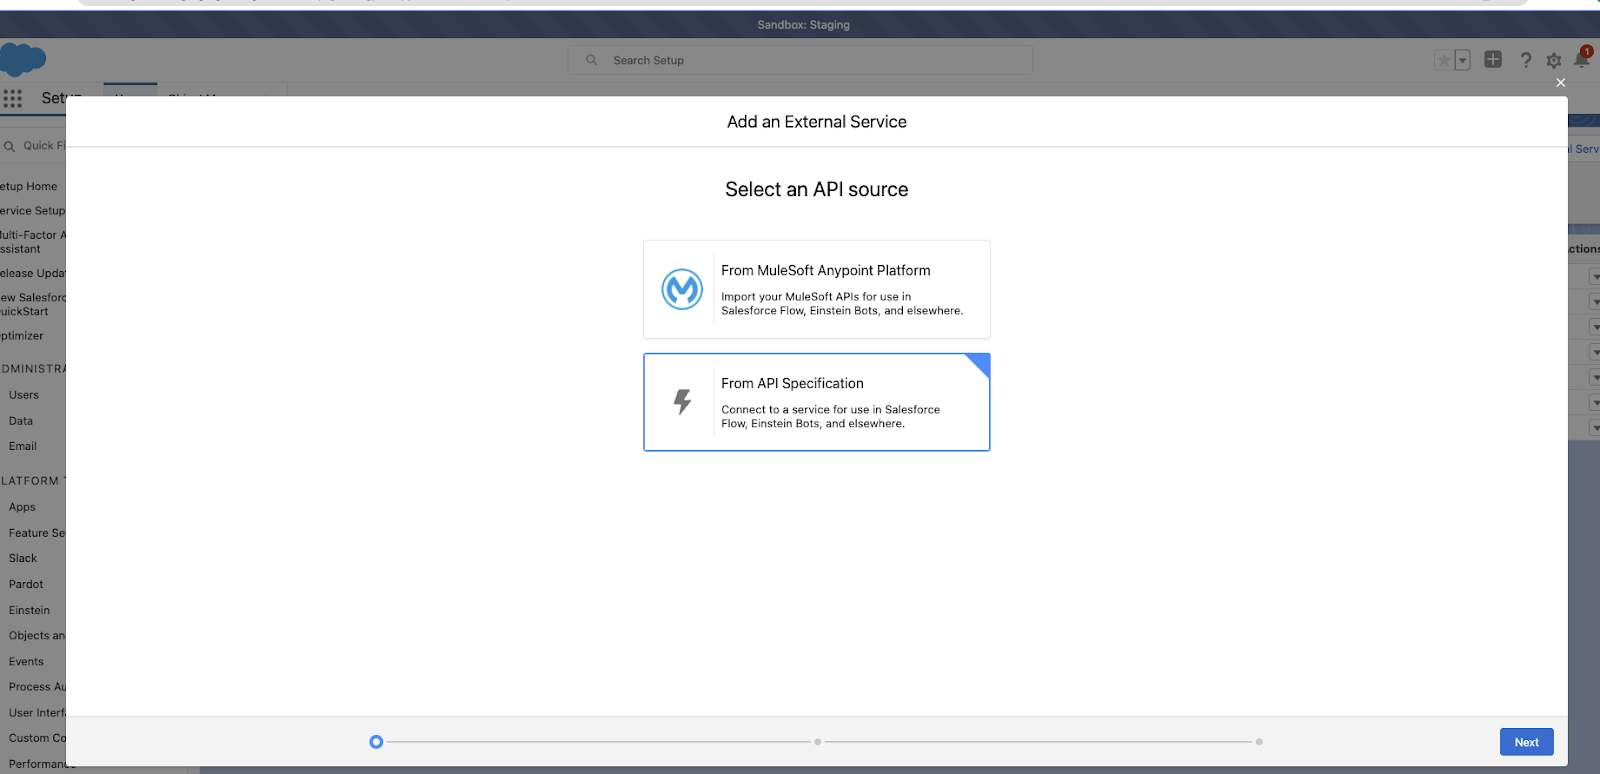
1. In Salesforce, go to Setup > External Services.
2. Select New External Service.
3. Select From API Specification, and click Next
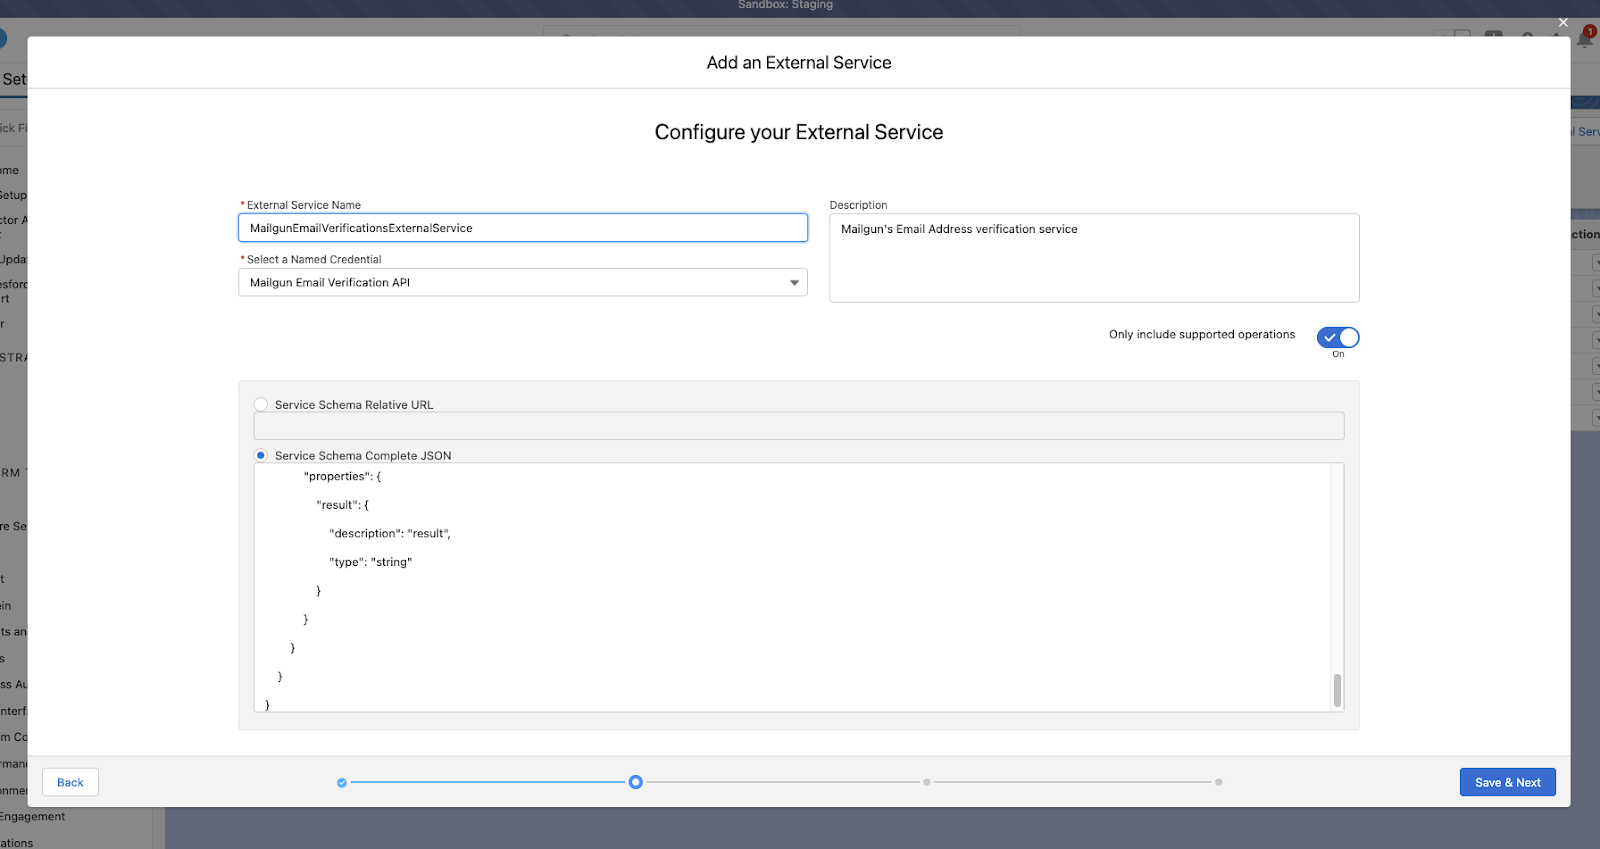
4. Specify these values for the following fields:
                                {

    "swagger": "2.0",

    "info": {

        "description": "Mailgun Email Address Validation API",

        "version": "4.0",

        "title": "Mailgun Email Address Validation API"

    },

    "host": "api.mailgun.net",

    "schemes": [

        "https"

    ],

    "paths": {

        "/v4/address/validate": {

            "get": {

                "summary": "Validate an Email Address",

                "produces": [

                    "application/json"

                ],

                "parameters": [

                    {

                        "in": "query",

                        "name": "address",

                        "description": "Email Address to be Verified",

                        "required": true,

                        "type": "string"

                    }

                ],

                "responses": {

                    "200": {

                        "description": "Result of the Email Address Validation",

                        "schema": {

                            "$ref": "#/definitions/validationResponse"

                        }

                    }

                }

            }

        }

    },

    "definitions" : {

        "validationResponse" : {

            "properties": {

                "result": {

                    "description": "result",

                    "type": "string"

                }

            }

        }

    }

}
Your External Service should look similar to this:
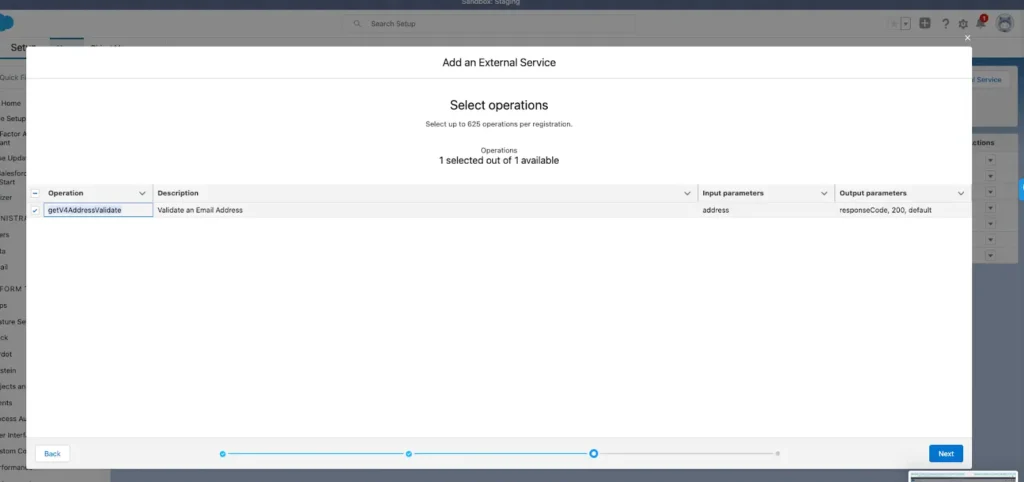
5. Select operation getv4AddressValidate and click Next.
6. Click Done.
Now that we’ve superpowered Salesforce with Mailgun, we’ll create a Screen Flow to use the Mailgun email validation API in Salesforce.
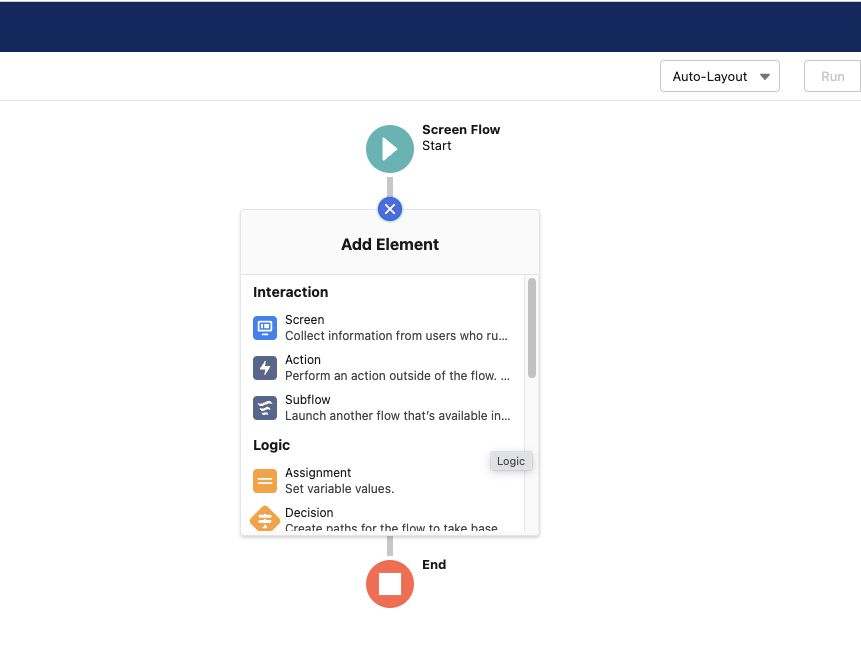
1. In Salesforce Setup, go to Flows > New Flow.
2. Select Screen Flow and click Create.
3. The flow will simply be three elements: a screen element, an action element, and another screen element
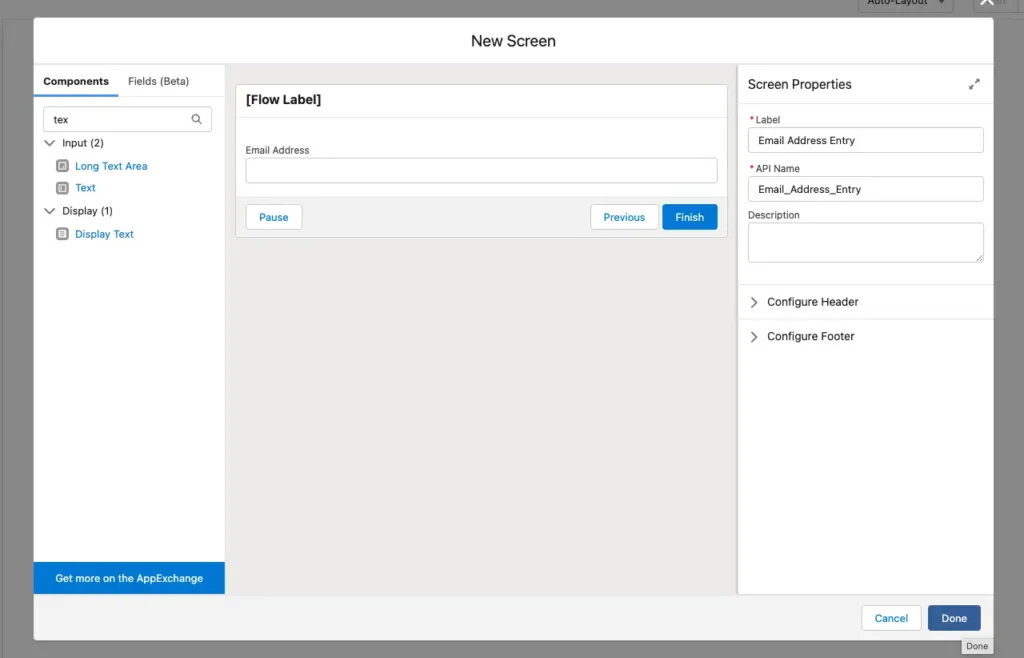
4. Add the first screen element:
The element name can be Email Address Entry and this element will only have one Text type field on it. Call this field “Email Address,” as shown below.
5. Add an action element below the screen element. In the flow, create a new resource by clicking the New Resource button. Add these field values to the new resource and save it:
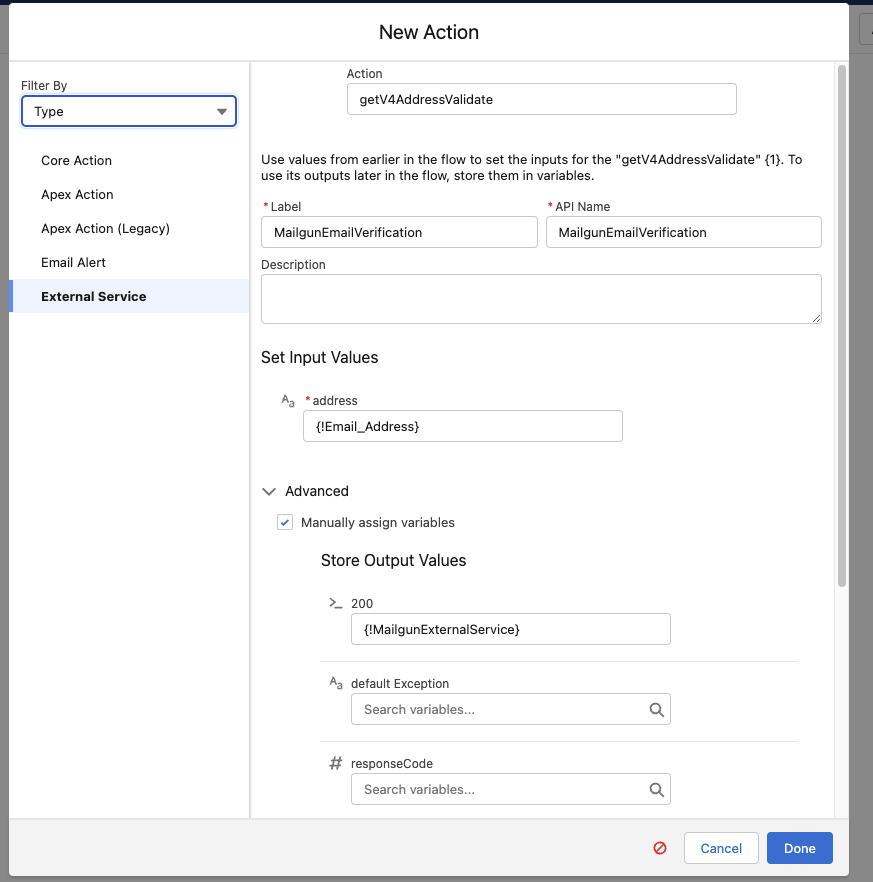
6. Add an action element to the flow where the Type is External Service. The Action field should be your external service, and the input values just need to be the Email Address from screen element 1 above. Make sure you select Advanced > outputs and enter the apex defined variable you created above called MailgunExternalServices. Your action element should look like this:
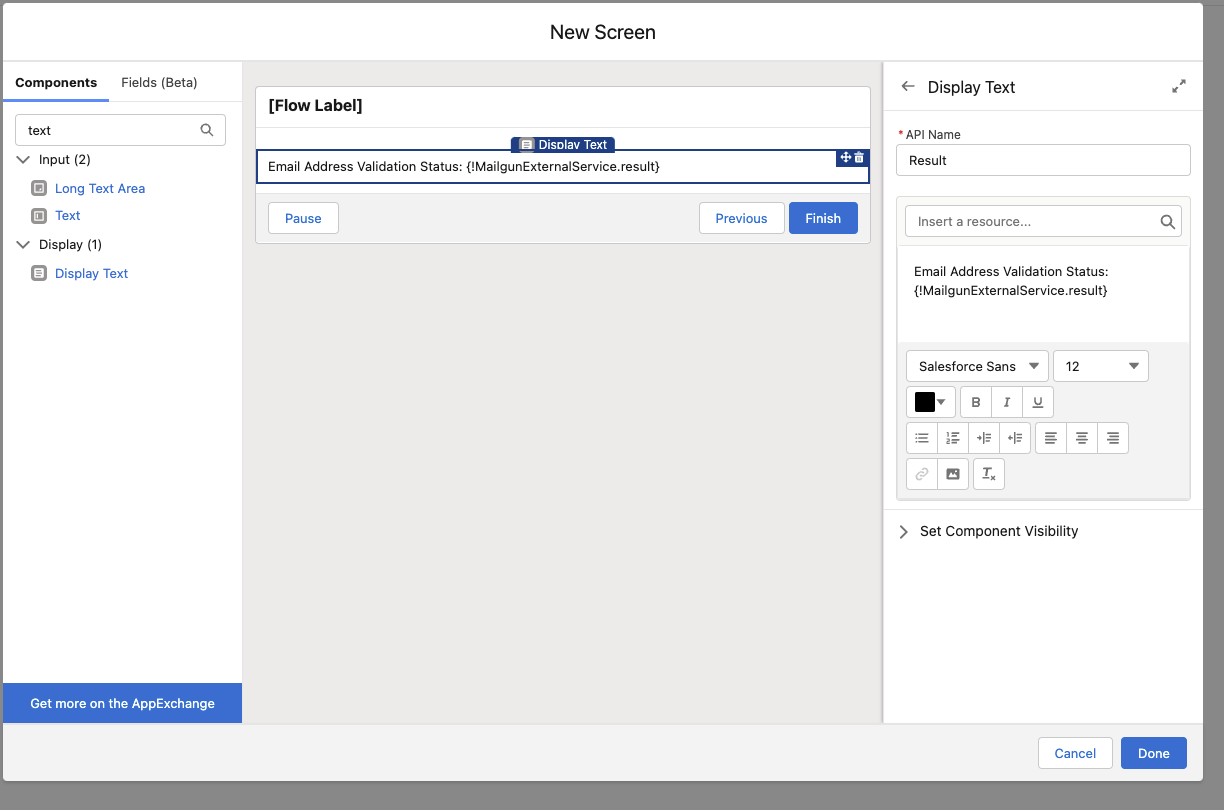
7. Now add your final screen element. This will only have a Display Text type field on it, and it will output the result of the action from the external service call above. The screen should look like this (note that the output value {!MailgunExternalService.result} can be found above the display text by clicking Insert a Resource and then selecting the output of your external service variable as shown below:
That’s all! Now let’s see it in action.
You’ve successfully integrated the Mailgun API into your Salesforce organization. Let’s see how it all works.
To test the flow you created above:
You should get a result from the Mailgun API that indicates if the email address you input is a deliverable or undeliverable email address. Want to learn more? Watch this video to see what this flow looks like in use.
We’ve gone over some methods to verify your email address with our user interface and our Mailgun email validations API. We’ve also given you tips to integrate our API with external clients like Salesforce.
Now, you should be well on your way to checking your email addresses’ validity in real-time and get sending! Still have questions? Don’t hesitate to reach out!