Deliverability
What is an SPF record, and how does it work? Everything you need to know
SPF doesn’t refer to how long you can wait before you have to reapply your sunblock (seriously, go get some). Instead, the term “SPF” refers to a security measure that helps keep your sender ID and domain safe.
Today, we’re going to learn all about SPF records, why they’re important, and how to put them to work.
Ready? Let’s dive in.
SPF records, explained
Simply put, an SPF record keeps track of all the sources that can send messages from a particular domain name.
You might also hear it called a, “DNS SPF record” because it’s a kind of DNS TXT record.
SPF stands for Sender Policy Framework and ensures that an unauthorized entity does not have the power to send email under your domain identity. If SPF records didn’t exist, email spoofing (pretending to send from someone else’s email address) would be out of control as anyone could claim to send a message on behalf of a legitimate organization – often in an attempt at phishing. But regardless of the perpetrator’s intent, failing to guard the use of your domain can damage your business and reputation.
SPF records are a relatively recent invention, as they were developed in the early 2000s – probably while you were listening to Britney Spears on TRL or watching the newest Harry Potter movie. However, they’ve become widely used in a relatively short period of time thanks to their benefits and ease of use.
SPF is just one of several email authentication protocols that help keep subscribers safe and the inbox manageable. DKIM, DMARC, and BIMI are others you may want to learn about.
How do SPF records work?
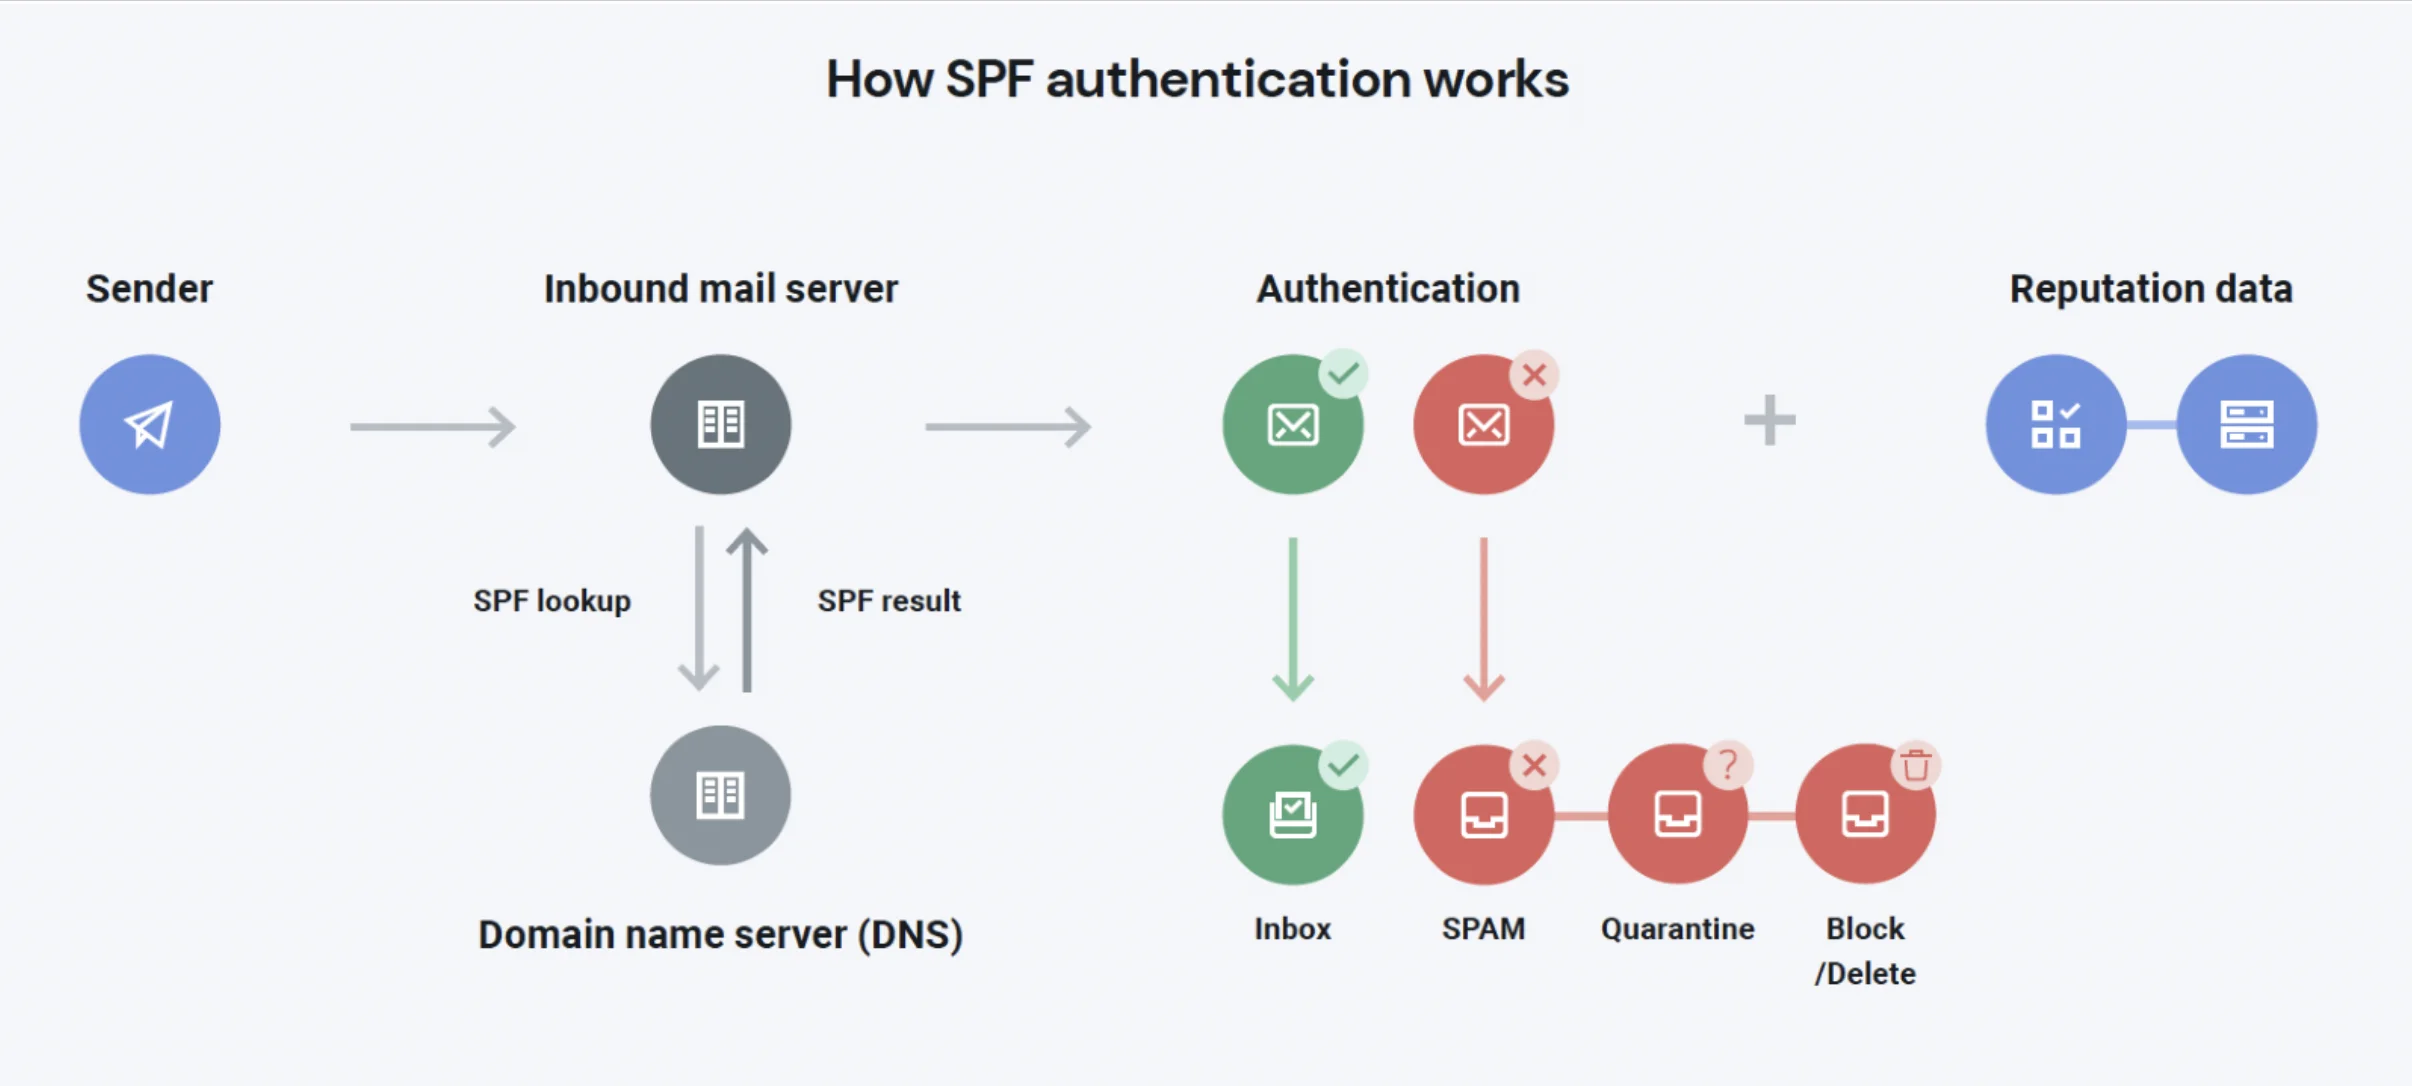
SPF records are essential for safeguarding email authenticity and preventing spoofing. These records are created by the domain owner to specify which email servers are authorized to send email from their domain. Here’s how they work:
When an email is sent, the receiving mail server checks the SPF record in the DNS to verify if the email sender’s IP address is authorized. The SPF record consists of qualifiers such as “include,” “a,” and “mx,” which indicate the mechanisms for validating the sender’s identity. This process is known as SPF validation. SPF validation is particularly critical for large email providers like Gmail, Yahoo, and Microsoft, which enforce strict policies to combat spam and ensure deliverability.
By examining the SPF header and comparing it to the return-path in the email, the receiving server can determine if the sender is legitimate according to the rules defined in the SPF record. This protocol is crucial for adhering to RFC standards and ensuring email security and trustworthiness.
Why do we need SPF records?
An SPF record is like an ID when you’re trying to get past the bouncer at a fancy club. It verifies that you are, in fact, who you say you are.
When an incoming mail server for a mailbox provider receives a message, it can check that it was sent by a source authorized to use that domain. This is important because, otherwise, someone might “spoof” an address and claim to be sending from one source (like a financial institution or even a trusted client) while they’re actually a scammer hoping to trick the subscriber into giving away personal information or downloading a harmful file.
As a sender, including SPF in your DNS records makes it much more likely that your email makes it to the inbox – not a spam folder. Because, sure, you can tell the bouncer you’re 21, but without an ID, they might not believe you.
Additionally, including a correctly formatted SPF record tied to your sender address can dramatically reduce the risk of phishing-related impersonation. Mailbox providers look for email authentication protocols like SPF records to help protect their users (your subscribers) from spam, spoofing, phishing attacks, and more. It helps them provide a better service and retain customers.
What other authentications do you need for email?
SPF authentication is just one of several email authentication protocols that help keep subscribers safe and the inbox manageable. DKIM, DMARC (really more of a protocol), and BIMI are others you may want to learn about.
| Authentication Type | Definition |
|---|---|
| DKIM | DKIM (https://www.mailgun.com/blog/deliverability/understanding-dkim-how-it-works/), which stands for Domain Keys Identified Mail, is an email authentication protocol that allows a receiving server to check that an email message was sent and authorized by the sending domain. |
| DMARC | DMARC (https://www.mailgun.com/blog/deliverability/implement-dmarc/) is a protocol that protects you against bad actors trying to spoof, or impersonate, your brand. It works by allowing ISPs and mail servers to validate a sender’s identity. |
| BIMI | BIMI (https://www.mailgun.com/blog/deliverability/bimi-more-than-funny-name/) stands for Brand Indicators for Message Identification. It’s a certification that first requires you to adopt DMARC, and then rewards you with logo identification in the inbox. |
Email authentications are your ID card for sending. They protect your brand by securing your identity. Get our guide here.
How do SPF records work?
The process by which an SPF record through SMTP works is pretty simple. When a message is sent, the sending mail server (you) makes a connection with the receiving mail server (your recipient, if that wasn’t obvious). Your recipient’s server can see your IP address, and the two servers exchange relevant information before your server sends your SMTP mail. Your recipient’s email server can then use the SPF record for your sending domain or hostname to confirm that the IP address is authorized to send mail on behalf of your domain.
If the address is authorized, the validation is complete and the recipient’s server accepts the message and the email delivery. This is why configuring your SPF record correctly in your domain’s DNS settings is so crucial. Improper SPF syntax can lead to failed validation and email rejection.
What are the benefits of using an SPF record?
Now that we’ve all moved on from clunky 2000s technology (goodbye, beepers) and use email regularly, we’ve all started to appreciate the importance of a safe, streamlined email inbox. And email security is the main purpose – and benefit – of SPF records.
SPF records add an extra layer of security to your sending domain by authenticating the IP addresses associated with it.
In short, SPF records help protect senders from spam, spoofing, and phishing attacks.
By doing this, they help safeguard your reputation from those who could use your domain to act maliciously. You can spend less time worrying about security and damage to your credibility, and more time using your domain and messages to strengthen your email program and further your business goals.
To be specific, SPF can help:
- Prevent spoofing and phishing attacks. SPF records help incoming mail servers thwart fake messages from cybercriminals seeking to scam or trick subscribers, or even employees, of the domain they’re trying to spoof.
- Boost your credibility. By demonstrating your commitment to following email best practices, including SPF records as part of your DNS records, builds trust with receivers and blocklist organizations.
- Keep your reputation pristine. When scammers can’t use your name to wreak havoc, they won’t drag you into the fray and land you on blocklists.
- Bonus: Improve email deliverability. By maintaining a clean sender reputation and increasing your credibility with key organizations, you improve your chances of making it to the inbox instead of the spam folder. In other words, you can boost your deliverability. And, as you know, when more subscribers actually see your message, your efforts will be more effective.
So, you’re convinced that you need to set up an SPF record. Now what?
How do I create an SPF record?
Creating an SPF record is simpler than it may initially seem. Here’s what you’ll need to do:
1. Identify all the legitimate sources of email
Start by making a list of all of the IP addresses, hostnames, or a records associated with sources authorized to send emails on your behalf. This should include everything – yes, the ESP you use for mass email marketing – but also things like marketing automation software and individual employee email service providers.
2. Set up your SPF record
Once you’ve identified the legitimate sources of email, you can start to build out the record.
Start the record
You’ll need to start with v=spf1
Add authorized sources
Then, on a new line, you’ll add the authorized sources. You can:
- List specific IP addresses of authorized senders
- Ask the incoming mail server to reference the
arecord of a domain (this tells the incoming mail server that as long as the IP used to send the email is found on thearecord, it’s authorized) - Use
mxbefore listing a domain to tell the incoming mail server to reference both all of thearecords and the mx records of a domain to verify an associated IP.
Depending on which method you select (you can choose more than one) you’ll include one of the corresponding prefixes:
- “
ip4” or “ip6” - “
a” - “
mx”
If you wish to add third parties to your authorized list, they’ll need to be noted with the “include” tag, which would look something like this:
"include:insert-third-party-domain-name.com here"
Place a space between each source. So, your record might now look like:
V=spf1rnip4:61.949.100.188 ip6:98.422.200.766
Tell the incoming mail server how to handle the results
To end your record, you’ll include “all”. However, the prefix you choose to accompany “all” will determine how mail servers react to the results.
–all If an exact match is not found, the incoming mail server should reject the message completely.
~all – This is known as a “softfail.” If you use this and the incoming mail server can’t authenticate the sender, the message will still send but will most likely go to a junk folder.
+all This actually allows any server to send from your specific domain. It essentially thwarts most of the goals of SPF and is probably not the best choice.
?all This passes on a neutral result. “I can neither confirm nor deny!” This is almost essentially the same as not having one at all.
Now, your SPF record might look like this:
V=spf1rnip4:61.949.100.188 ip6:98.422.200.766 ~all
Ensure the syntax of your SPF record is correctly formatted before you proceed. Misplaced tags or missing spaces can cause SPF validation to fail.
Note: Your SPF record can’t be longer than 255 characters and you can only use up to ten “include” tags or lookups.
3. Publish the new SPF record to your DNS records
Now that you’ve set up your SPF record, go ahead and publish it to your DNS. Once the records have propagated (which can take up to 48 hours), the SPF record will be good to go and your domain will officially enjoy an extra layer of security.
How do I check an SPF record?
You can perform an SPF check by using an online tool like MxToolbox’s SPF checker or Google Admin Toolbox. All you need to do is input your domain name, and the site will return the current SPF record associated with it.
You can also check for any errors that might be causing an issue with your SPF record. For example, if the SPF record is too long or there are too many “include” tags, you’ll be clued into this so you can make changes.
Add SPF records with Mailgun
Use the below tutorial to see how to add SPF records with Mailgun. (Then, maybe reapply that sunscreen you used earlier…)
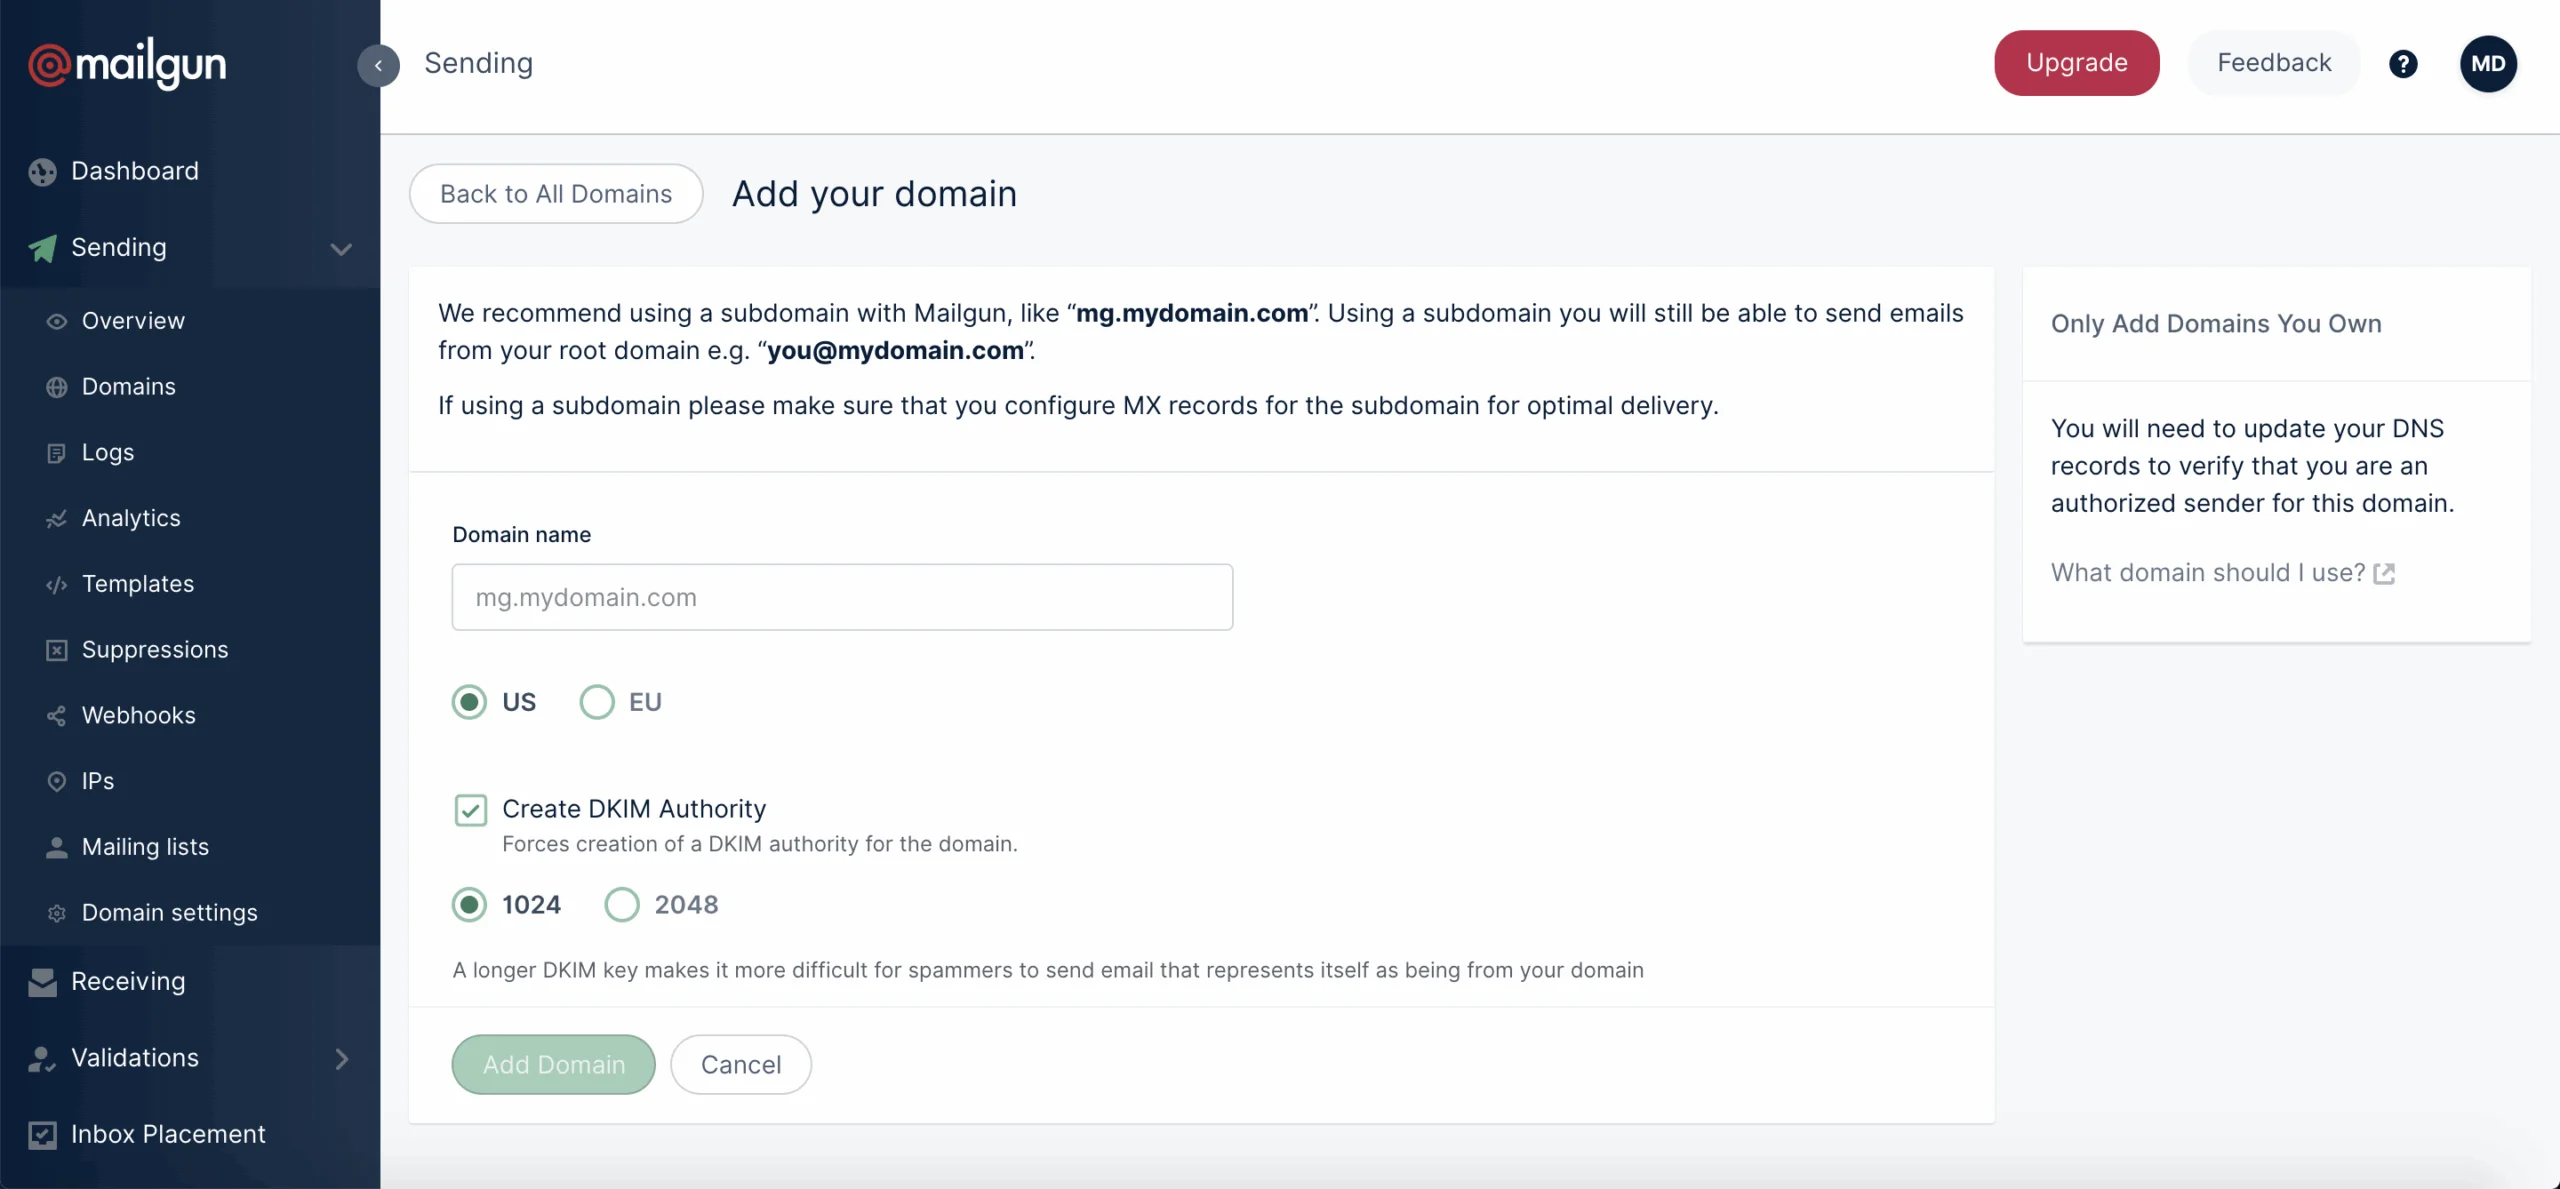
Verify your domain
Add a domain you own and verify it by setting up the DNS TXT record we provide (this is the SPF record) at your DNS provider. An example is below.
1. Add your domain or subdomain in the Domains tab of the Mailgun control panel.
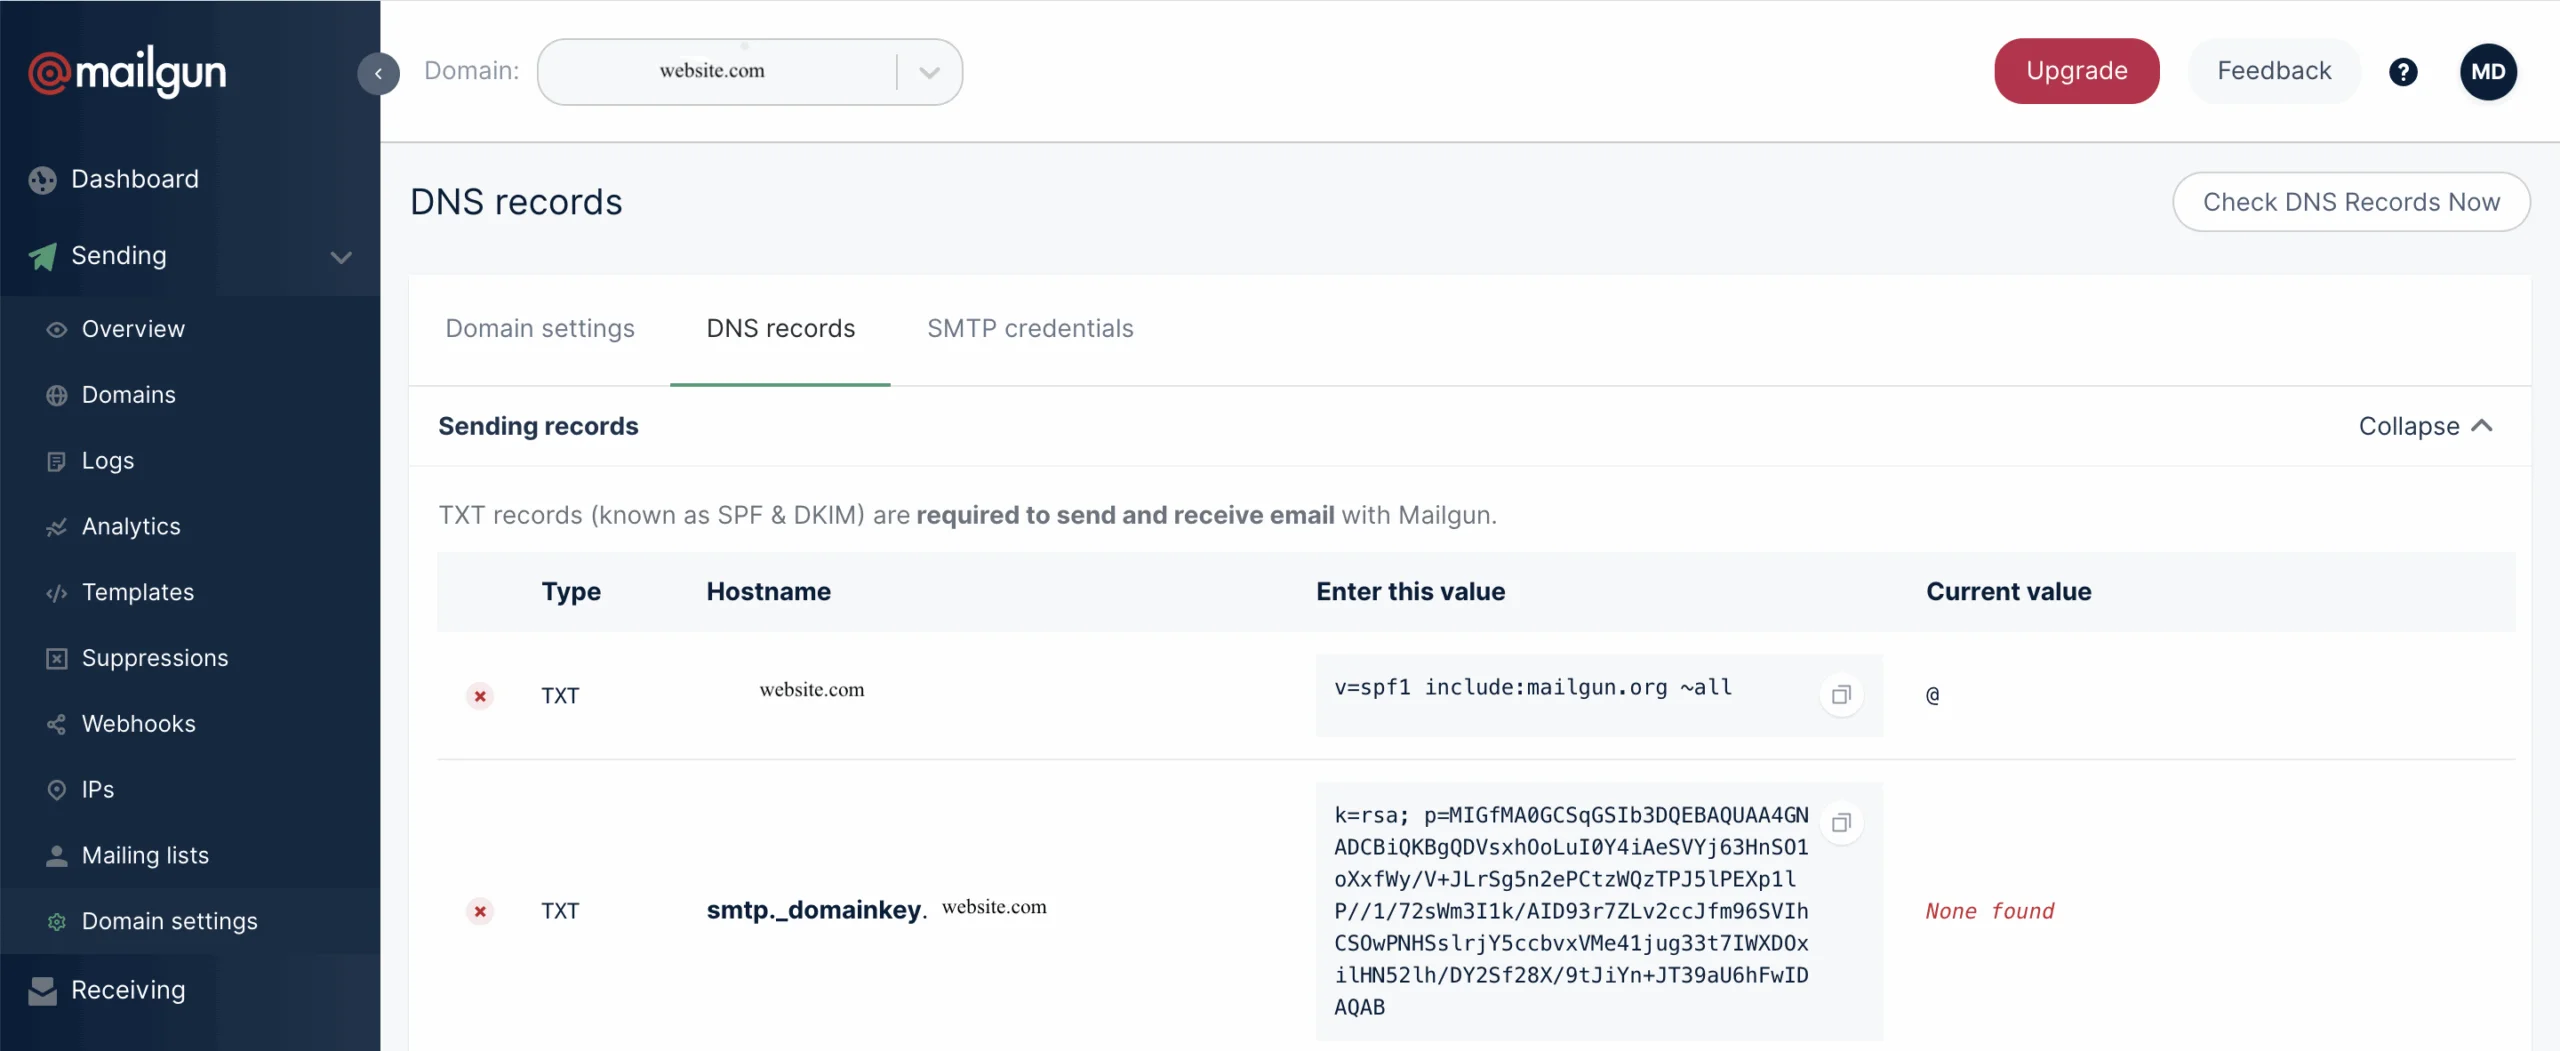
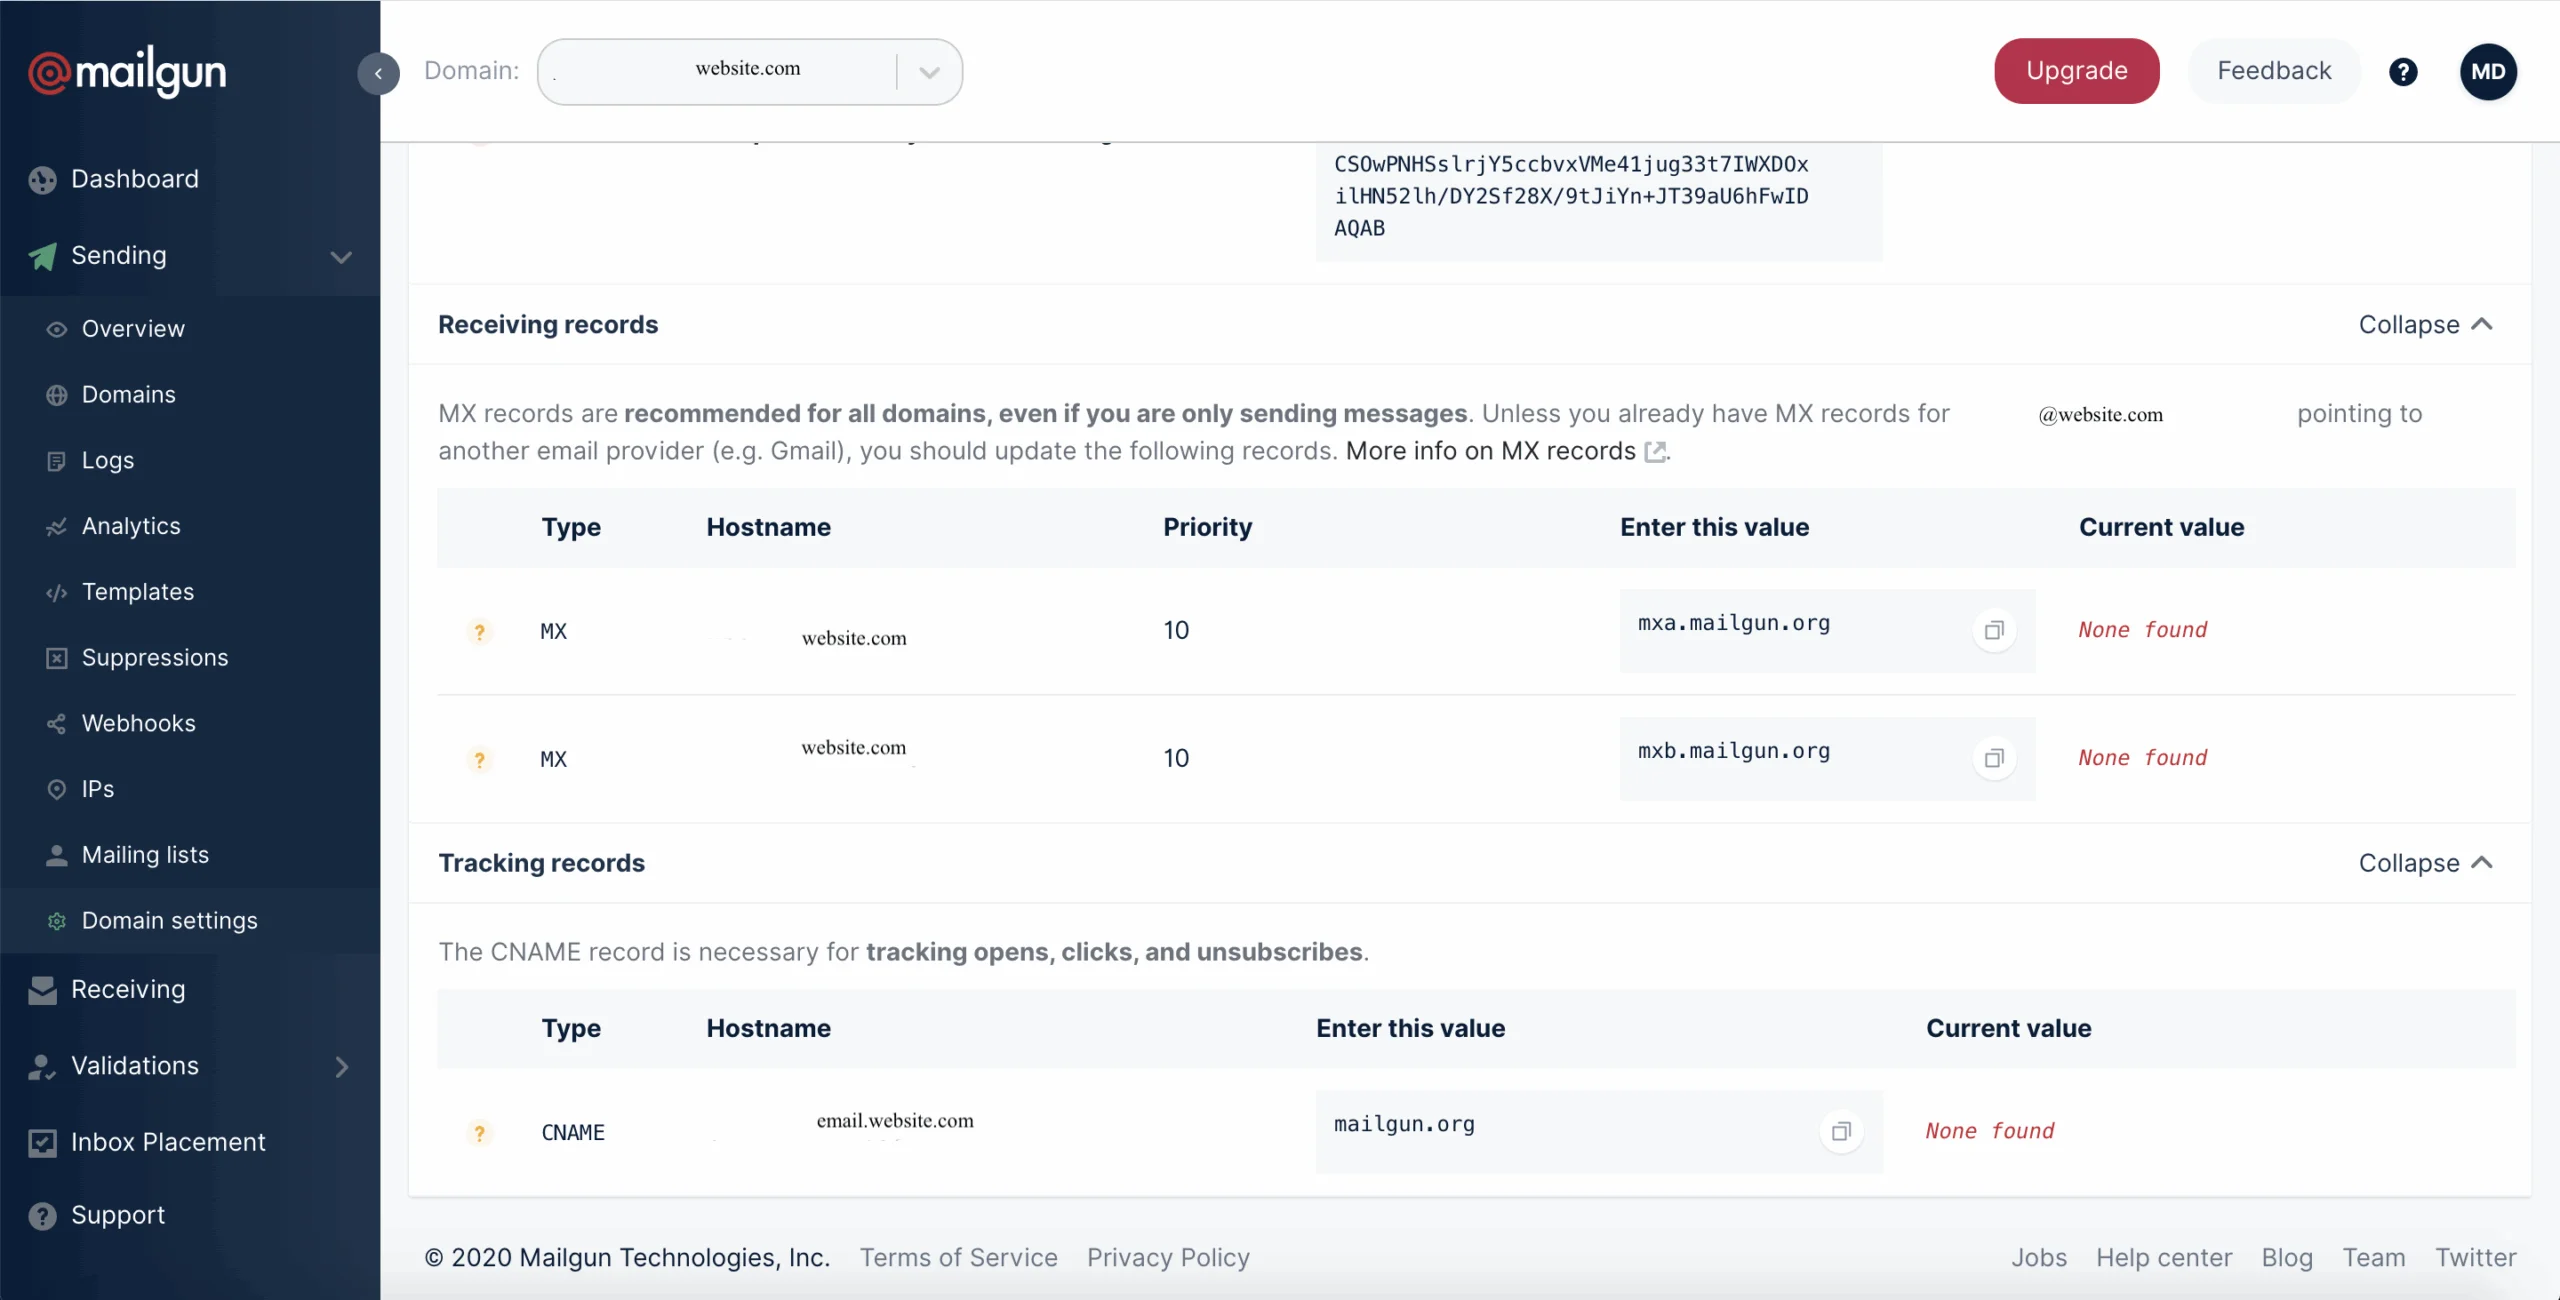
2. Open your DNS provider and add the SPF TXT record provided (shown in the first line below where the value begins with “v=.” The second TXT record type is a DKIM record). This record can be found in the Domain Verification & DNS section of the domain settings page of the Mailgun control panel.
3. If you want Mailgun to track clicks and opens you can also add the CNAME record.
4. MX records should also be added, unless you already have MX records for your domain pointed at another email service provider (e.g. Gmail).
Once you’ve added the records and they’ve propagated, your domain will be verified. Again: it can take 24-48 hours for DNS changes to be verified.
Common DNS Provider Documentation
Common providers are listed below. If yours is not listed, contact your DNS provider for assistance:
- GoDaddy: MX –CNAME –TXT
- NameCheap: All Records
- Network Solutions: MX –CNAME –TXT
- Rackspace Email & Apps: All Records
- Rackspace Cloud DNS: Developer Guide
- Amazon Route 53: Developer Guide
Now you’re all set! With Mailgun, you can use your SPF records to stay safe and secure. You can find all other necessary (or curiosity-fueled!) information in our documentation.
Key takeaways about SPF records
It’s pretty obvious by now that bad email security is as dated as the Y2K panic. SPF records help provide better email security by verifying the addresses that can be sent from your domain, and ensuring that your sender ID reputation is protected from unauthorized use from spammers and spoofing attempts. By using them, you can spend less time worrying about your rep and more time worrying about, you know, your emails.
When in doubt, it’s always a good idea to make sure you’re secure. So, whether it comes to (sun) SPF or (email) SPF, try it out and see how it can help you handle the heat. Curious about other ways to protect your identity and secure your email program? We’ve done the deep dive, check out our ebook for all the information you need to know.