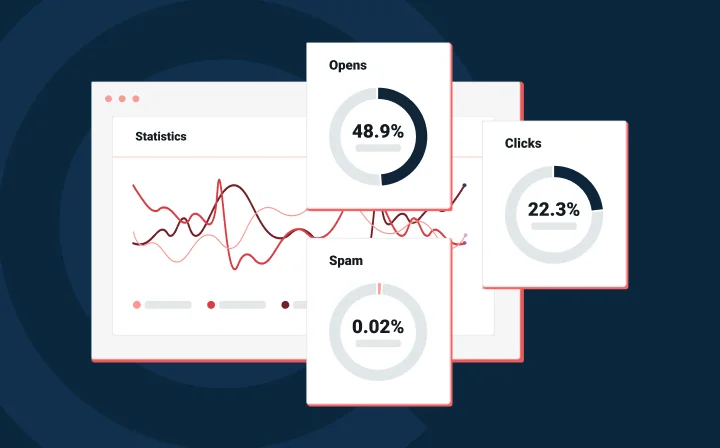
Deliverability
How to implement DMARC – A step-by-step guide
DMARC is not just a record, it’s a process of organizing your email program to keep spoofers from impersonating you. Follow these steps to get set up:
Deliverability
Email spoofing is rampant across the internet. Fraudulent emails come in the form of scams, ransomware, and even stock-market manipulation. We see companies lose millions of dollars every year to malicious hackers – not even charities are safe. Even if you’re a domain owner and set up strict email security, your “from” address can still be spoofed without DMARC.
But what is DMARC and why is it so important? In this post, we’ll share all you need to know about this email authentication and the steps you need to take to implement it.
Take a deep breath – this acronym is a long one.
Domain-based Message Authentication, Reporting, and Conformance (DMARC) is an authentication method designed to stop bad actors from impersonating you.
Developed in 2012, DMARC has become an industry-standard practice and is your first line of defense against malicious emails on your sender program. Not sure if you already have DMARC set up? Use this tool to perform a quick DMARC check.
While email is as old as the internet itself, email authentication is an unfolding process. Before DMARC, inbox providers like Google relied on strict filters and user feedback to identify spammers. So strict, in fact, it could block out legitimate senders and email domains.
Using DMARC, a sender can analyze feedback loop reports to develop a strict authentication protocol that tells receiving mail servers which IPs on your domain are yours. A DMARC policy will instruct ISPs to reject emails from fraudulent IPs that are attempting to use your domain.
That all sounds great, but why bother if your emails are currently getting through to the inbox just fine? The answer is twofold starting with security. 90% of network attacks are carried out through email infrastructure and are becoming increasingly sophisticated. Your ISP reputation, deliverability rates, and brand reputation are all severely damaged in the case of a phishing attack. DMARC helps protect your users and your sender identity.
The second reason is DMARC is now a requirement for bulk senders – at least for those who are sending messages to Gmail or Yahoo mailboxes. These mailbox providers announced in October 2023 that they would be holding senders to stricter standars, including more robust authentications. That means DMARC.
Simply put, DMARC is a line of code that goes into your DNS TXT record. Yet DMARC is so much more than code – it’s a process that takes place before, during, and after implementation to ensure your email system continues to run smoothly. Let’s run through three key components of DMARC to understand this authentication standard better.
To understand DMARC, we first need to understand its predecessors, Sender Policy Framework (SPF) and DomainKeys Identified Mail (DKIM).
SPF is an authentication method for senders to publish the IPs of trusted SMTP servers that are allowed to send from a domain. The receiving server then cross-checks this record to validate the email and send it to the inbox. DKIM authentication, on the other hand, is a signature that goes into your public DNS records, verified with a private key in your email header.
Why are these so important to DMARC? Because DMARC passes or fails a message based on the alignment of SPF and DKIM.
A DMARC record is compiled of relatively straightforward tags and values. Only two fields are required, and the rest are optional. In this post, we will cover the minimum requirements. However, Google has a list with all the advanced tags.
Here is an example of a simple DMARC record:
v=DMARC1; p=reject; rua=mailto:postmaster@example.com;
The first tag v= is easy. It must always be DMARC1. There are no other versions at the moment, so always use 1.
The second tag p= is an instruction to the recipient’s email server for emails that do not pass authentication. Here are your options:
None: Log the entry but take no action.Quarantine: Mark as spam.Reject: Bounce the email message.If you are using BIMI, the p= tag must be set to quarantine or reject as BIMI does not support none.
The third tag is rua= or Report Email Address. This is the dedicated mailbox where your DMARC reports are sent.
If you don’t want to compile the record yourself, Dmarcian has a free DMARC record generator wizard.
Finally, we have the reporting stage of DMARC. Once DMARC has been successfully implemented, reports will begin flying into your assigned inbox. These reports will tell you:
An optional reporting tag ruf= tells ISPs where to return fail or forensic reports. While this tag is not supported by all mailbox providers for data reasons (Gmail, we’re looking at you…), it can give you more insights into the email content that failed compared to a standard aggregate report.
The results of these reports will help you pivot your DMARC policy. For example, if most messages are passing through the email receiver’s mail servers, you will need a stricter policy to catch spoofers. Each day, you will need to analyze your reports and troubleshoot any issues that you come across, like legitimate emails being sent to the spam folder. Now that we have a better understanding of DMARC, let’s go over a checklist of steps to implement it.
If you’re serious about improving deliverability, DMARC implementation isn’t optional—it’s essential. Strong authentication checks help protect your brand, and they start with a clear understanding of DMARC authentication protocols. Whether you’re reviewing DMARC aggregate data or digging into failure reports, the goal is the same: make sure your messages land in the inbox, not the junk folder.
That’s why we’ve partnered with Red Sift. By combining their domain protection platform with Mailgun’s powerful email service, we’re making DMARC implementation faster, simpler, and smarter. From setup to enforcement, you’ll get end-to-end support, complete visibility into DMARC authentication outcomes, and clear insights from your aggregate and failure reports. This partnership helps you meet today’s security standards without slowing down your send—or your team.
Wondering how to configure DMARC? Here’s a detailed guide to help you implement it.
We know you’re eager to roll out your new DMARC policy, but there is some preparation you need to undertake first.
As mentioned above, you must have SPF and DKIM activated in order to run DMARC.
For SPF, this requires adding a DNS TXT record found within your ESP settings to your DNS provider. For DKIM signatures, the process is similar – copy the DKIM record from your ESP and paste it in your TXT DNS file in the settings of your DNS provider.
XML reports that track emails to every location and ISP are going to pile up quickly. So you’re going to need a mailbox that’s independent of other functioning addresses. For small companies, this may be a few and for a large organization, a few thousand. Consider using a third-party service to manage and decode these reports.
Even a chess prodigy would struggle to remember a list of IP addresses. So when your DMARC reports begin to roll in, you’re going to want a list of your sending domains handy so that you can identify the fake from the familiar.
A domain management function is a process of auditing your domains. Doing this step first will save you a lot of time and headaches, especially for larger organizations that require cross-collaboration between teams. Luckily, our friends over at Dmarcian have created a handy video about DMARC project management.

Before DMARC, it was up to mailbox providers to decide your email’s fate. Now email senders can take the steering wheel by defining their authentication policy. Aka, what action should Microsoft take when a message from your domain name does not match the DMARC record. Imagine your policy is a traffic light system with the aim to move your policy from green (none) to orange (quarantine) to finally red (reject). While a policy of p=none is a great start for testing DMARC, you shouldn’t stop there, as Mailgun’s deliverability experts Kate Nowrouzi and Jonathan Torres explain in this video.

Right now, p=none is the minimum specification required. The p=none tag makes no changes to your existing arrangement – the receiving mail servers will pass on the message as normal to the recipient. This is a good place to start, as it allows you to monitor the initial DMARC reports in safe mode.
Remember – BIMI doesn’t support DMARC policies with the p=none option set to none.
We should all know what a quarantine policy is by this point. For DMARC, this means sending unqualified mail to the spam folder until you are 100% sure where these emails are originating.
p=reject is the end goal of DMARC. While quarantining is a good start, you don’t want spoofed emails in your customer’s spam folder forever. With that said, choosing this policy too early may result in legitimate emails bouncing. So only activate the reject policy once you have gone through your reports (see step five) with a fine toothpick.
To control the flow of your authentication rollout, consider applying your policy to just a small percentage of your messages to begin with using this tag: pct=5
The number five represents 5% of the total number of messages sent from your domain. Consider your time, resources, and risk appetite to determine how you want to set this value. Starting small and slowly increasing this value on a sliding scale is the safest approach. The default authentication volume will be 100% if you do not add this tag.
Now you’ve defined your DMARC policy, it’s time to push the button.
_dmarc.yourdomain.comYou now have a DMARC record in place and reports have started landing in your mailbox. This data tells you which messages are passing or failing SPF and DKIM authentication. A raw XML DMARC report looks like this:
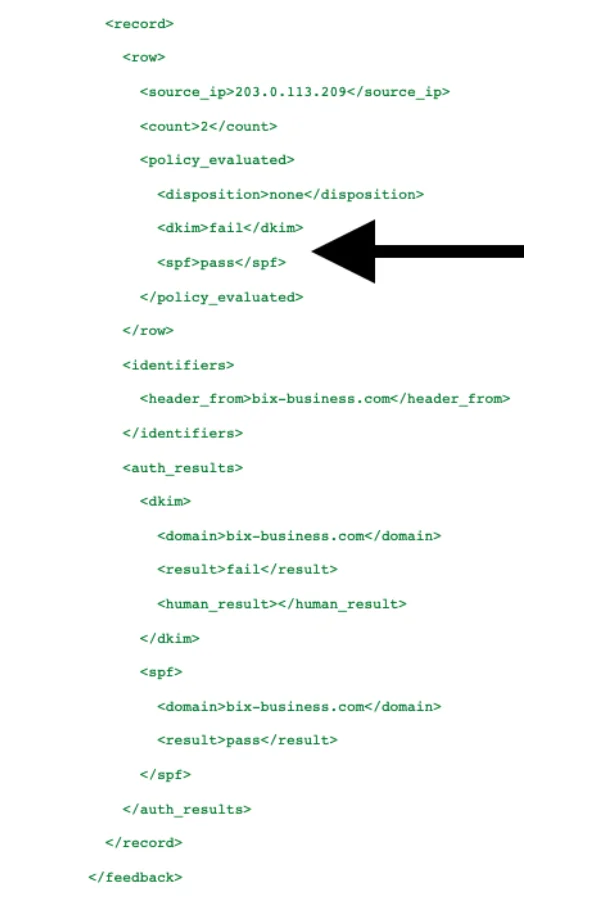
Note: this record is paraphrased.
Extensible Markup Language (XML) files like this are really designed for machine-reading and can be difficult and time-consuming for humans to read. There are a few methods for adding clarity to these reports:

We’re not robots – we like our reports in tabular format.
We were lost, but now we can see. Hopefully we recognize the IP addresses in the left column as our own. However, it’s unlikely you will remember all the IPs from your third-party apps. There is a three-step process to dealing with these email streams:
The DMARC policy (p=) you have chosen should evolve gradually like a traffic light from p=none to p=quarantine to finally p=reject. This gives you time to collect data and methodically analyze your daily reports. A safe rollout would look like this:
v=DMARC1; p=none; pct=100; rua=mailto:postmaster@example.com;
Starting with this record, messages are delivered normally and reports are issued from the ISP, letting you identify safe senders on your domain. Six weeks should be enough time to collect data before moving on to the next stage:
v=DMARC1; p=quarantine; pct=5; rua=mailto:postmaster@example.com;
Slide the pct= up slowly as you gather information until you reach 100%. When you are happy with the quarantining messages, move on to the next stage:
v=DMARC1; p=reject; pct=5; rua=mailto:postmaster@example.com;
Slide the pct= up slowly and ensure all legitimate mail is making it to the inbox until you hit 100%. Congratulations, you have safely and successfully implemented DMARC!
Particularly with the new standards from Gmail and Yahoo, monitoring your authentication success rate, the percentage of your emails that pass authentication against all received traffic, is critical. For Google we’ve made this easy with our Google Postmaster Tools integration which supports convenient monitoring of your authentication status across domains over a selected period of time.
Mailgun leads the charge in email authentication by requiring DKIM and SPF records by default before you can begin sending. Therefore, if you are already using Mailgun, you are just one step away from completing the authentication puzzle with DMARC. This process can also improve other aspects of your email program, like identifying safe IPs with the domain management function.
But the story doesn’t end here – an ISP is still entitled to send your messages to spam if you fail to follow email sending best practices. So why stop there when you’re on a roll? Take a look through these email deliverability best practices to keep your emails away from the spam folder and join our newsletter to get these tips in your inbox every week!