Product
Sending email using the Mailgun PHP API
This is a guest post by Mihály Sáróy, Developer at EDMdesigner.
It’s been a while since the Mailgun PHP SDK came around, and we’ve seen lots of changes: new functionalities, new integrations built on top, new API endpoints…yet the core of PHP is the same. Since it was the first SDK for the Mailgun API, it’s had time to mature and go through iterations that make it easy to use – which we realized when we gave it a try.
In this post we’re going to show how you can implement the Mailgun API using PHP with PEAR.
Why use a PHP Email API for transactional email?
We’re going to kick off this how-to by saying that transactional email is everywhere, and it’s important we get it right. Not getting email to work properly could mean losing revenue for your business and just overall creates an unpleasant experience for customers.
As a developer, you’re always looking to find the most simple (time-efficient) and powerful way to solve a problem. You often achieve this by fulfilling two conditions:
- Using external libraries that apply to your solution.
- Designing scalable applications.
No need to explain the first condition – you wouldn’t start to write an OS before coding an application, right? Throughout the post, we’ll look at how to use pre-written packages to send email. But now, on to my second point: read on.
For scalable design, this is where you look for services like Mailgun. You can expect a feature-rich solution that meets requirements for high-volume email sending.
If you care about delivery (and you should), Mailgun offers high reliability as it’s designed to handle transactional email very well. You can set up multiple domains and choose if you want to share IPs or build your own reputation. To protect your email headers, Mailgun requires DKIM and SPF be added to the account, and that they pass their checks at the authentication and alignment level. All of these things work together to help you with email delivery.
Now to the good stuff: setting up a PHP wrapper script for Mailgun. First, we’ll use the package manager and then see examples of how to apply it.
Setting up your your PHP environment for the Mailgun Email API
PEAR is a community driven initiative that lets us reuse PHP code components, while the dependent code is also added and maintained.
First, you will need PHP, and the package manager to continue. They’re best installed by Debian Advanced Package Manager (APT) if you’re using Linux.
Although PEAR is an older solution, it’s still widely used and it’s short for PHP Extension and Application Repository. Based on the installed PHP version, you probably already have PEAR available. You can check by running pear command without arguments. If you receive a warning that your system doesn’t have it, just run: sudo apt install php-pear. Now, we’re ready to install third-party PHP code with PEAR.
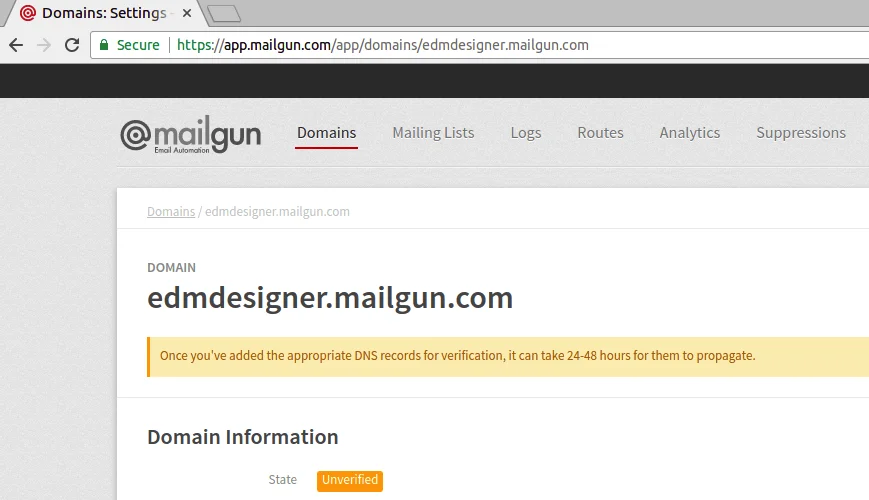
If you follow this article by coding along, this is the point where you should open your Mailgun account to have access to the API. If you get stuck, just check these getting started bits of advice.
Creating a PHP project to send email with Mailgun’s API
The steps with PEAR apply in the following way:
- Installing project dependencies and including the packages by requiring the main class or the vendor/autoloader.php script
- Provide API related credentials, such as your API key and domain information
- Instantiating the Mail class/client
- Make function call to send the email(s)
Simple, right?
Using PEAR to send email with PHP via the Mailgun Email API
Step 1: Install the project dependencies
We can install the Mail package by typing sudo pear install Mail using the appropriate command. After it’s finished installing, the next step is to include that in a script file with your project directory:
require_once "Mail.php";
Save yourself some time and do as our boilerplate suggests, then provide the API specific variables.
Step 2: Provide input variables
If you head to your API dashboard, you can find these necessary pieces of information under the domain tab:
We need the host, account user and password variables, and the port to use:
We use SMTP connection to send email through our Mailgun account.
Step 3: Instantiate the client
We gather the above parameters into an array and instantiate the Mail class with this:
Step 4: Make a call to the client
The final step is to call the send() method of the Mail class and we are good to go:
Here, the $to variable holds the value for the recipient address, while the $headers variable is an array, containing additional fields for delivery.
At this point, you may want to check out the full final code:
You can download the full source code here.
Moving on, if you set up everything, you can try to run the script: php mailer.php.
You run it, and receive an ugly error stack trace! Examine it closely:
PHP Fatal error: Uncaught Error: Class 'Net_SMTP' not found in /usr/share/php/Mail/smtp>php:366.
This means that we forgot to add another project dependency that’s necessary to use PEAR Mail. Run sudo pear install Net_SMTP and try again!
The output is:
Message sent successfully!
If you followed along, then your message should have arrived to the specified mailbox, and I’m silent clapping for you. Bravo!
PHP mail() function
PHP’s native mail() can send messages from your app, but it comes with baggage. Because it depends on your server’s local mail setup, mail sent this way often hits spam filters or gets blocked outright. It also lacks modern essentials like tracking, analytics, and reliable deliverability features. Most critically, naïve implementations can expose you to header injection attacks. In short, mail() works in a pinch, but for production email you’ll want a dedicated API like Mailgun’s PHP SDK.
What are the drawbacks of using the PHP mail() function?
- Deliverability: Messages depend on your server’s local mail setup, which often lacks proper SPF, DKIM, and DMARC alignment. This lowers sender reputation and reduces inbox placement.
- Spam risk: Mail from web servers is frequently flagged or rejected by filters that distrust generic server IPs and missing authentication.
- No SMTP authentication: mail() does not natively support authenticated SMTP. You must hand-roll configs or use another library to send through a proper SMTP relay.
- No tracking or analytics: There is no built-in way to track opens, clicks, bounces, or complaints, and no event webhooks for programmatic monitoring.
For reliable delivery, authentication, and analytics, use a dedicated service like the Mailgun PHP API.
PHP Email API wrap-up: Next steps & resources
We saw the sample script to get started using Mailgun with the PEAR package manager, and we created PHP scripts to send an email with SMTP and the HTTP API. Incorporating proper testing ensures that your email delivery functions as expected. But there are other options you could use if PEAR isn’t your go-to choice. Alternatives like SendGrid allow you to replicate the same outcome using Composer, and Mailgun has gone into detail about this previously on the blog. Or for more in-depth instructions, check out our tutorial on implementing the Mailgun API with PHP.
And of course, if you wish to improve your skills with PHP, these are a few of my favorite resources that I would recommend for sending email with PHP and dealing with email HTML in general.
FAQs
Use Mailgun’s PHP SDK (Composer install) and call the Messages endpoint. An API request is typically faster to set up and more reliable than configuring local SMTP to send email with PHP.
An email API for PHP gives you authenticated requests, better deliverability, retries, webhooks, and analytics. It avoids the spam risks and server-config headaches common with mail().
Authenticate with your API key over HTTPS. In PHP, set the key as an environment variable and initialize the Mailgun client with it. There’s no SMTP username/password required.
Yes. You can set html and text bodies, attach files, and render templates with variables, which are ideal when you want to send email with PHP that looks great and scales.
Enable tracking in your Mailgun domain settings or per-message parameters, then consume events via webhooks or the Events API from your PHP app for real-time analytics.
- 401/403: Wrong API key or domain region
- 400: Missing fields (from, to, subject, text/html).
- 429: Rate limiting: Queue or back off with retries. Validate your domain (SPF/DKIM) to improve delivery and reduce soft bounces.
Abstract your “send” function, swap the mail() call with a Mailgun client request, and add domain authentication (SPF/DKIM/DMARC). You’ll gain deliverability, tracking, and error visibility with minimal code changes.