Product
A practical guide to using Mailgun’s webhooks
This guest post comes from Opeyemi Obembe, a Mailgun customer based in Nigeria. When we saw Opeyemi’s tutorial on how to set up webhooks, we knew we needed to share it with you. Not only is Opeyemi’s methodology rock solid, but he’s the type of developer we love supporting.
Opeyemi first signed up for Mailgun four years ago, and since then he’s built some really cool things. Most recently, he’s developed Suet, an open-source project that provides detailed analytics and reporting for transactional emails sent via Mailgun. You can use it in tandem with our new analytics features for additional insights into your email engagement.
Transactional emails are essential for most apps. We send welcome emails, password recovery emails, notifications, and more. And when we do, we use providers like Mailgun. Sending the emails is cool and all, but what about the delivery and performance? Did that user get that password reset email? Was that ‘credit card expiring’ notification email opened?
Although this data is available in your Mailgun account dashboard, another way to get updates about what’s happening to your transactional messages in Mailgun is through webhooks. There’s also the API, but unlike with the API where you “request” these updates (Poll), with webhooks, the updates are sent to you (Push). All you need to do is provide the URL of a script that can handle the event data through POST.
Needless to say, push has some advantage over poll.
- You don’t have to make repeated API requests. This means consuming less server resources.
- Updates are more real-time because it is pushed as soon as available on the server.
Setting up webhooks
There are two ways to set up webhooks in Mailgun. It can either be done through the Mailgun dashboard or API. The more straightforward way to do it is through the dashboard. Once logged into your dashboard, a Webhooks link is available on the navigation bar.

The webhooks page lists the different event types you can receive event data for. By clicking the “+” icon in front of each event, you can set the URL where the event data will be sent.
Handling the data
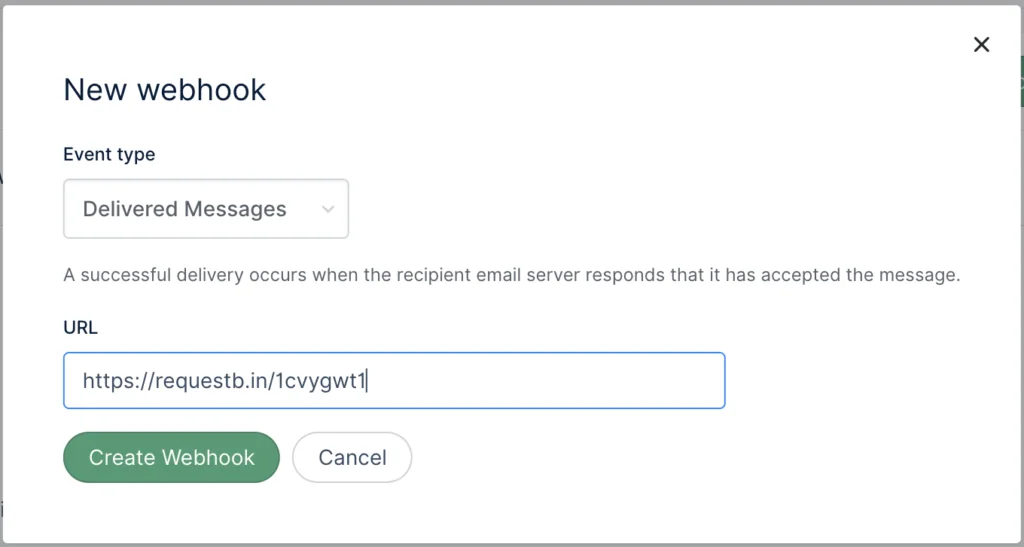
To handle the event data sent to our webhook URL, we have to know what the data will look like in the first place. Parameters sent via POST are available in the API documentation. We can go a step further and confirm this by using a test webhook URL that will log the data from Mailgun. We can use Mailgun’s Postbin or requestb.in. These services will generate a unique endpoint we can use in the Mailgun dashboard to get sample event data. I recommend requestbin because it provides more details like the request headers. These headers are important because you will easily miss the fact that Mailgun sends some data using the content-type [application/x-www-form-urlencoded] and some as [multipart/form-data]. Missing these little details changes everything about how you get the event data.
Let’s go ahead to create a test endpoint and see what the event data looks like compared to what is in the documentation.
- Visit requestb.in and create a bin.
- Copy the URL and access the Webhooks section of your Mailgun Dashboard.
- Paste the URL in the input field and click the Test Webhook link. This will send sample event data to the URL.
- Repeat this for all the events you are interested in.
- Refresh your requestbin page to see the event data sent.
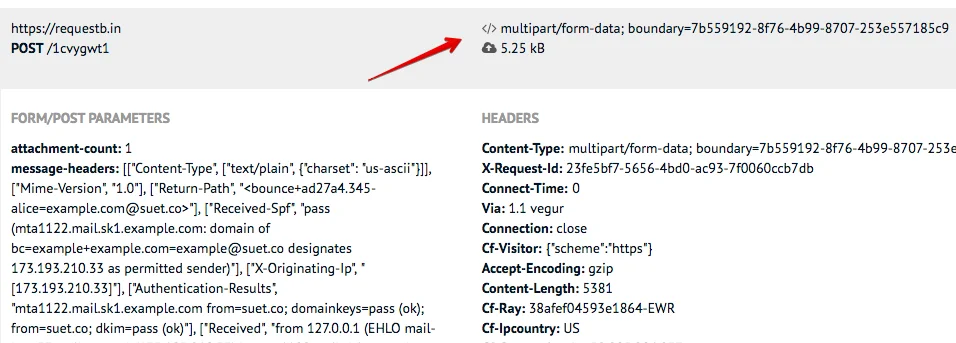
If you look closely at the requestbin data, you’ll notice what I said about some data sent as multipart/form-data.
Now that we know what the parameters are for each event type and the content type they may come in, it’s easy to write code to handle the sent data. Here’s a simple code that will output details of complaints and dropped emails. (I’m using multer to handle multipart/form-data.)
const express = require('express') rn , bodyParser = require('body-parser')rn , multer = require('multer')rn ;rnrnconst app = express(); rnapp.use(bodyParser.urlencoded({extended: false})); rnapp.listen(process.env.PORT || 3000);rnrnapp.post('/webhook', multer().none(), function(req, res) { rn const email = req.body.recipient;rn const event = req.body.event;rnrn if (event == 'complained') {rn console.log(<code data-enlighter-language="generic" class="EnlighterJSRAW">${email} complained about your mail</code>);rn }rn else if (event == 'dropped') {rn console.log(<code data-enlighter-language="generic" class="EnlighterJSRAW">Mail to ${email} dropped. ${event.description}</code>);rn }rn else if (event == 'bounced') {rn console.log(<code data-enlighter-language="generic" class="EnlighterJSRAW">Error ${event.code}: Mail to ${email} bounced. ${event.error}</code>);rn }rnrn res.end();rn});
Making it secure
There’s nothing to stop someone who knows our webhook URL from crafting false event data and sending it to the URL. Luckily, Mailgun signs each request sent and posts the following parameters as well:
- timestamp (number of seconds passed since January 1, 1970)
- token (randomly generated string with length 50)
- signature (hexadecimal string generated by HMAC algorithm)
To verify the token, you need to:
- Concatenate the values of timestamp and token.
- Encode the resulting string with HMAC, using your HTTP webhook signing key as the key and Sha256 as the algorithm.
The result should be the same as the signature.
Here is what this looks like in Node.js:
const value = event_data_timestamp+event_data_token; rnconst hash = crypto.createHmac('sha256', apikey) rn .update(value)rn .digest('hex');rnif (hash !== event_data_signature) { rn console.log('Invalid signature');rn return;rn}
If we add that to our original code example, we will have something like this:
const express = require('express') rn , crypto = require('crypto')rn , multer = require('multer')rn , bodyParser = require('body-parser')rn ;rnrnconst app = express(); rnapp.use(bodyParser.urlencoded({extended: false})); rnapp.listen(process.env.PORT || 3000);rnrnapp.get('/webhook', multer().none(), function(req, res) { rn // Validate signaturern const value = req.body.timestamp+req.body.token;rn const hash = crypto.createHmac('sha256',rn process.env.API_KEY)rn .update(value)rn .digest('hex');rn if (hash !== req.body.signature) {rn console.log('Invalid signature');rn return res.end();rn }rnrn // Log status of eventrn const email = req.body.recipient;rn const event = req.body.event;rnrn if (event == 'complained') {rn console.log(<code data-enlighter-language="generic" class="EnlighterJSRAW">${email} complained about your mail</code>);rn }rn else if (event == 'dropped') {rn console.log(<code data-enlighter-language="generic" class="EnlighterJSRAW">Mail to ${email} dropped. ${event.description}</code>);rn }rn else if (event == 'bounced') {rn console.log(<code data-enlighter-language="generic" class="EnlighterJSRAW">Error ${event.code}: Mail to ${email} bounced. ${event.error}</code>);rn }rnrn res.end();rn});
We can even step this up, and:
- For every request, check against a token cache to prevent use of the same token. Every token will be stored there. This will prevent replay attacks.
- Check if the timestamp is not too far from the current time.
Making It scalable
If you send lots of emails and you are expecting lots of events, putting your webhook script on a server that can’t scale automatically is a bad idea. Even if you aren’t expecting lots of events, unexpected things can lead to a surge in events. Having a server that can scale automatically is really useful for instances like this.
Enter serverless computing. In simple terms, the idea is that you can delegate the execution of your code and everything related to a provider. Multiple instances of your code can be executed in parallel, and you can adjust computing resources like RAM and execution time on the fly. This makes it highly scalable. You are also charged based on consumed resources and execution time, so it can be really cheap if you aren’t sending lots of emails on a regular basis.
There are a couple of serverless computing providers. One I use and recommend is Google Cloud Functions because of the ease of setting up HTTP functions. An HTTP function is a code block wrapped as a function that can be triggered by visiting a URL. This is exactly what we need for our webhook.
To create this function, we need to write a JavaScript function that will be exported as a Node.js module. The function takes HTTP-specific arguments: request and response.
exports.webhook = function(request, response) { rn // Handle event data herern response.send({status:"ok"});rn}
Based on the request content-type, the body of the request is automatically passed and available in the body parameter of the request object.
exports.webhook = function(request, response) { rn let event = request.body.event; // deliveredrn // Handle event data herern // ...rn response.send({status:"ok"});rn}
This doesn’t work for the content type multipart/form-data though. And as we already know, Mailgun sends some data as multipart/form-data. We can bring in a library like Multer by using require(). However, we need to ensure the dependency is listed in the package.json file.
const multer = require('multer');rnrnexports.webhook = function(request, response) { rn parser(request, response, function(){rn console.log(request.body); // Our event datarn // Handle event data herern // ...rn response.send({status:"ok"});rn });rn}
{rn "dependencies": {rn "multer": "^1.3.0"rn }rn}
Next, we can publish the function to Cloud Functions. An easy way to do this is to do it from the Cloud Functions dashboard.
- Go to your Google Cloud Console (if you don’t have an account yet, create one).
- Enable Cloud Functions in the dashboard.
- Click on “Create Function”.
- Enter a name for your function (e.g. “mailgun-webhook”).
- In the trigger section, select “HTTP trigger”. Note the URL, that will be your webhook URL.
- Copy your event data handling code to the index.js section of the Cloud function.
- Copy the content of your package.json and paste in the package.json section.
- Select or create a Stage bucket. The stage bucket is simply where the code is staged. You can use anything here.
- In Function to execute, enter the name of your function (e.g. “webhook”).
- Save.
You can now use the function’s URL in Mailgun as your webhook URL.
Conclusion
Working with Mailgun’s webhooks is easy. There are many ways the event data can be used to enrich your applications outside Mailgun. If, for example, you allow your users to send emails from your website for any reason and you use Mailgun, you can use webhooks to provide analytics for them. Or maybe you want to send your email analytics to another platform. Or maybe you want to be notified of failures in your Slack account. Or maybe not even that, maybe you just want more detailed analytics. Whatever the use case is, the event data is available for you.
For a real-world example, check out the source of Suet’s webhook file.
Want to try out Mailgun’s webhooks? Sign up!
And if you need some help getting started with Mailgun, check out this free Mailgun training! Our Team Lead of Customer Support, Chris Hammer, guides you through the setup process and helps you get started sending, receiving, and tracking your emails with Mailgun.